Create cloud resources using IaC
This guide shows how to open a pull request in your Git repository—directly from Port—to create a new cloud resource using GitOps.
Prerequisites
- A Port account with permissions to create self-service actions.
- The Git Integration that is relevant for you needs to be installed.
- A repository in your Git provider in which you can create a workflow/pipeline. We recommend naming it
Port-actions.
Common use cases
- Platform engineers can define the logic of creating a cloud resource, including standard enforcement, security and permission boundaries.
- Developers can easily create and track cloud resources directly from Port.
Set up data model
To enable tracking of cloud resource definitions in Port, we'll add a new URL property to the existing Repository blueprint.
This property will point to the location of IaC templates in your Git repository, letting us seamlessly link infrastructure code to each repository.
Add a resource definitions property
In this guide we will add a new property to our Repository blueprint, which we can use to access our cloud resource definitions.
-
Go to your Data model page in Port.
-
Expand your
Repositoryblueprint, then click on+ New property. -
Choose
URLas the type, fill it like this and clickSave: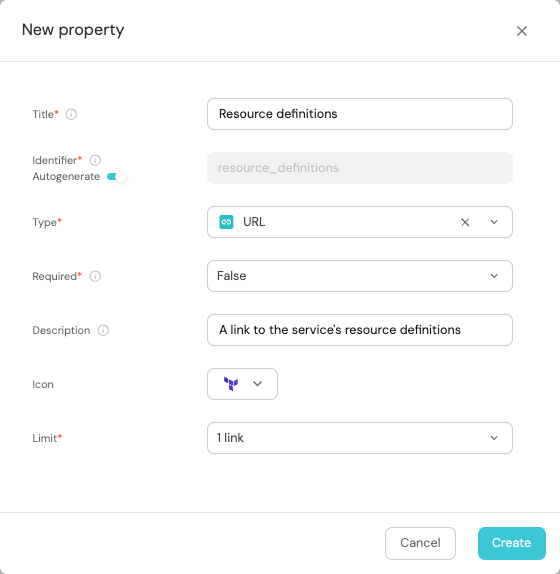
This property is empty for now in all repositories, we will fill it as part of the action we're about to create 😎
Set up the action's frontend
-
Head to the Self-service page in Port.
-
Click on the
+ Actionbutton in the top-right corner :
-
Fill the basic form with the following:
-
Title: Enter
Create s3 bucket -
Identifier Toggle the switch icon off and type a
create_s3_bucket -
Description: Enter the description (e.g., Create an s3 bucket)
-
Icon: Type s3 and choose the Icon (optional)
-
Operation: Choose
Day-2from the dropdown -
Blueprint: Choose
Repositoryfrom the dropdown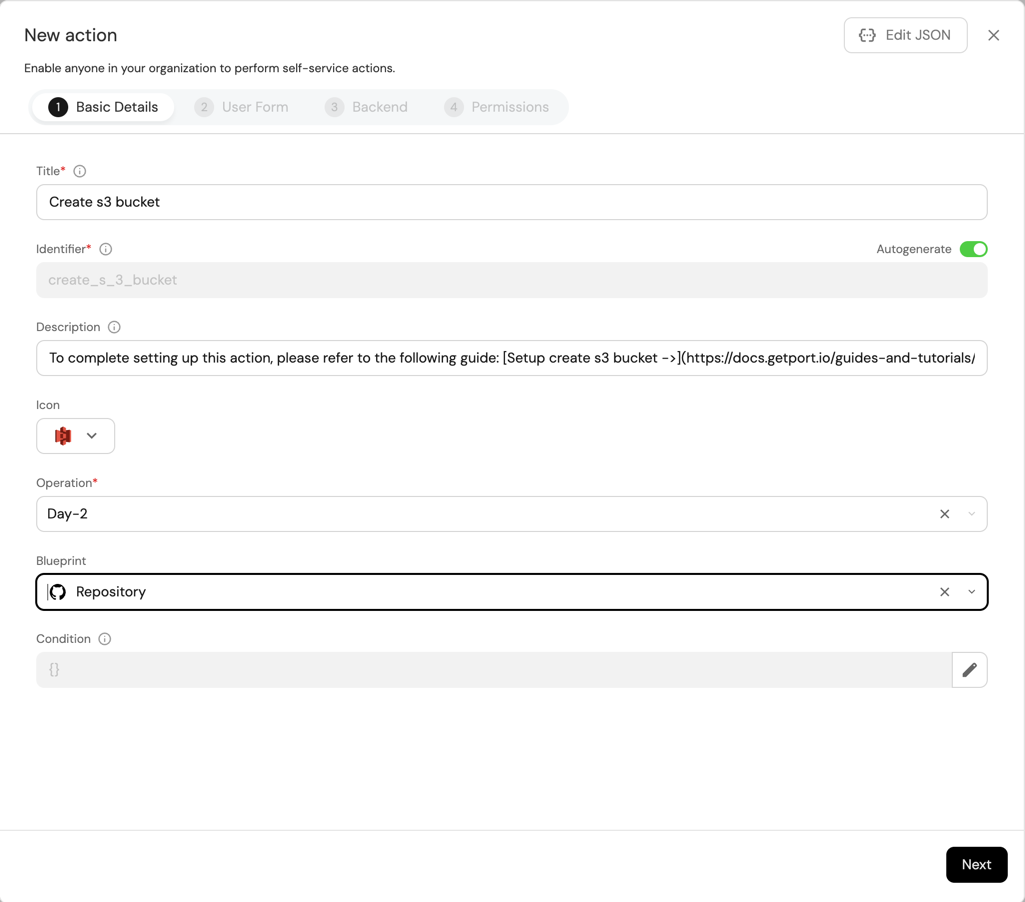
-
-
Click on
Next, and add the following inputs:NameandVisibility.To create the
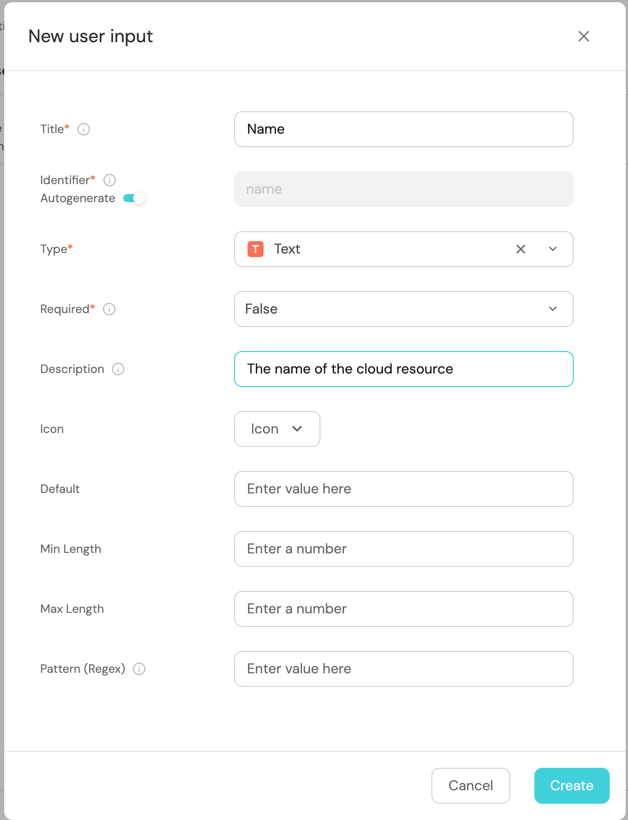
Nameinput field:-
Click on
+ Input. -
Enter the Title
Name. -
Select the Type
Text. -
Add the Description (optional).
-
Set Required to
True. -
Click on the
Createbutton.
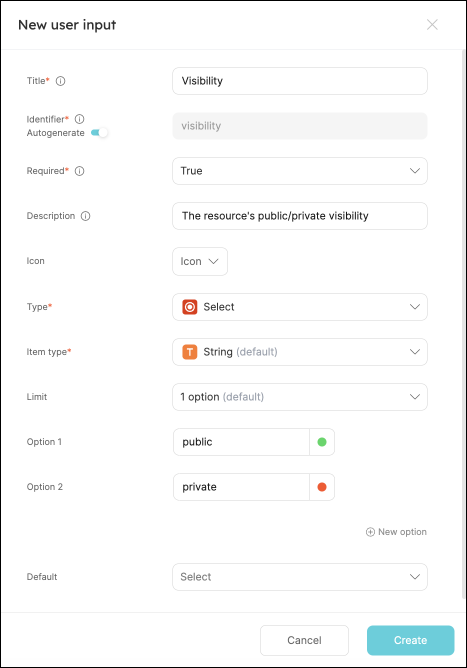
To create the
Visibilityinput field:-
Click on
+ Input. -
Enter the Title
Visibility. -
Choose the Type
Select. -
Set Required to
True. -
Configure Additional Information:
- Item Type:
String. - Limit:
1 option. - Add Options:
- Option 1:
public(choose a color). - Option 2:
private(choose a color).
- Option 1:
- Item Type:
-
Click on the
Createbutton.
-
-
Click on
Nextto configure the Backend.
Now we'll define the backend of the action. Port supports multiple invocation types, depending on the Git provider you are using.
- GitHub
- GitLab
- Bitbucket (Jenkins)
Fill out the form with your values:
-
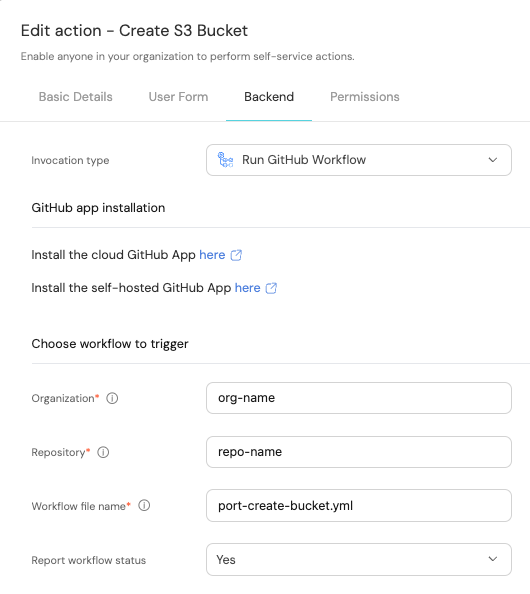
Replace the
OrganizationandRepositoryvalues with your values (this is where the workflow will reside and run). -
Name the workflow
port-create-bucket.yml. -
Fill out your workflow details:
-
Scroll down to the
Configure the invocation payloadsection.
This is where you can define which data will be sent to your backend each time the action is executed.For this example, we will send some details that our backend needs to know - the inputs, along with the entity and the id of the action run.
Copy the following JSON snippet and paste it in the payload code box:{"port_context": {"entity": "{{ .entity.identifier }}","runId": "{{ .run.id }}"},"name": "{{ .inputs.name }}","visibility": "{{ .inputs.visibility }}"}
You will need a few parameters for this part that are generated in the setup the action's backend section, it is recommended to complete the steps there and then follow the instructions here with all of the required information in hand.
First, choose Trigger Webhook URL as the invocation type, then fill out the form:
-
For the
Endpoint URLyou need to add a URL in the following format:https://gitlab.com/api/v4/projects/{GITLAB_PROJECT_ID}/ref/main/trigger/pipeline?token={GITLAB_TRIGGER_TOKEN}- The value for
{GITLAB_PROJECT_ID}is the ID of the GitLab group that you create in the setup the action's backend section which stores the.gitlab-ci.ymlpipeline file.- To find the project ID, browse to the GitLab page of the group you created, at the top right corner of the page, click on the vertical 3 dots button (next to
Fork) and selectCopy project ID
- To find the project ID, browse to the GitLab page of the group you created, at the top right corner of the page, click on the vertical 3 dots button (next to
- The value for
{GITLAB_TRIGGER_TOKEN}is the trigger token you create in the setup the action's backend section.
- The value for
-
Set
HTTP methodtoPOST. -
Set
Request typetoAsync. -
Set
Use self-hosted agenttoNo.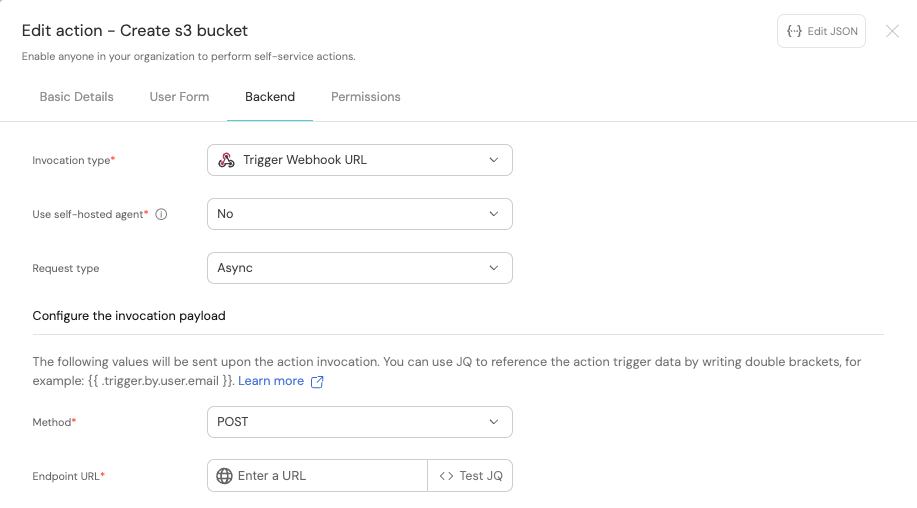
-
Scroll down to the
Configure the invocation payloadsection.
This is where you can define which data will be sent to your backend each time the action is executed.For this example, we will send some details that our backend needs to know - the inputs, along with the entity and the id of the action run.
Copy the following JSON snippet and paste it in the "Body" code box:{"port_context": {"entity": "{{ .entity.identifier }}","runId": "{{ .run.id }}",},"name": "{{ .inputs.name }}","visibility": "{{ .inputs.visibility }}",}
First, choose Jenkins as the invocation type.
- Follow the instructions under
Define a webhook to trigger a Jenkins jobto obtain your webhook URL.
Then, fill out your workflow details:
-
Replace the
Webhook URLwith your value (this is where the pipeline will reside and run). -
Leave the
Use self-hosted agentoption set toNo.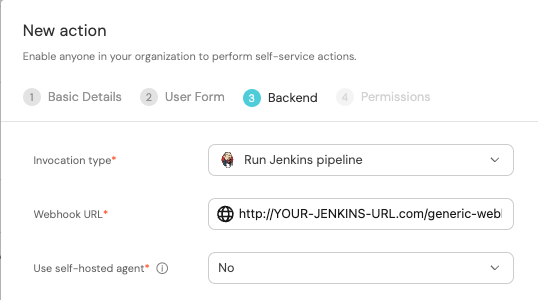
-
Scroll down to the
Configure the invocation payloadsection.
This is where you can define which data will be sent to your backend each time the action is executed.For this example, we will send some details that our backend needs to know - the three user inputs, and the id of the action run.
Copy the following JSON snippet and paste it in the payload code box:{"port_context": {"entity": "{{ .entity.identifier }}","runId": "{{ .run.id }}",},"name": "{{ .inputs.name }}","visibility": "{{ .inputs.visibility }}","bitbucket_workspace_name": "{{ .inputs.bitbucket_workspace_name }}",}
The last step is customizing the action's permissions. For simplicity's sake, we will use the default settings. For more information, see the permissions page. Click Create.
The action's frontend is now ready 🥳
Set up the action's backend
Now we want to write the logic that our action will trigger.
- GitHub
- GitLab
- Bitbucket (Jenkins)
-
First, let's create the necessary token and secrets. If you've already completed the scaffold a new service guide, you should already have these configured and you can skip this step.
-
Go to your Github tokens page, create a personal access token with
repoandadmin:orgscope, and copy it (this token is needed to create a pull-request from our workflow).
-
Open the Credentials modal and copy your
Client IDandClient secret.
-
-
In the repository where your workflow will reside, create 3 new secrets under
Settings->Secrets and variables->Actions:-
ORG_ADMIN_TOKEN- the personal access token you created in the previous step. -
PORT_CLIENT_ID- the client ID you copied from your Port app. -
PORT_CLIENT_SECRET- the client secret you copied from your Port app.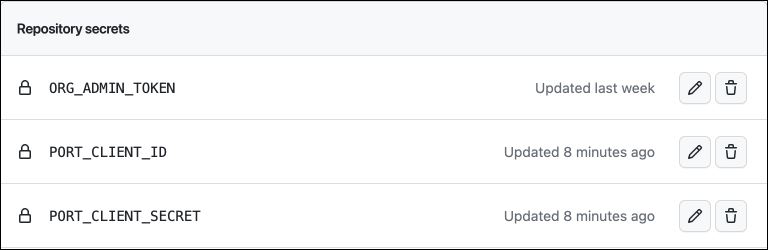
-
-
Now let's create the workflow file that contains our logic. Our workflow will consist of 3 steps:
- Creating a copy of the template file in the selected service's repository and replacing its variables with the data from the action's input.
- Creating a pull request in the selected service's repository to add the new resource.
- Reporting & logging the action result back to Port, and updating the relevant service's
Resource definitionsproperty with the URL of the service's resources directory.
-
Under
.github/workflows/, create a new file namedport-create-bucket.ymland use the following snippet as its content:Github workflow (click to expand)
name: Create cloud resourceon:workflow_dispatch:inputs:port_context:required: truedescription: Includes the entity identifier, and the action's run idname:required: truedescription: The name of the new resourcetype: stringvisibility:required: truedescription: The visibility of the new resourcetype: stringjobs:createResource:runs-on: ubuntu-lateststeps:# Checkout the workflow's repository- uses: actions/checkout@v6# Checkout the service's repository- uses: actions/checkout@v6with:repository: "${{ fromJson(inputs.port_context).entity }}"path: ./targetRepotoken: ${{ secrets.ORG_ADMIN_TOKEN }}- name: Copy template filerun: |mkdir -p ./targetRepo/resourcescp templates/cloudResource.tf ./targetRepo/resources/${{ inputs.name }}.tf- name: Update new file datarun: |sed -i 's/{{ bucket_name }}/${{ inputs.name }}/' ./targetRepo/resources/${{ inputs.name }}.tfsed -i 's/{{ bucket_acl }}/${{ inputs.visibility }}/' ./targetRepo/resources/${{ inputs.name }}.tf- name: Open a pull requestuses: peter-evans/create-pull-request@v5with:token: ${{ secrets.ORG_ADMIN_TOKEN }}path: ./targetRepocommit-message: Create new resource - ${{ inputs.name }}committer: GitHub <noreply@github.com>author: ${{ github.actor }} <${{ github.actor }}@users.noreply.github.com>signoff: falsebranch: new-resource-${{ inputs.name }}delete-branch: truetitle: Create new resource - ${{ inputs.name }}body: |Create new ${{ inputs.visibility }} resource - ${{ inputs.name }}draft: falsecreate-entity-in-port-and-update-run:runs-on: ubuntu-latestneeds: createResourcesteps:- name: UPSERT Entityuses: port-labs/port-github-action@v1with:identifier: ${{ fromJson(inputs.port_context).entity }}blueprint: githubRepositoryproperties: |-{"resource_definitions": "${{ github.server_url }}/${{ fromJson(inputs.port_context).entity }}/blob/main/resources/"}clientId: ${{ secrets.PORT_CLIENT_ID }}clientSecret: ${{ secrets.PORT_CLIENT_SECRET }}baseUrl: https://api.port.iooperation: UPSERTrunId: ${{ fromJson(inputs.port_context).runId }}- name: Create a log messageuses: port-labs/port-github-action@v1with:clientId: ${{ secrets.PORT_CLIENT_ID }}clientSecret: ${{ secrets.PORT_CLIENT_SECRET }}baseUrl: https://api.port.iooperation: PATCH_RUNrunId: ${{ fromJson(inputs.port_context).runId }}logMessage: Pull request created successfully for "${{ inputs.name }}" 🚀
First, let's create a GitLab project that will store our new bucket creation pipeline - Go to your GitLab account and create a new project.
Next, let's create the necessary token and secrets:
-
Open the Credentials modal and copy your
Client IDandClient secret. -
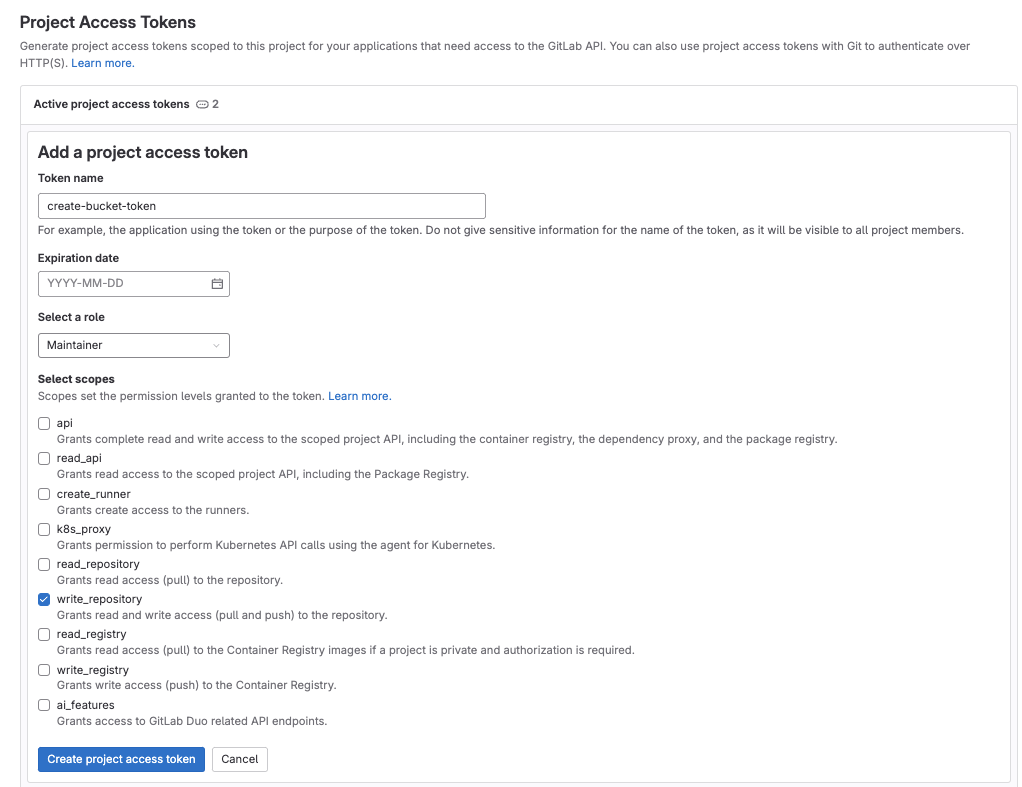
Go to your project, and follow the steps here to create a new project access token with the following permission scopes:
write_repository, then save its value as it will be required in the next step.
-
Go to your GitLab project, from the
Settingsmenu at the sidebar on the left, selectCI/CD. -
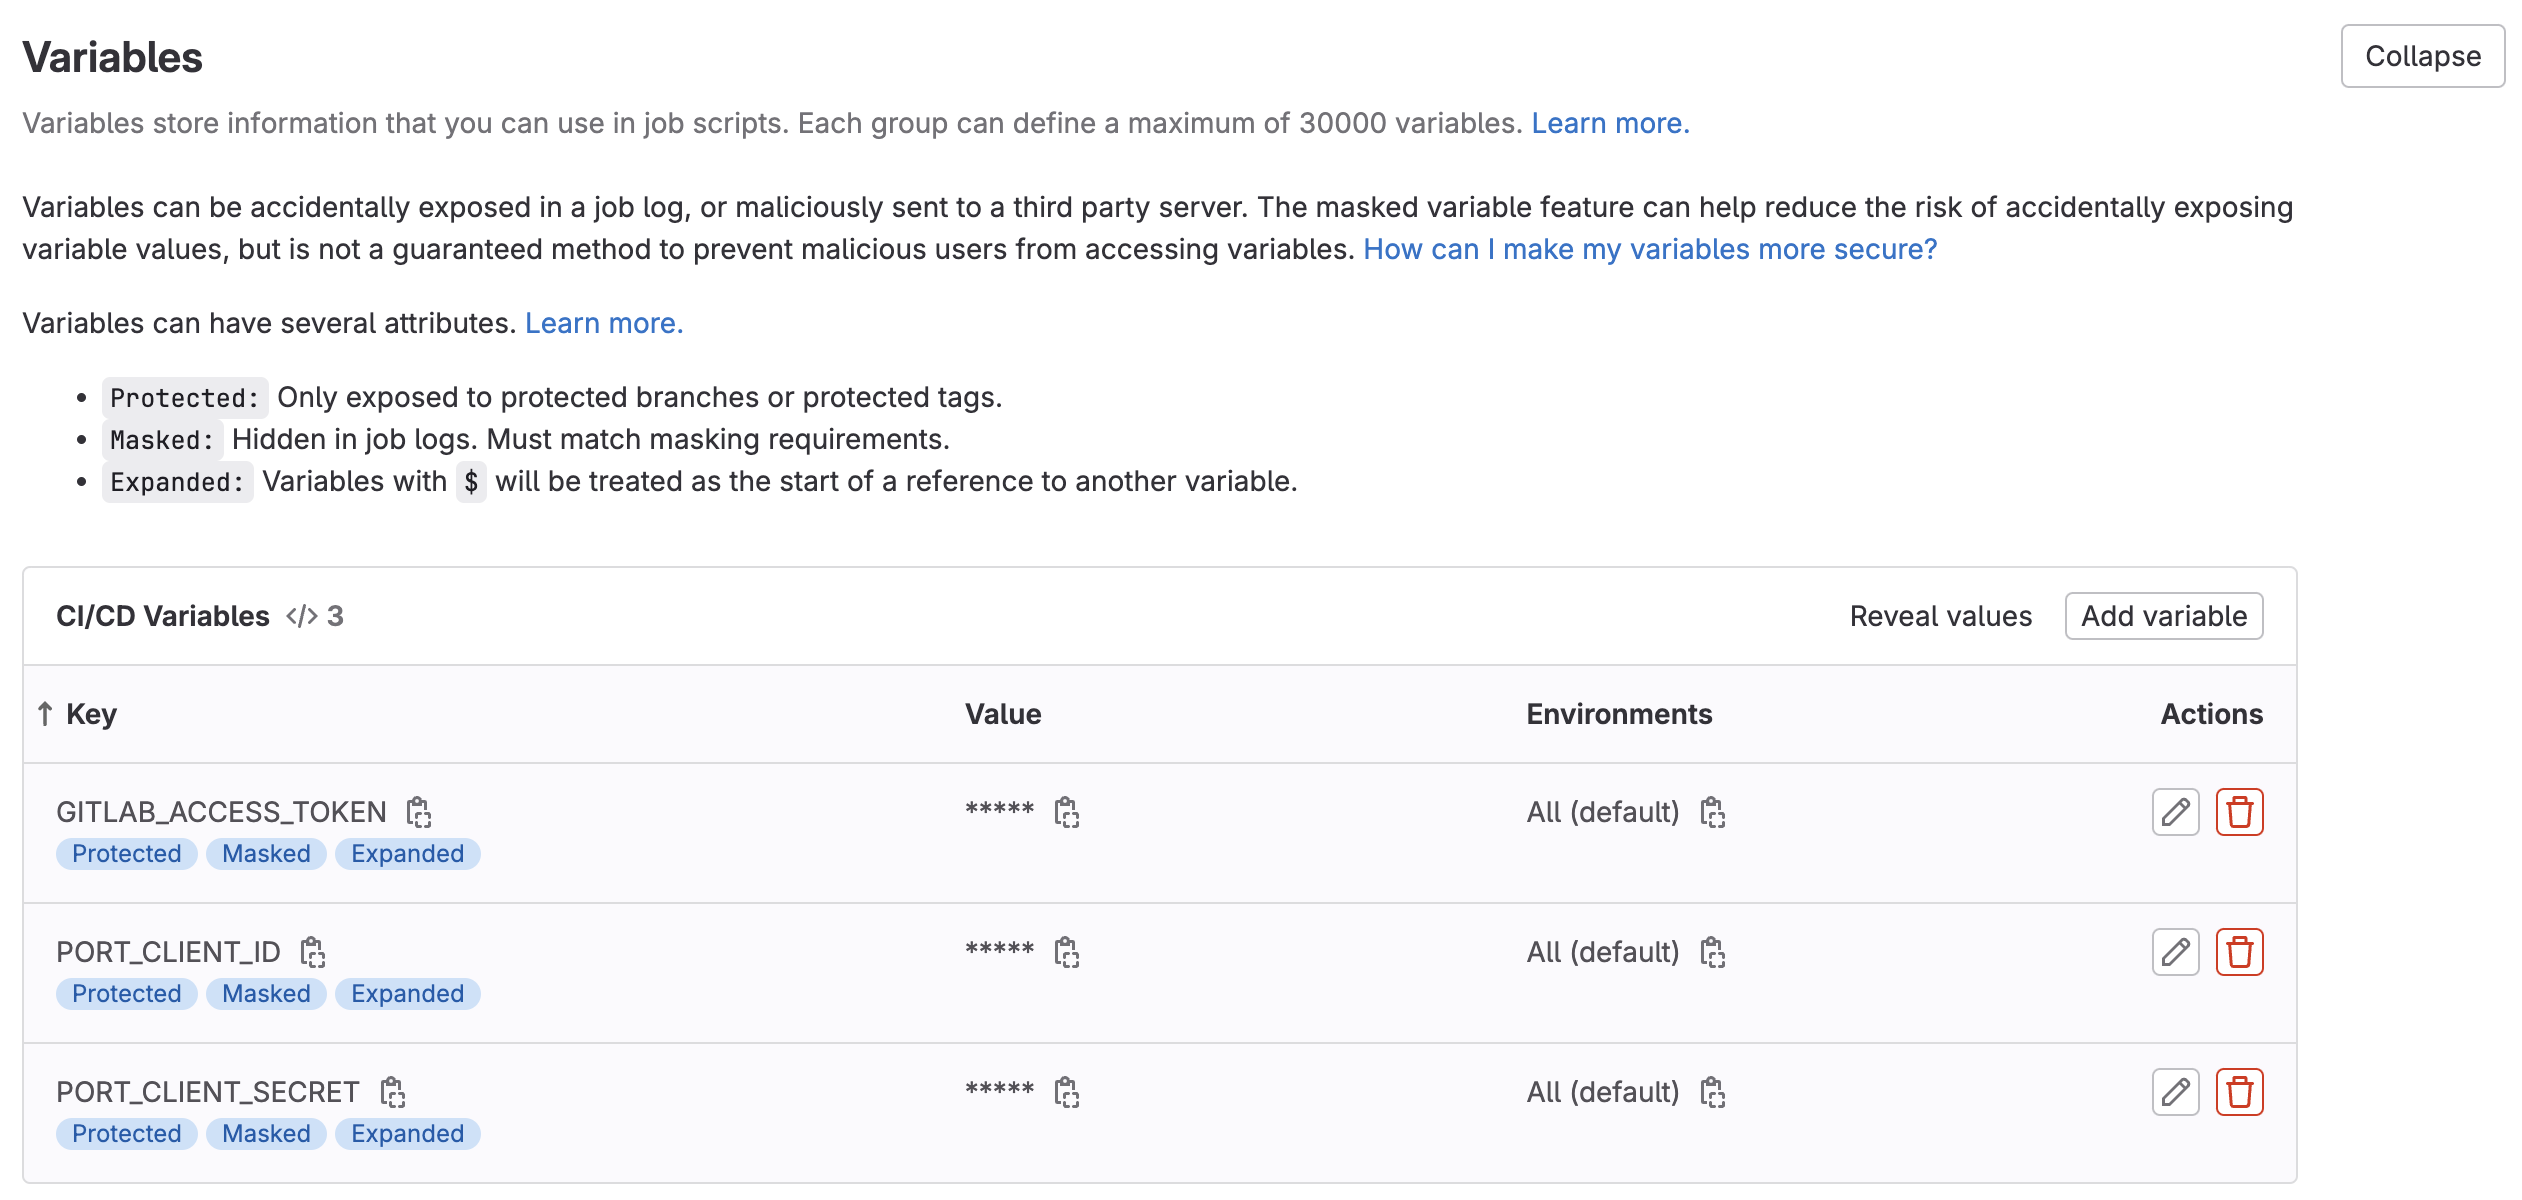
Expand the
Variablessection and save the following secrets:PORT_CLIENT_ID- Your Port client ID.PORT_CLIENT_SECRET- Your Port client secret.GITLAB_ACCESS_TOKEN- The GitLab group access token you created in the previous step.
-
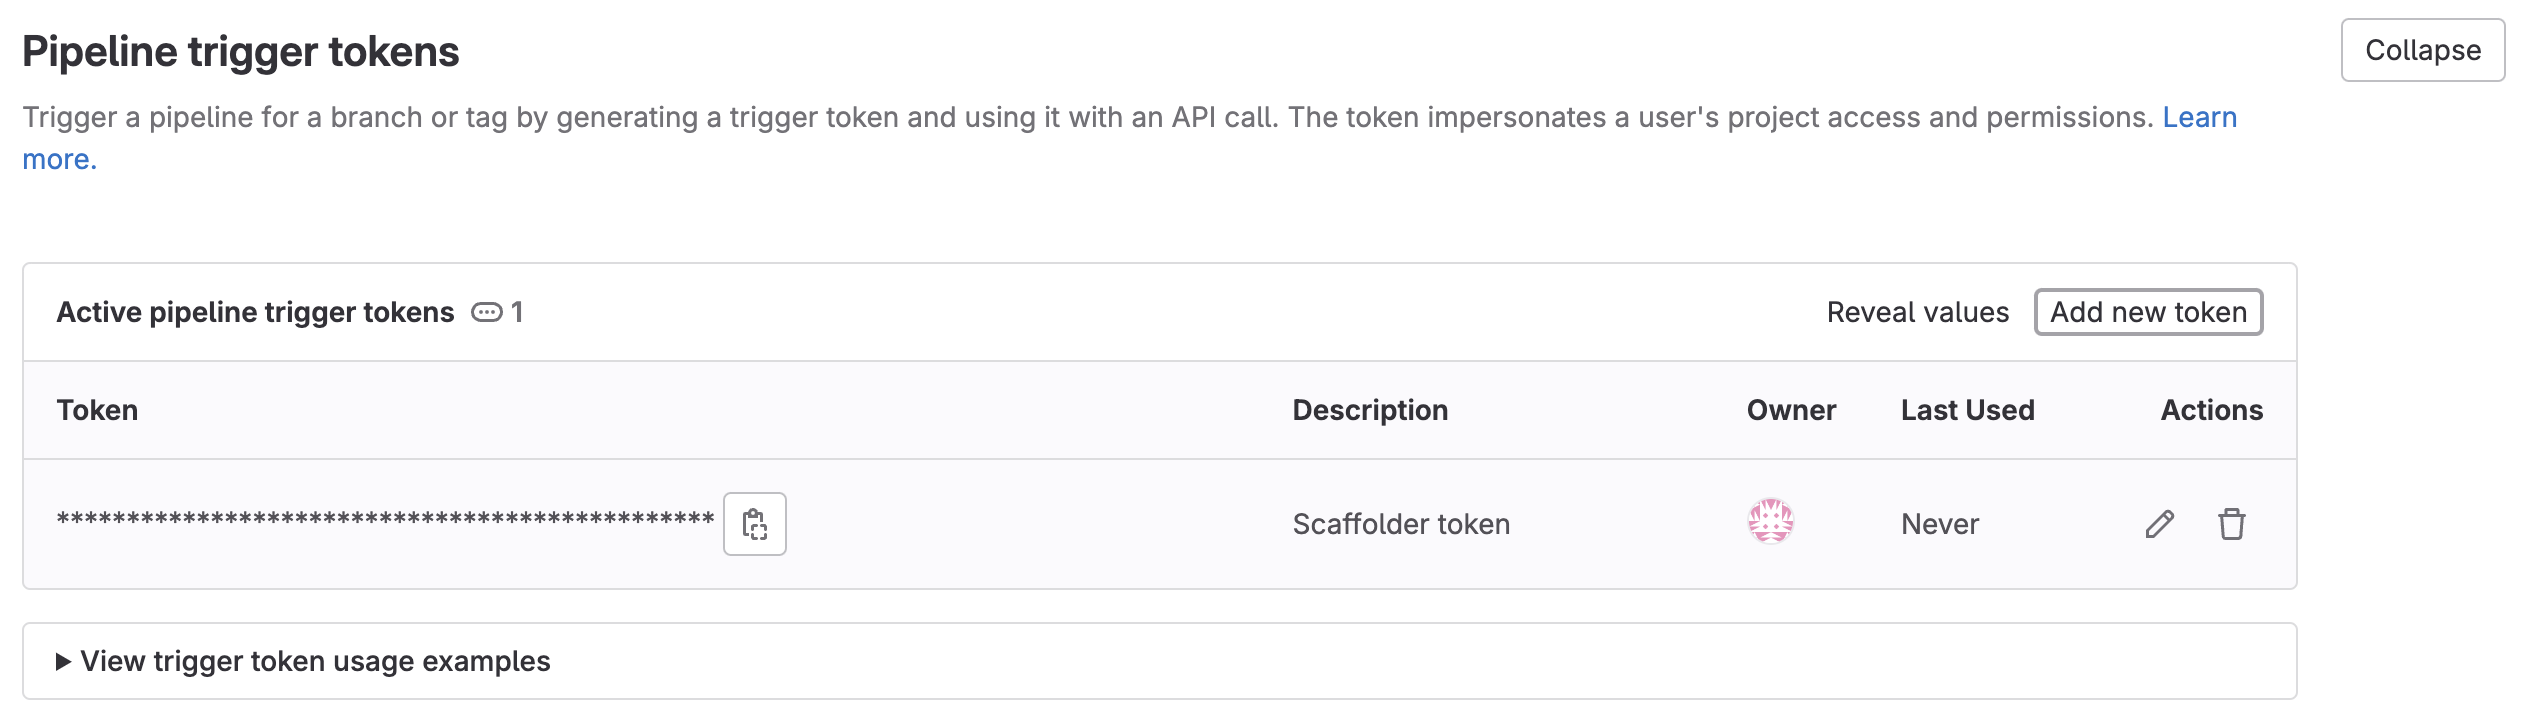
Expand the
Pipeline trigger tokenssection and add a new token, give it a meaningful description such asBucket creator tokenand save its value- This is the
{GITLAB_TRIGGER_TOKEN}that you need for the defining the backend of the Action.
- This is the
Now let's create the pipeline file that contains our logic. In the root of your GitLab project, create a new file named .gitlab-ci.yml and use the following snippet as its content:GitLab pipeline (click to expand)
First, let's create the necessary tokens and secrets:
-
Open the Credentials modal and copy your
Client IDandClient secret. -
Configure the following as Jenkins credentials:
BITBUCKET_USERNAME- a user with access to the Bitbucket workspace and project.BITBUCKET_APP_PASSWORD- an App Password with theRepositories:ReadandRepositories:Writepermissions.PORT_CLIENT_ID- Your Port client ID.PORT_CLIENT_SECRET- Your Port client secret.

Next, create a Jenkins pipeline with the following configuration:
-
Define the value of the
tokenfield, the token you specify will be used to trigger the scaffold pipeline specifically. For example, you can usebucket-creator-token. -
Define variables for the pipeline: define the
SERVICE_NAME,BITBUCKET_WORKSPACE_NAME,BITBUCKET_PROJECT_KEY,BUCKET_NAME,VISIBILITYandRUN_IDvariables. Scroll down to thePost content parametersand for each variable add configuration like so (look at the table below for the full variable list):
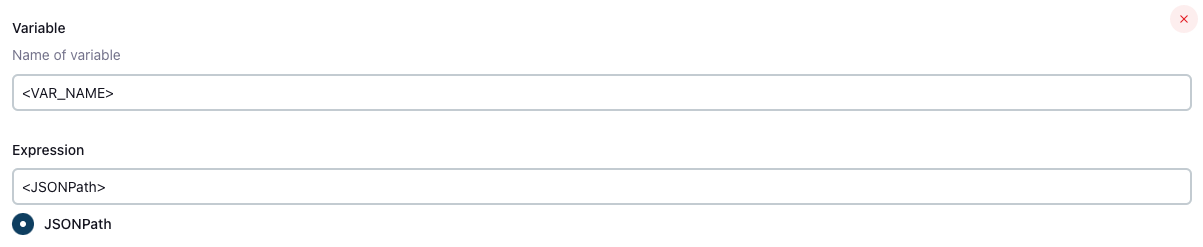
Create the following variables and their related JSONPath expression:
| Variable Name | JSONPath Expression |
|---|---|
| SERVICE_NAME | $.port_context.entity |
| BITBUCKET_WORKSPACE_NAME | $.bitbucket_workspace_name |
| RUN_ID | $.port_context.runId |
| BUCKET_NAME | $.name |
| VISIBILITY | $.visibility |
Add the following content to the new Jenkins pipeline:Jenkins pipeline (click to expand)
The port_region, port.baseUrl, portBaseUrl, port_base_url and OCEAN__PORT__BASE_URL parameters select which Port API instance to use:
- EU (app.port.io) →
https://api.port.io - US (app.us.port.io) →
https://api.us.port.io
We will now create a simple .tf file that will serve as a template for our new resource:
- In your source repository (
port-actionsfor example), create a file namedcloudResource.tfunder/templates/(it's path should be/templates/cloudResource.tf). - Copy the following snippet and paste it in the file's contents:
cloudResource.tf (click to expand)
resource "aws_s3_bucket" "example" {
provider = aws.bucket_region
name = "{{ bucket_name }}"
acl = "{{ bucket_acl }}"
}
All done! The action is ready to be executed 🚀
Execute the action
After creating an action, it will appear in the Self-service page in Port:
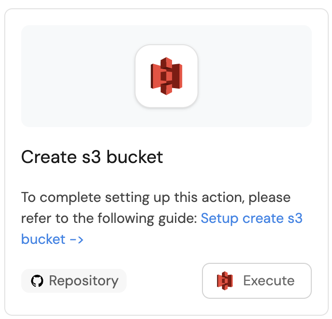
-
Click
Execute. On the top right corner of the page, click on the action button to view the action progress: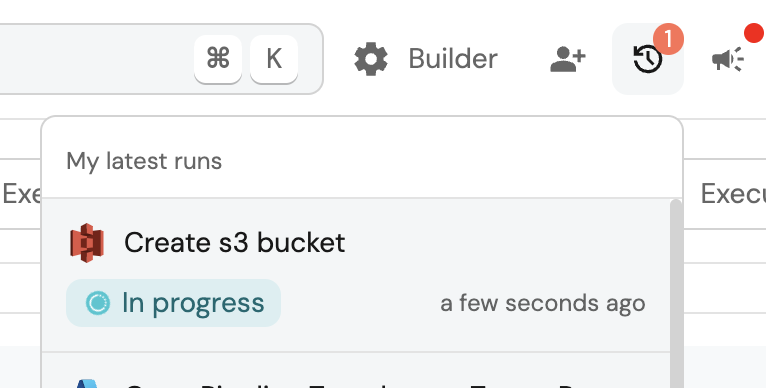
-
This page provides details about the action run. We can see that the backend returned
Successand the pull-request was created successfully: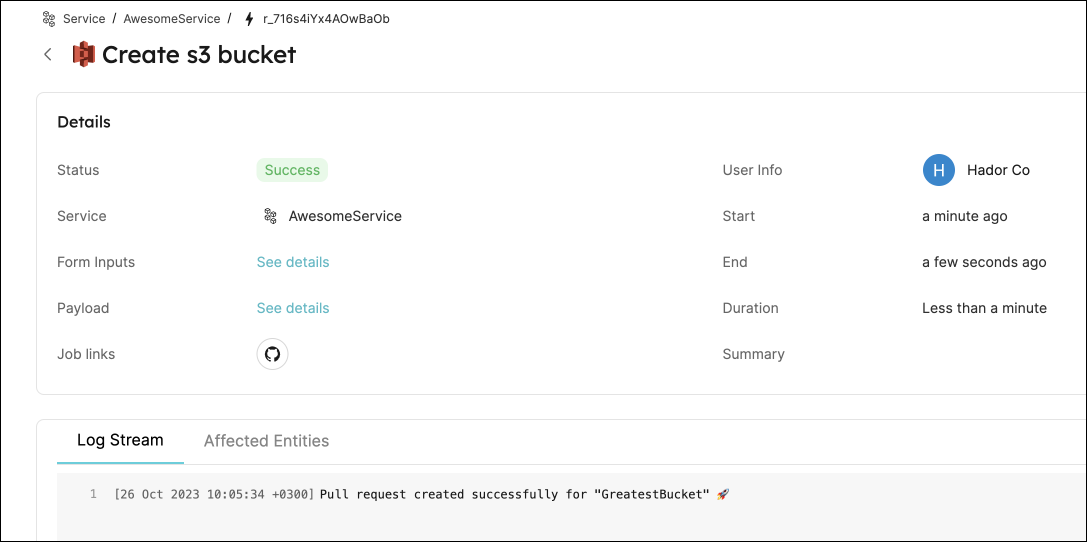
Access the bucket's definition from Port
You may have noticed that even though we updated the service's Resource definitions URL, it still leads to a non-existent page. This is because we do not have any resources in the repository yet, let's take care of that:
-
Merge the pull-request.
-
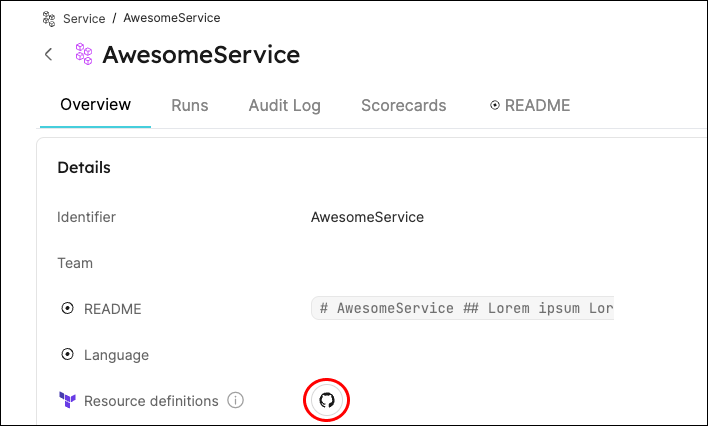
Go to the entity page of the service that you executed the action for:
-
Click on the
Resource definitionslink to access the service's resources.
All done! You can now create resources for your services directly from Port 💪🏽
Example: S3 bucket
Use this example when you want to create an AWS S3 bucket with Terraform and report the bucket back to Port as an entity.
This example creates:
- An
s3Bucketblueprint in Port. - An AWS S3 bucket.
- An S3 bucket ACL.
- A matching Port entity for the created bucket.
Set up the S3 bucket blueprint
Create the s3Bucket blueprint before running the Terraform example.
- API
- Terraform
S3 bucket blueprint API definition (click to expand)
{
  "identifier": "s3Bucket",
  "description": "",
  "title": "S3 Bucket",
  "icon": "Bucket",
  "schema": {
    "properties": {
      "isPrivate": {
        "type": "boolean",
        "title": "Is private?"
      }
    },
    "required": []
  },
  "mirrorProperties": {},
  "calculationProperties": {},
  "relations": {}
}
Set your credentials as environment variables:
export PORT_CLIENT_ID="<PORT_CLIENT_ID>"
export PORT_CLIENT_SECRET="<PORT_CLIENT_SECRET>"
S3 bucket blueprint Terraform definition (click to expand)
terraform {
  required_providers {
    port = {
      source  = "port-labs/port-labs"
      version = "~> 2.0.3"
    }
  }
}

provider "port" {
  base_url = "https://api.port.io"
}

resource "port_blueprint" "s3_bucket" {
  identifier = "s3Bucket"
  icon       = "Bucket"
  title      = "S3 Bucket"

  properties = {
    boolean_props = {
      isPrivate = {
        title    = "Is private?"
        required = false
      }
    }
  }
}
The port_region, port.baseUrl, portBaseUrl, port_base_url and OCEAN__PORT__BASE_URL parameters select which Port API instance to use:
- EU (app.port.io) →
https://api.port.io - US (app.us.port.io) →
https://api.us.port.io
Create the S3 bucket with Terraform
Create a main.tf file with the following Terraform definition. Replace the placeholders for access_key, secret_key, client_id, and secret before running it.
S3 bucket Terraform definition (click to expand)
terraform {
  required_providers {
    port = {
      source  = "port-labs/port-labs"
      version = "~> 2.0.3"
    }
  }
}

provider "aws" {
  access_key = "YOUR_ACCESS_KEY_ID"
  secret_key = "YOUR_SECRET_ACCESS_KEY"
  region     = "eu-west-1"
}

provider "port" {
  base_url = "https://api.port.io"
}

resource "aws_s3_bucket" "port-terraform-example-bucket" {
  bucket = "my-port-terraform-example-bucket"
}

resource "aws_s3_bucket_acl" "port-terraform-example-bucket-acl" {
  bucket = aws_s3_bucket.port-terraform-example-bucket.id
  acl    = "private"
}

resource "port_entity" "s3_bucket" {
  depends_on = [
    aws_s3_bucket.port-terraform-example-bucket
  ]

  identifier = aws_s3_bucket.port-terraform-example-bucket.bucket
  title      = aws_s3_bucket.port-terraform-example-bucket.bucket
  blueprint  = "s3Bucket"

  properties = {
    string_props = {
      "isPrivate" = aws_s3_bucket_acl.port-terraform-example-bucket-acl.acl == "private" ? true : false
    }
  }
}
The port_region, port.baseUrl, portBaseUrl, port_base_url and OCEAN__PORT__BASE_URL parameters select which Port API instance to use:
- EU (app.port.io) →
https://api.port.io - US (app.us.port.io) →
https://api.us.port.io
Run the following commands to initialize Terraform, inspect the planned changes, create the infrastructure, and update Port:
terraform init
terraform plan
terraform apply
The depends_on block on the Port entity ensures Terraform creates the S3 bucket before it creates the matching s3Bucket entity in Port.
Update the S3 bucket
The isPrivate property is calculated from the bucket ACL:
properties = {
  string_props = {
    "isPrivate" = aws_s3_bucket_acl.port-terraform-example-bucket-acl.acl == "private" ? true : false
  }
}
To change the bucket ACL, update the ACL resource:
resource "aws_s3_bucket_acl" "port-terraform-example-bucket-acl" {
  bucket = aws_s3_bucket.port-terraform-example-bucket.id
  acl    = "public-read" # Changed from "private"
}
Run terraform apply again. Terraform updates the bucket ACL and updates the isPrivate property on the matching Port entity.
Clean up the S3 bucket example
Run terraform destroy to delete the AWS S3 bucket and the matching Port entity created in this example.
Advanced example: Developer environment
Use this advanced example when you want to create a complete AWS developer environment with Terraform and report it back to Port as an entity.
This example creates:
- A
developerEnvironmentblueprint in Port. - An S3 bucket that stores generated artifacts.
- An SQS FIFO queue that receives messages.
- A Lambda function that is triggered by messages sent to the queue.
- A matching Port entity for the developer environment.
Set up the developer environment blueprint
Create the developerEnvironment blueprint before running the Terraform example.
- API
- Terraform
Developer environment blueprint API definition (click to expand)
{
  "identifier": "developerEnvironment",
  "description": "",
  "title": "Developer Environment",
  "icon": "Environment",
  "schema": {
    "properties": {
      "bucketUrl": {
        "type": "string",
        "title": "Bucket URL",
        "format": "url"
      },
      "lambdaUrl": {
        "type": "string",
        "title": "Lambda URL",
        "format": "url"
      },
      "queueUrl": {
        "type": "string",
        "title": "Queue URL",
        "format": "url"
      },
      "memorySize": {
        "type": "number",
        "title": "Memory Size"
      }
    },
    "required": []
  },
  "mirrorProperties": {},
  "calculationProperties": {},
  "relations": {}
}
Set your credentials as environment variables:
export PORT_CLIENT_ID="<PORT_CLIENT_ID>"
export PORT_CLIENT_SECRET="<PORT_CLIENT_SECRET>"
Developer environment blueprint Terraform definition (click to expand)
terraform {
  required_providers {
    port = {
      source  = "port-labs/port-labs"
      version = "~> 2.0.3"
    }
  }
}

provider "port" {
  base_url = "https://api.port.io"
}

resource "port_blueprint" "developer_environment" {
  identifier = "developerEnvironment"
  icon       = "Environment"
  title      = "Developer Environment"

  properties = {
    string_props = {
      "bucketUrl" = {
        title    = "Bucket URL"
        format   = "url"
        required = false
      }
      "queueUrl" = {
        title    = "Queue URL"
        format   = "url"
        required = false
      }
      "lambdaUrl" = {
        title    = "Lambda URL"
        format   = "url"
        required = false
      }
    }
    number_props = {
      "memorySize" = {
        title    = "Memory Size"
        required = false
      }
    }
  }
}
The port_region, port.baseUrl, portBaseUrl, port_base_url and OCEAN__PORT__BASE_URL parameters select which Port API instance to use:
- EU (app.port.io) →
https://api.port.io - US (app.us.port.io) →
https://api.us.port.io
Create the developer environment with Terraform
Download the Node.js Lambda template and save the .zip file next to your main.tf file.
Create a main.tf file with the following Terraform definition. Replace the placeholders for access_key, secret_key, client_id, and secret before running it.
Developer environment Terraform definition (click to expand)
terraform {
  required_providers {
    port = {
      source  = "port-labs/port-labs"
      version = "~> 2.0.3"
    }
  }
}

provider "aws" {
  access_key = "YOUR_ACCESS_KEY_ID"
  secret_key = "YOUR_SECRET_ACCESS_KEY"
  region     = "eu-west-1"
}

provider "port" {
  base_url = "https://api.port.io"
}

resource "aws_s3_bucket" "port_terraform_example_dev_env_bucket" {
  bucket = "my-port-terraform-example-dev-env-bucket"
}

resource "aws_s3_bucket_acl" "port_terraform_example_dev_env_bucket-acl" {
  bucket = aws_s3_bucket.port_terraform_example_dev_env_bucket.id
  acl    = "private"
}

resource "aws_sqs_queue" "port_terraform_example_dev_env_queue" {
  name                        = "terraform-example-queue.fifo"
  fifo_queue                  = true
  content_based_deduplication = true
}

resource "aws_iam_role" "iam_for_lambda" {
  name = "iam_for_lambda"

  assume_role_policy = <<EOF
{
  "Version": "2012-10-17",
  "Statement": [
    {
      "Action": "sts:AssumeRole",
      "Principal": {
        "Service": "lambda.amazonaws.com"
      },
      "Effect": "Allow",
      "Sid": ""
    }
  ]
}
EOF
}

resource "aws_iam_role_policy_attachment" "attach_sqs_policy_for_lambda_role" {
  role       = aws_iam_role.iam_for_lambda.name
  policy_arn = "arn:aws:iam::aws:policy/service-role/AWSLambdaSQSQueueExecutionRole"
}

resource "aws_lambda_function" "port_terraform_example_dev_env_lambda" {
  depends_on = [
    aws_sqs_queue.port_terraform_example_dev_env_queue
  ]

  filename      = "lambda_function_payload.zip"
  function_name = "dev-env-function"
  role          = aws_iam_role.iam_for_lambda.arn
  handler       = "index.test"

  runtime = "nodejs16.x"
}

resource "aws_lambda_function_url" "example_function_url" {
  function_name      = aws_lambda_function.port_terraform_example_dev_env_lambda.function_name
  authorization_type = "NONE"
}

resource "aws_lambda_event_source_mapping" "event_source_mapping" {
  event_source_arn = aws_sqs_queue.port_terraform_example_dev_env_queue.arn
  enabled          = true
  function_name    = aws_lambda_function.port_terraform_example_dev_env_lambda.arn
  batch_size       = 1
}

resource "port_entity" "dev_env" {
  depends_on = [
    aws_s3_bucket.port_terraform_example_dev_env_bucket,
    aws_lambda_function.port_terraform_example_dev_env_lambda,
    aws_sqs_queue.port_terraform_example_dev_env_queue,
    aws_lambda_function_url.example_function_url
  ]

  identifier = aws_lambda_function.port_terraform_example_dev_env_lambda.function_name
  title      = aws_lambda_function.port_terraform_example_dev_env_lambda.function_name
  blueprint  = "developerEnvironment"

  properties = {
    string_props = {
      "bucketUrl" = "https://${aws_s3_bucket.port_terraform_example_dev_env_bucket.bucket_domain_name}"
      "queueUrl"  = aws_sqs_queue.port_terraform_example_dev_env_queue.id
      "lambdaUrl" = aws_lambda_function_url.example_function_url.function_url
    }
    number_props = {
      "memorySize" = aws_lambda_function.port_terraform_example_dev_env_lambda.memory_size
    }
  }
}
The port_region, port.baseUrl, portBaseUrl, port_base_url and OCEAN__PORT__BASE_URL parameters select which Port API instance to use:
- EU (app.port.io) →
https://api.port.io - US (app.us.port.io) →
https://api.us.port.io
Run the following commands to initialize Terraform, inspect the planned changes, create the infrastructure, and update Port:
terraform init
terraform plan
terraform apply
The depends_on block on the Port entity ensures Terraform creates the S3 bucket, Lambda function, SQS queue, and Lambda function URL before it creates the matching developerEnvironment entity in Port.
Update the developer environment
The developer environment entity maps dynamic properties directly from the AWS resources defined in Terraform. If one of those resources changes, the Port entity updates the next time you run terraform apply.
For example, increase the Lambda function memory size:
resource "aws_lambda_function" "port_terraform_example_dev_env_lambda" {
  depends_on = [
    aws_sqs_queue.port_terraform_example_dev_env_queue
  ]

  filename      = "lambda_function_payload.zip"
  function_name = "dev-env-function"
  role          = aws_iam_role.iam_for_lambda.arn
  handler       = "index.handler"

  runtime = "nodejs16.x"

  memory_size = 256 # was 128
}
Run terraform apply again. Terraform updates the Lambda function and updates the memorySize property on the matching Port entity.
Clean up the developer environment example
Run terraform destroy to delete the AWS infrastructure and the matching Port entity created in this example.
Integrate daily routines
- Send a Slack message to relevant people in the organization, notifying them about the new resource.
- Send a weekly or monthly report for managers and DevOps teams showing the new resources created in this timeframe and their owners.
More relevant guides
An agentic SDLC platform should integrate with GitOps practices seamlessly. Developers should be able to perform routine tasks independently, without creating bottlenecks within the organization.
With Port, platform engineers can design precise and flexible self-service actions for their developers while integrating with many different backends to suit your specific needs.