IAM permission management
Developers often require access to various cloud resources daily. With all your essential AWS resources integrated into Port, you can streamline the process by allowing developers to request IAM permissions directly from Port.
It's crucial to track the permissions allocated to your developers, including who requested them and what permissions were granted.
In this step-by-step guide, we will create Port blueprints and workflows that enable you to request and revoke IAM permissions for different AWS resources. Additionally, you'll be able to monitor which permissions were requested and by whom.
Prerequisites
-
Prepare your credentials: Have your Port organization's Client ID and Client Secret ready. You can find your Port credentials here.
-
Set up AWS IAM user: In your AWS console, create an IAM user called
port-iam-management-userwith the following IAM permissions policy:IAM policy json (click to expand)
{"Version": "2012-10-17","Statement": [{"Effect": "Allow","Action": ["iam:CreateRole","iam:UpdateRole","iam:DeleteRole","iam:CreatePolicy","iam:DeletePolicy","iam:AttachRolePolicy","iam:DetachRolePolicy"],"Resource": "*"}]} -
Create access credentials: Generate access credentials for this IAM user (
AWS_ACCESS_KEY_IDandAWS_SECRET_ACCESS_KEY). -
GitHub repository: Create a repository named
port-iam-permissionsin your GitHub organization. This repository will store the workflow backend and dependency files. -
Install GitHub Ocean: Install the GitHub Ocean integration in your account. Port workflows dispatch GitHub Actions through this integration.
-
Create GitHub secrets: Add the following GitHub Action secrets in the
port-iam-permissionsrepository:PORT_CLIENT_ID- Your Port Client ID.PORT_CLIENT_SECRET- Your Port Client Secret.AWS_ACCOUNT_ID- The AWS account ID you want to manage.AWS_ACCESS_KEY_ID- The AWS access key ID for theport-iam-management-userIAM user.AWS_SECRET_ACCESS_KEY- The AWS secret access key for theport-iam-management-userIAM user.AWS_REGION- Your primary AWS region (use us-east-1 if unsure).
Set up data model
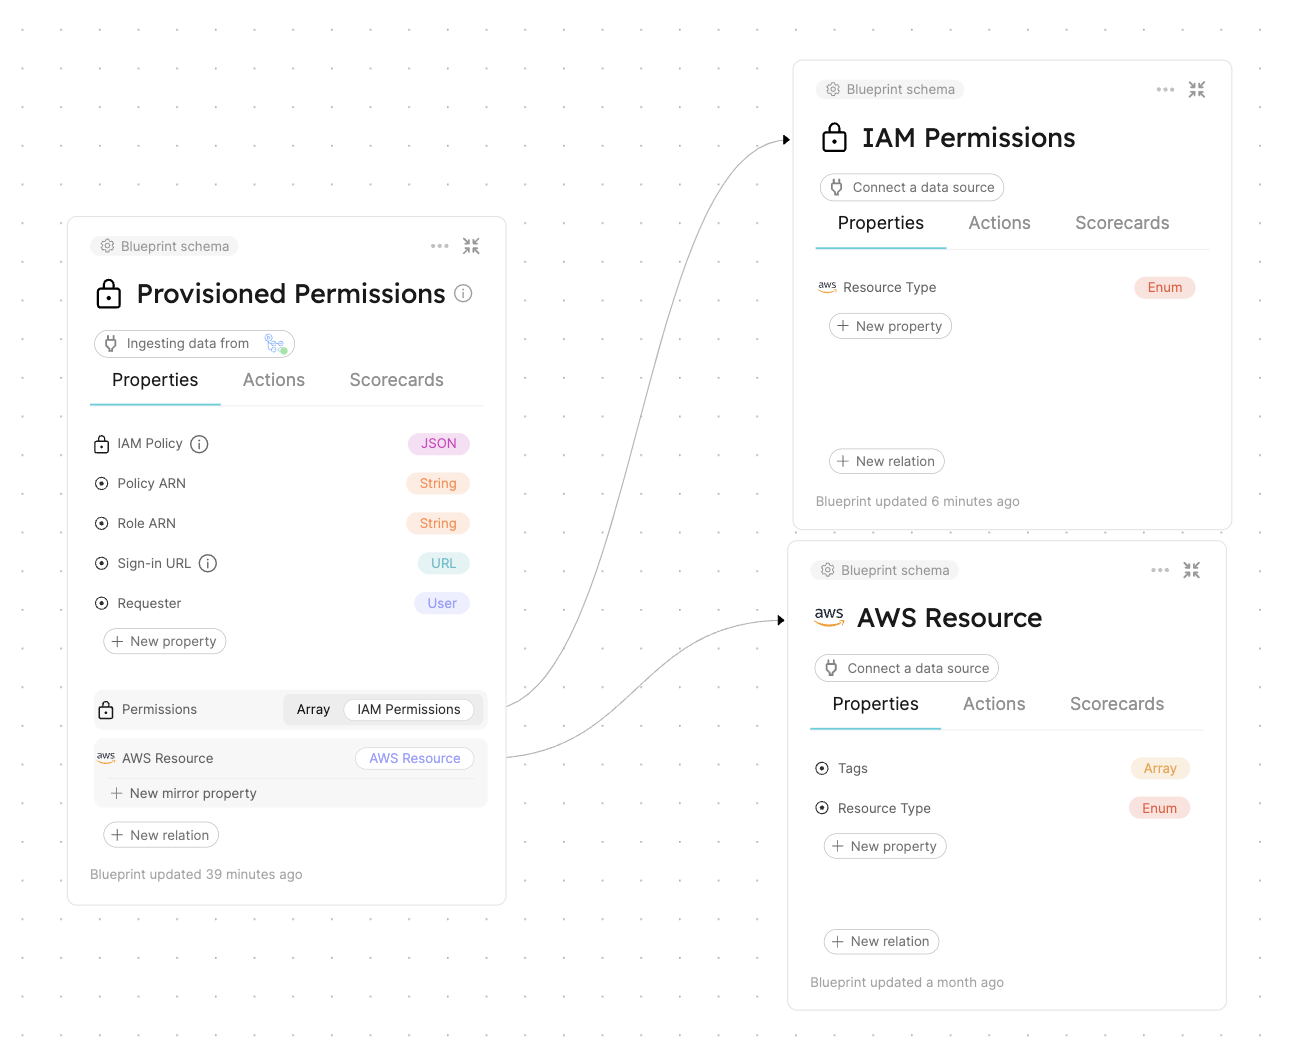
Create blueprints to manage AWS resources and track IAM permission requests from developers.
Blueprints to create:
AWS Resource blueprint (click to expand)
The entities of this blueprint represent different AWS resources we want to manage IAM permissions for (S3 buckets, EC2 instances, etc.).
{
    "identifier": "aws_resource",
    "title": "AWS Resource",
    "icon": "AWS",
    "schema": {
        "properties": {
            "tags": {
                "items": {
                    "type": "object"
                },
                "title": "Tags",
                "type": "array",
                "icon": "DefaultProperty"
            },
            "resource_type": {
                "icon": "DefaultProperty",
                "title": "Resource Type",
                "type": "string",
                "enum": [
                    "S3",
                    "EC2"
                ],
                "enumColors": {
                    "S3": "blue",
                    "EC2": "green"
                }
            }
        },
        "required": ["resource_type"]
    },
    "mirrorProperties": {},
    "calculationProperties": {},
    "aggregationProperties": {},
    "relations": {}
}
IAM Permissions blueprint (click to expand)
The entities of this blueprint represent different AWS IAM permissions that can be associated to an IAM Policy (s3:DeleteBucket, s3:PutObject, ec2:StopInstances, ec2:TerminateInstances, etc.).
{
    "identifier": "iam_permissions",
    "title": "IAM Permissions",
    "icon": "Lock",
    "schema": {
        "properties": {
            "resource_type": {
                "icon": "AWS",
                "title": "Resource Type",
                "type": "string",
                "enum": [
                    "S3",
                    "EC2"
                ],
                "enumColors": {
                    "S3": "blue",
                    "EC2": "green"
                }
            }
        },
        "required": ["resource_type"]
    },
    "mirrorProperties": {},
    "calculationProperties": {},
    "aggregationProperties": {},
    "relations": {}
}
Provisioned Permissions blueprint (click to expand)
The entities of this blueprint represent the permissions which were created and managed using Port.
{
    "identifier": "provisioned_permissions",
    "description": "This blueprint represents a set of provisioned permissions for some AWS resource",
    "title": "Provisioned Permissions",
    "icon": "Lock",
    "schema": {
        "properties": {
            "requester": {
                "title": "Requester",
                "type": "string",
                "format": "user",
                "icon": "DefaultProperty"
            },
            "iam_policy": {
                "title": "IAM Policy",
                "type": "object",
                "icon": "Lock",
                "description": "The IAM policy given for this temporary permission"
            },
            "sign_in_url": {
                "icon": "DefaultProperty",
                "title": "Sign-in URL",
                "type": "string",
                "description": "The sign-in URL for this temporary permission",
                "format": "url"
            },
            "policy_arn": {
                "title": "Policy ARN",
                "type": "string",
                "icon": "DefaultProperty"
            },
            "role_arn": {
                "title": "Role ARN",
                "type": "string",
                "icon": "DefaultProperty"
            },
            "expiry_time": {
              "title": "Expiry Time",
              "icon": "DefaultProperty",
              "description": "When the provisioned permission will expire",
              "type": "string",
              "format": "timer"
            }
        },
        "required": []
    },
    "mirrorProperties": {},
    "calculationProperties": {},
    "aggregationProperties": {},
    "relations": {
        "permissions": {
            "title": "Permissions",
            "target": "iam_permissions",
            "required": false,
            "many": true
        },
        "aws_resource": {
            "title": "AWS Resource",
            "target": "aws_resource",
            "required": false,
            "many": false
        }
    }
}
For simplicity, the blueprints above include pre-defined options for resource types, such as EC2 and S3.
You can modify the blueprints to support any type of AWS resource by adding additional options to the resource_type properties in both the AWS Resource and IAM Permissions blueprints.
Set up the workflows
To provision and revoke permissions for AWS resources via Port, we will create workflows and set up their backends.
Because AWS IAM operations rely on the AWS CLI, we keep GitHub Actions as the workflow backend. Port dispatches the GitHub Actions workflows through the GitHub integration action, and native Port nodes handle the rest (creating and removing catalog entities).
Workflow backends - GitHub Actions
You'll create two GitHub workflow files which interact with AWS via the CLI to create and revoke IAM permissions, and two JSON files which are used as templates for the IAM permissions.
Create the following files in the port-iam-permissions repository you set up in the prerequisites section using the correct path as it appears in each filename:
Create permissions for AWS resource GitHub workflow (click to expand)
This workflow is responsible for creating new IAM permissions for an AWS resource. It receives the resource identifier, requester, and permissions directly as inputs, then reports the provisioned permission back to Port as a Provisioned Permissions entity.
name: Create permissions for AWS resource
on:
  workflow_dispatch:
    inputs:
      permissions:
        type: string
        required: true
        description: JSON array of IAM permission identifiers
      resource_identifier:
        type: string
        required: true
        description: The ARN of the AWS resource to grant permissions for
      requester:
        type: string
        required: false
        description: Email of the user who requested the permissions

jobs:
  create-iam-permissions:
    name: Create IAM permissions
    runs-on: ubuntu-latest
    env:
      POLICY_NAME: Permission-${{github.run_id}}
    steps:
      - uses: actions/checkout@v6
        with:
          persist-credentials: true
      - name: Configure AWS Credentials
        uses: aws-actions/configure-aws-credentials@v4
        with:
          aws-access-key-id: ${{ secrets.AWS_ACCESS_KEY_ID }}
          aws-secret-access-key: ${{ secrets.AWS_SECRET_ACCESS_KEY }}
          aws-region: ${{ secrets.AWS_REGION }}
      - name: Create JSON for permissions
        id: create-jsons
        run: |
          permissions='${{ inputs.permissions }}'
          echo "PERMISSIONS_ARRAY=${permissions}" >> $GITHUB_OUTPUT
          jq -r --argjson permissions "${permissions}" --arg resource "${{ inputs.resource_identifier }}/*" '.Statement[0].Action=$permissions | .Statement[0].Resource=$resource' .github/templates/iamPolicyDocument.json > temp_policy_document.json
          jq -r --arg aws_acc_id "${{ secrets.AWS_ACCOUNT_ID }}" '.Statement[0].Principal.AWS="arn:aws:iam::"+$aws_acc_id+":root"' .github/templates/iamTrustPolicy.json > temp_trust_policy.json
      - name: Apply policies and attachments
        id: apply-policies
        run: |
          # Create the policy
          policy_arn=$(aws iam create-policy --policy-name $POLICY_NAME --policy-document file://temp_policy_document.json --no-cli-pager | jq '.Policy.Arn')
          echo ${policy_arn}
          echo "POLICY_ARN=${policy_arn}" >> $GITHUB_OUTPUT
          # Create the role with assume-role policy
          echo "ROLE_ARN=$(aws iam create-role --role-name $POLICY_NAME --assume-role-policy-document file://temp_trust_policy.json --no-cli-pager | jq '.Role.Arn')" >> $GITHUB_OUTPUT
          # Attach policy to the role
          aws iam attach-role-policy --role-name $POLICY_NAME --policy-arn arn:aws:iam::${{ secrets.AWS_ACCOUNT_ID }}:policy/$POLICY_NAME
      - name: Create variables
        id: create-variables
        run: |
          echo "POLICY=$(cat temp_policy_document.json | jq -c '.')" >> $GITHUB_OUTPUT
          echo "SIGN_IN_URL=https://signin.aws.amazon.com/switchrole?account=${{ secrets.AWS_ACCOUNT_ID }}&roleName=${{ env.POLICY_NAME }}&displayName=${{ env.POLICY_NAME }}" >> $GITHUB_OUTPUT
      - name: "Report permission to Port 🚢"
        uses: port-labs/port-github-action@v1
        with:
            clientId: ${{ secrets.PORT_CLIENT_ID }}
            clientSecret: ${{ secrets.PORT_CLIENT_SECRET }}
            baseUrl: https://api.port.io
            identifier: ${{ env.POLICY_NAME }}
            title: ${{ env.POLICY_NAME }}
            blueprint: provisioned_permissions
            properties: |
              {
                "iam_policy": ${{ steps.create-variables.outputs.POLICY }},
                "requester": "${{ inputs.requester }}",
                "sign_in_url": "${{ steps.create-variables.outputs.SIGN_IN_URL }}",
                "role_arn": ${{ steps.apply-policies.outputs.ROLE_ARN }},
                "policy_arn": ${{ steps.apply-policies.outputs.POLICY_ARN }}
              }
            relations: |
              {
                "aws_resource": "${{ inputs.resource_identifier }}",
                "permissions": ${{ steps.create-jsons.outputs.PERMISSIONS_ARRAY }}
              }
Revoke permissions for AWS resource GitHub workflow (click to expand)
This workflow is responsible for revoking IAM permissions for an AWS resource. It receives the role name (the provisioned permission identifier) and reconstructs the policy ARN from your AWS account ID. Removing the corresponding Port entity is handled by a native Port node in the workflow.
name: Delete IAM permissions for AWS resource
on:
  workflow_dispatch:
    inputs:
      role_name:
        type: string
        required: true
        description: The name of the IAM role and policy to delete (the provisioned permission identifier)

jobs:
  delete-permissions:
    name: Delete IAM permissions
    runs-on: ubuntu-latest
    env:
      POLICY_ARN: arn:aws:iam::${{ secrets.AWS_ACCOUNT_ID }}:policy/${{ inputs.role_name }}
    steps:
      - uses: actions/checkout@v6
        with:
          persist-credentials: true
      - name: Configure AWS Credentials
        uses: aws-actions/configure-aws-credentials@v4
        with:
          aws-access-key-id: ${{ secrets.AWS_ACCESS_KEY_ID }}
          aws-secret-access-key: ${{ secrets.AWS_SECRET_ACCESS_KEY }}
          aws-region: ${{ secrets.AWS_REGION }}
      - name: Delete policies
        id: delete-policies
        run: |
          # Detach the policy from the role
          aws iam detach-role-policy --role-name ${{ inputs.role_name }} --policy-arn ${{ env.POLICY_ARN }}
          # Delete the policy
          aws iam delete-policy --policy-arn "${{ env.POLICY_ARN }}" --no-cli-pager
          # Delete the role
          aws iam delete-role --role-name ${{ inputs.role_name }} --no-cli-pager
The port_region, port.baseUrl, portBaseUrl, port_base_url and OCEAN__PORT__BASE_URL parameters select which Port API instance to use:
- EU (app.port.io) →
https://api.port.io - US (app.us.port.io) →
https://api.us.port.io
IAM policy JSON template file (click to expand)
This file will act as a template for the generated IAM policies.
{
    "Version": "2012-10-17",
    "Statement": [
        {
            "Effect": "Allow",
            "Action": [],
            "Resource": ""
        }
    ]
}
IAM trust policy JSON template file (click to expand)
This file will act as a template for the generated IAM trust policies.
Replace the <YOUR_AWS_ACCOUNT_ID> with the AWS account ID you want to allocate permissions for.
{
    "Version": "2012-10-17",
    "Statement": [
        {
            "Effect": "Allow",
            "Principal": {"AWS": "arn:aws:iam::<YOUR_AWS_ACCOUNT_ID>:root"},
            "Action": "sts:AssumeRole"
        }
    ]
}
Creating the workflows
After setting up the backend in GitHub, create the Port workflows that dispatch these GitHub Actions. To create each workflow:
- Go to the workflows page in Port.
- Click + Workflow.
- Fill out the Create new workflow form. For Name, enter the workflow name from the matching section below, then click Confirm.
- Click the
{...}button to open the JSON editor, paste the workflow JSON from the matching section below, and click Apply changes.
Replace the <YOUR_GITHUB_ORG> and <YOUR_GITHUB_OCEAN_INTEGRATION_ID> placeholders in the JSON below with your GitHub organization and GitHub Ocean integration ID. Secrets are not passed to integration actions; the GitHub workflow authenticates through your installed integration.
Request permissions workflow (click to expand)
Create a workflow named Request permissions. It selects an AWS resource and the permissions to grant, then dispatches the create GitHub workflow. The ENTITY context makes it available from the bolt (⚡) menu on AWS Resource entity pages.
{
  "identifier": "request_permissions",
  "title": "Request permissions",
  "icon": "DefaultProperty",
  "description": "Request permissions for an AWS resource",
  "nodes": [
    {
      "identifier": "trigger",
      "title": "Request permissions",
      "config": {
        "type": "SELF_SERVE_TRIGGER",
        "contexts": [
          {
            "on": "ENTITY",
            "userInput": "aws_resource"
          }
        ],
        "userInputs": {
          "properties": {
            "aws_resource": {
              "title": "AWS Resource",
              "description": "The AWS resource to grant permissions for",
              "type": "string",
              "format": "entity",
              "blueprint": "aws_resource"
            },
            "permissions": {
              "title": "Permissions",
              "type": "array",
              "items": {
                "type": "string",
                "format": "entity",
                "blueprint": "iam_permissions"
              }
            }
          },
          "required": ["aws_resource", "permissions"],
          "order": ["aws_resource", "permissions"]
        }
      }
    },
    {
      "identifier": "create_permissions",
      "title": "Create IAM permissions",
      "config": {
        "type": "INTEGRATION_ACTION",
        "installationId": "<YOUR_GITHUB_OCEAN_INTEGRATION_ID>",
        "integrationProvider": "github-ocean",
        "integrationInvocationType": "dispatch_workflow",
        "integrationActionExecutionProperties": {
          "org": "<YOUR_GITHUB_ORG>",
          "repo": "port-iam-permissions",
          "workflow": "create-iam-permissions.yaml",
          "workflowInputs": {
            "permissions": "{{ .outputs.trigger.permissions | tojson }}",
            "resource_identifier": "{{ .outputs.trigger.aws_resource }}",
            "requester": "{{ .workflowRun.trigger.by.email }}"
          },
          "reportWorkflowStatus": true
        }
      }
    }
  ],
  "connections": [
    {
      "sourceIdentifier": "trigger",
      "targetIdentifier": "create_permissions"
    }
  ]
}
The permissions input above lists every IAM Permissions entity. To limit the options, add a static dataset filter on the input's items, for example filtering by resource_type.
Revoke permissions workflow (click to expand)
Create a workflow named Revoke permissions. It dispatches the delete GitHub workflow to remove the IAM role and policy from AWS, then removes the Provisioned Permissions entity from Port. The ALERT variant styles it as a destructive action in the bolt menu.
{
  "identifier": "revoke_permissions",
  "title": "Revoke permissions",
  "icon": "Alert",
  "description": "Revoke provisioned IAM permissions for an AWS resource",
  "nodes": [
    {
      "identifier": "trigger",
      "title": "Revoke permissions",
      "config": {
        "type": "SELF_SERVE_TRIGGER",
        "variant": "ALERT",
        "contexts": [
          {
            "on": "ENTITY",
            "userInput": "provisioned_permission"
          }
        ],
        "userInputs": {
          "properties": {
            "provisioned_permission": {
              "title": "Provisioned Permission",
              "description": "The provisioned permission to revoke",
              "type": "string",
              "format": "entity",
              "blueprint": "provisioned_permissions"
            }
          },
          "required": ["provisioned_permission"],
          "order": ["provisioned_permission"]
        }
      }
    },
    {
      "identifier": "delete_permissions",
      "title": "Delete IAM permissions",
      "config": {
        "type": "INTEGRATION_ACTION",
        "installationId": "<YOUR_GITHUB_OCEAN_INTEGRATION_ID>",
        "integrationProvider": "github-ocean",
        "integrationInvocationType": "dispatch_workflow",
        "integrationActionExecutionProperties": {
          "org": "<YOUR_GITHUB_ORG>",
          "repo": "port-iam-permissions",
          "workflow": "delete-iam-permissions.yaml",
          "workflowInputs": {
            "role_name": "{{ .outputs.trigger.provisioned_permission }}"
          },
          "reportWorkflowStatus": true
        }
      }
    },
    {
      "identifier": "remove_from_port",
      "title": "Remove permission from Port",
      "config": {
        "type": "WEBHOOK",
        "url": "https://api.port.io/v1/blueprints/provisioned_permissions/entities/{{ .outputs.trigger.provisioned_permission }}",
        "method": "DELETE",
        "synchronized": true
      }
    }
  ],
  "connections": [
    {
      "sourceIdentifier": "trigger",
      "targetIdentifier": "delete_permissions"
    },
    {
      "sourceIdentifier": "delete_permissions",
      "targetIdentifier": "remove_from_port"
    }
  ]
}
Managing permissions
Before provisioning and revoking permissions, we need to complete two tasks:
- Define the AWS resources for which we want to provision permissions.
- Specify the permissions we want our developers to be able to request and provision.
Defining AWS resources
Managing the AWS resources we want to provision permissions for will be done using Port entities. Navigate to AWS Resources page in your catalog to create some example entities.
For simplicity, we will be creating AWS resource entities manually. This can also be done using Port's AWS Exporter. Go to the Next Steps section to read more.
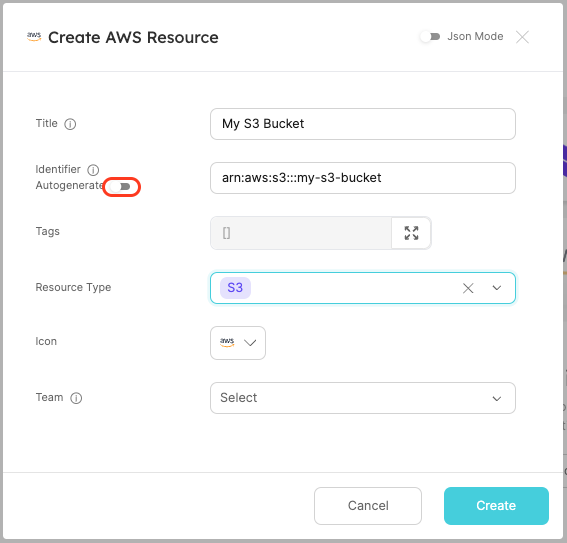
In the AWS Resources catalog page, click Manually add AWS Resource or click the + AWS Resource button to create an entity.
The entity's identifier is the AWS ARN of the AWS resource. Ensure sure you toggle off the Autogenerate for the identifier.
Create two AWS Resource entities:
-
S3Bucket:- Title:
My awesome S3 bucket - Identifier:
arn:aws:s3:::my-s3-bucket - Resource Type:
S3
- Title:
-
EC2Instance:- Title:
My awesome EC2 machine - Identifier:
arn:aws:ec2:us-east-1:12345678:instance/i-abc123456789 - Resource Type:
EC2
- Title:
Feel free to add more AWS resources of your own, just ensure the entity's identifier matches the AWS ARN of the resource you want to add.
Defining allowed IAM permissions
To manage the IAM permissions we want our developers to provision, we will use Port entities. Navigate to IAM Permissions in your catalog to create example entities
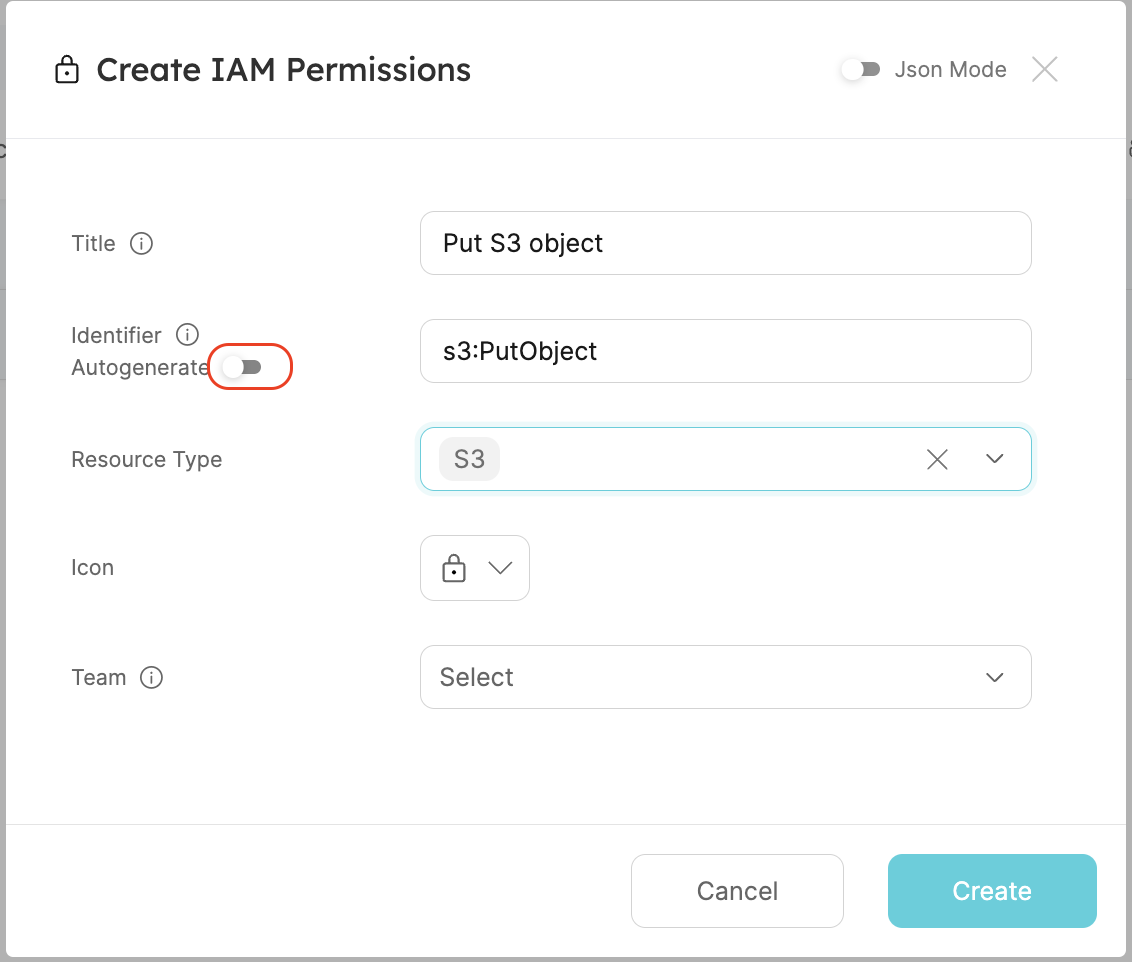
In the IAM Permissions catalog page, click Manually add IAM Permission or click the + IAM Permissions button to create an entity.
The entity's identifier should be the IAM permission you want to allow (e.g., s3:PutObject). Ensure you toggle off the Autogenerate option for the identifier.
Create two IAM Permissions entities:
-
S3Permission:- Title:
Put S3 objects - Identifier:
s3:PutObject - Resource Type:
S3
- Title:
-
EC2Permission:- Title:
Stop EC2 Instance - Identifier:
ec2:StopInstances - Resource Type:
EC2
- Title:
Feel free to add more IAM permissions of your own, just ensure the entity's identifier matches the IAM permission you want to add.
We are all set!
Managing permissions
Now that we finished setting up our Port environment, workflows, and workflow backends, we are ready to manage IAM permissions for our AWS resources!
Provision permissions
Start by creating new temporary permissions for our S3 bucket my-s3-bucket. Navigate to the bucket's entity page.
- Click the
...at the top right of the entity screen. - Select
Request permissions. - Choose the
s3:PutObjectpermission. - Click
Execute.
This will trigger a new workflow run which will appear in the workflow runs bar on the right. Click on the workflow run to navigate to the run page.
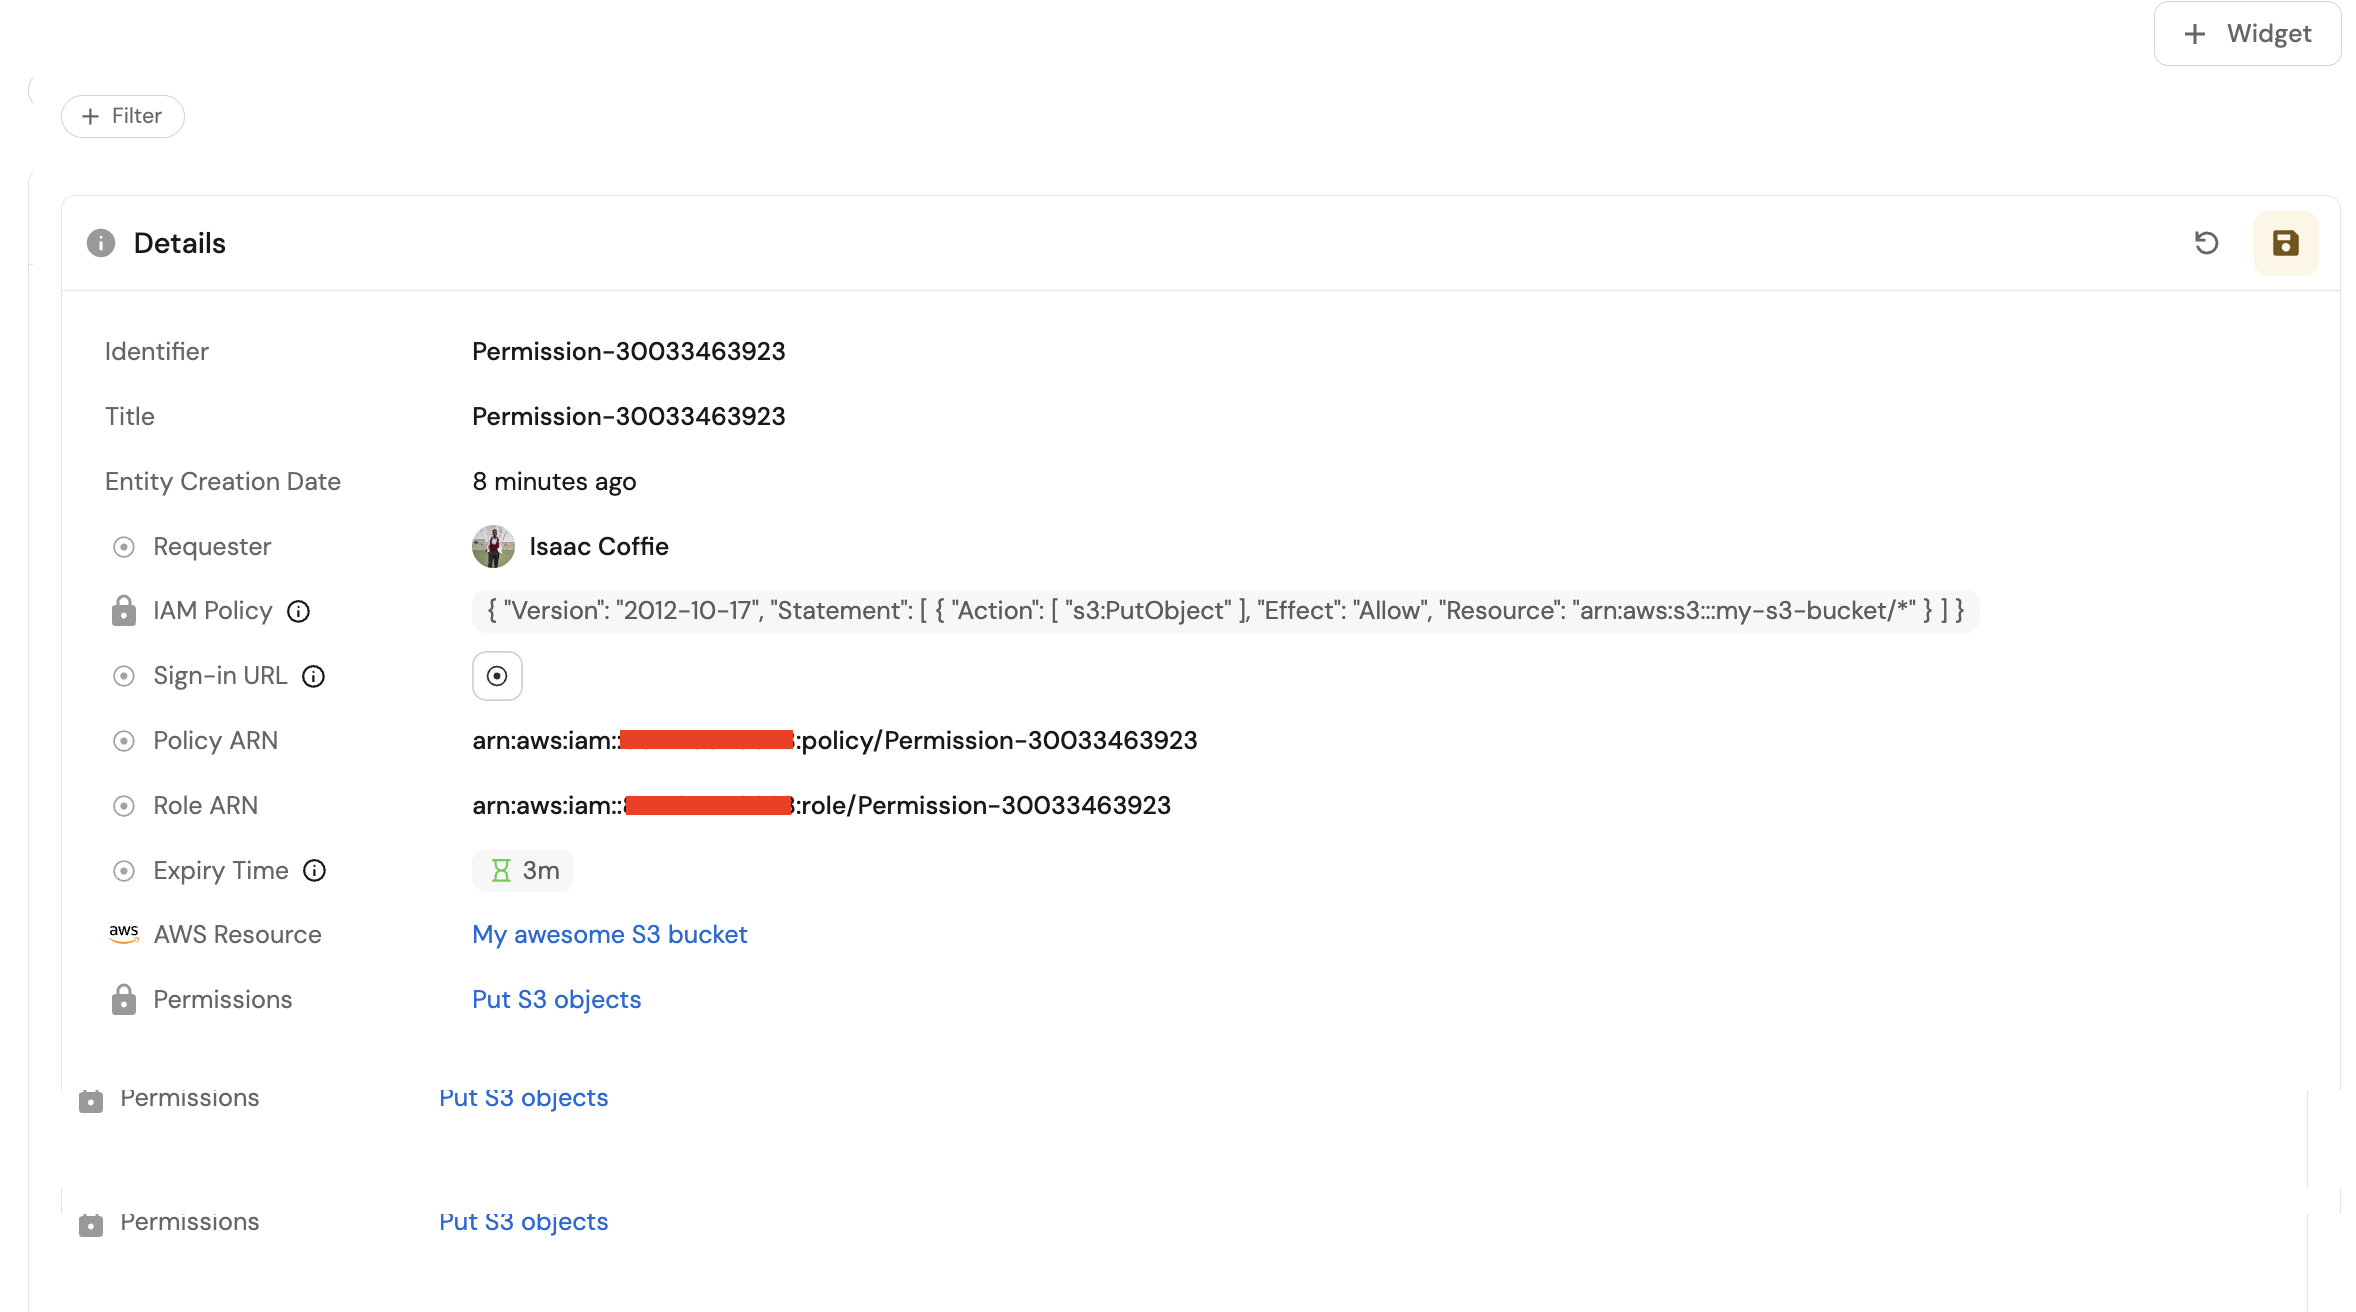
Once the workflow run is complete, the workflow will create a new Provisioned Permissions entity, visible in the Provisioned Permissions catalog page. That entity records:
- The AWS resource for which the IAM permissions were provisioned.
- Who requested the IAM permissions.
- The sign-in URL for the provisioned role.
To test your new temporary permissions, open the new Provisioned Permissions entity, copy the Sign-in URL property, and paste it into your browser's URL bar. Click the Switch Role button.
You are now signed in to your new role, which has permissions as defined in the Port workflow! 🥳
Revoke permissions
Now, we want to revoke the permissions provisioned for our S3 bucket my-s3-bucket. Start by navigating to the new Provisioned Permission entity.
- Head over to Provisioned Permissions in your catalog.
- Click on the new
Permission-XXXXXXXXentity.
On the Provisioned Permissions entity page, you can view crucial information about the provisioned permissions, such as the generated IAM policy and the requester of the permissions.
In the Related entities section, you can see which permissions were provisioned and to which resource.
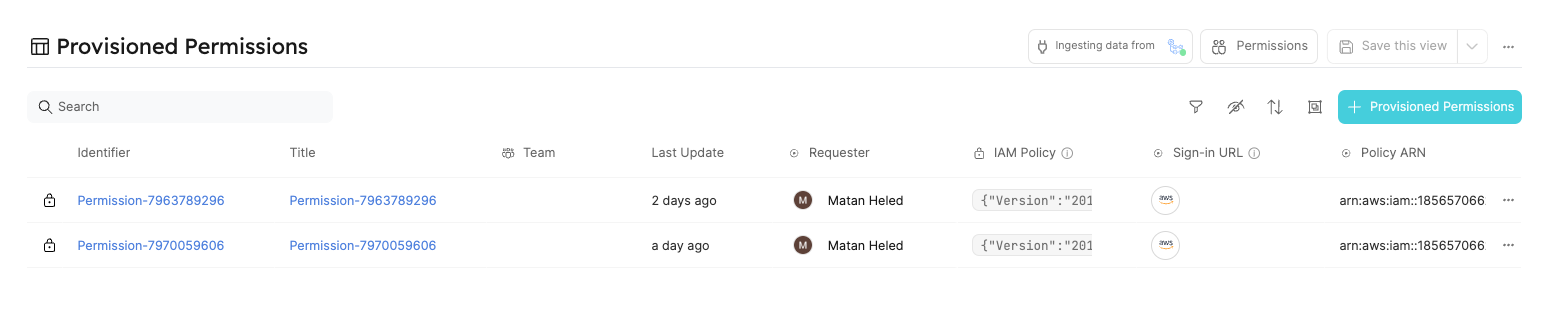
Head over to Provisioned Permissions page in your catalog to view all active permissions. There, you can find detailed information, including the requesters of permissions, IAM policies, sign-in URLs, and more.
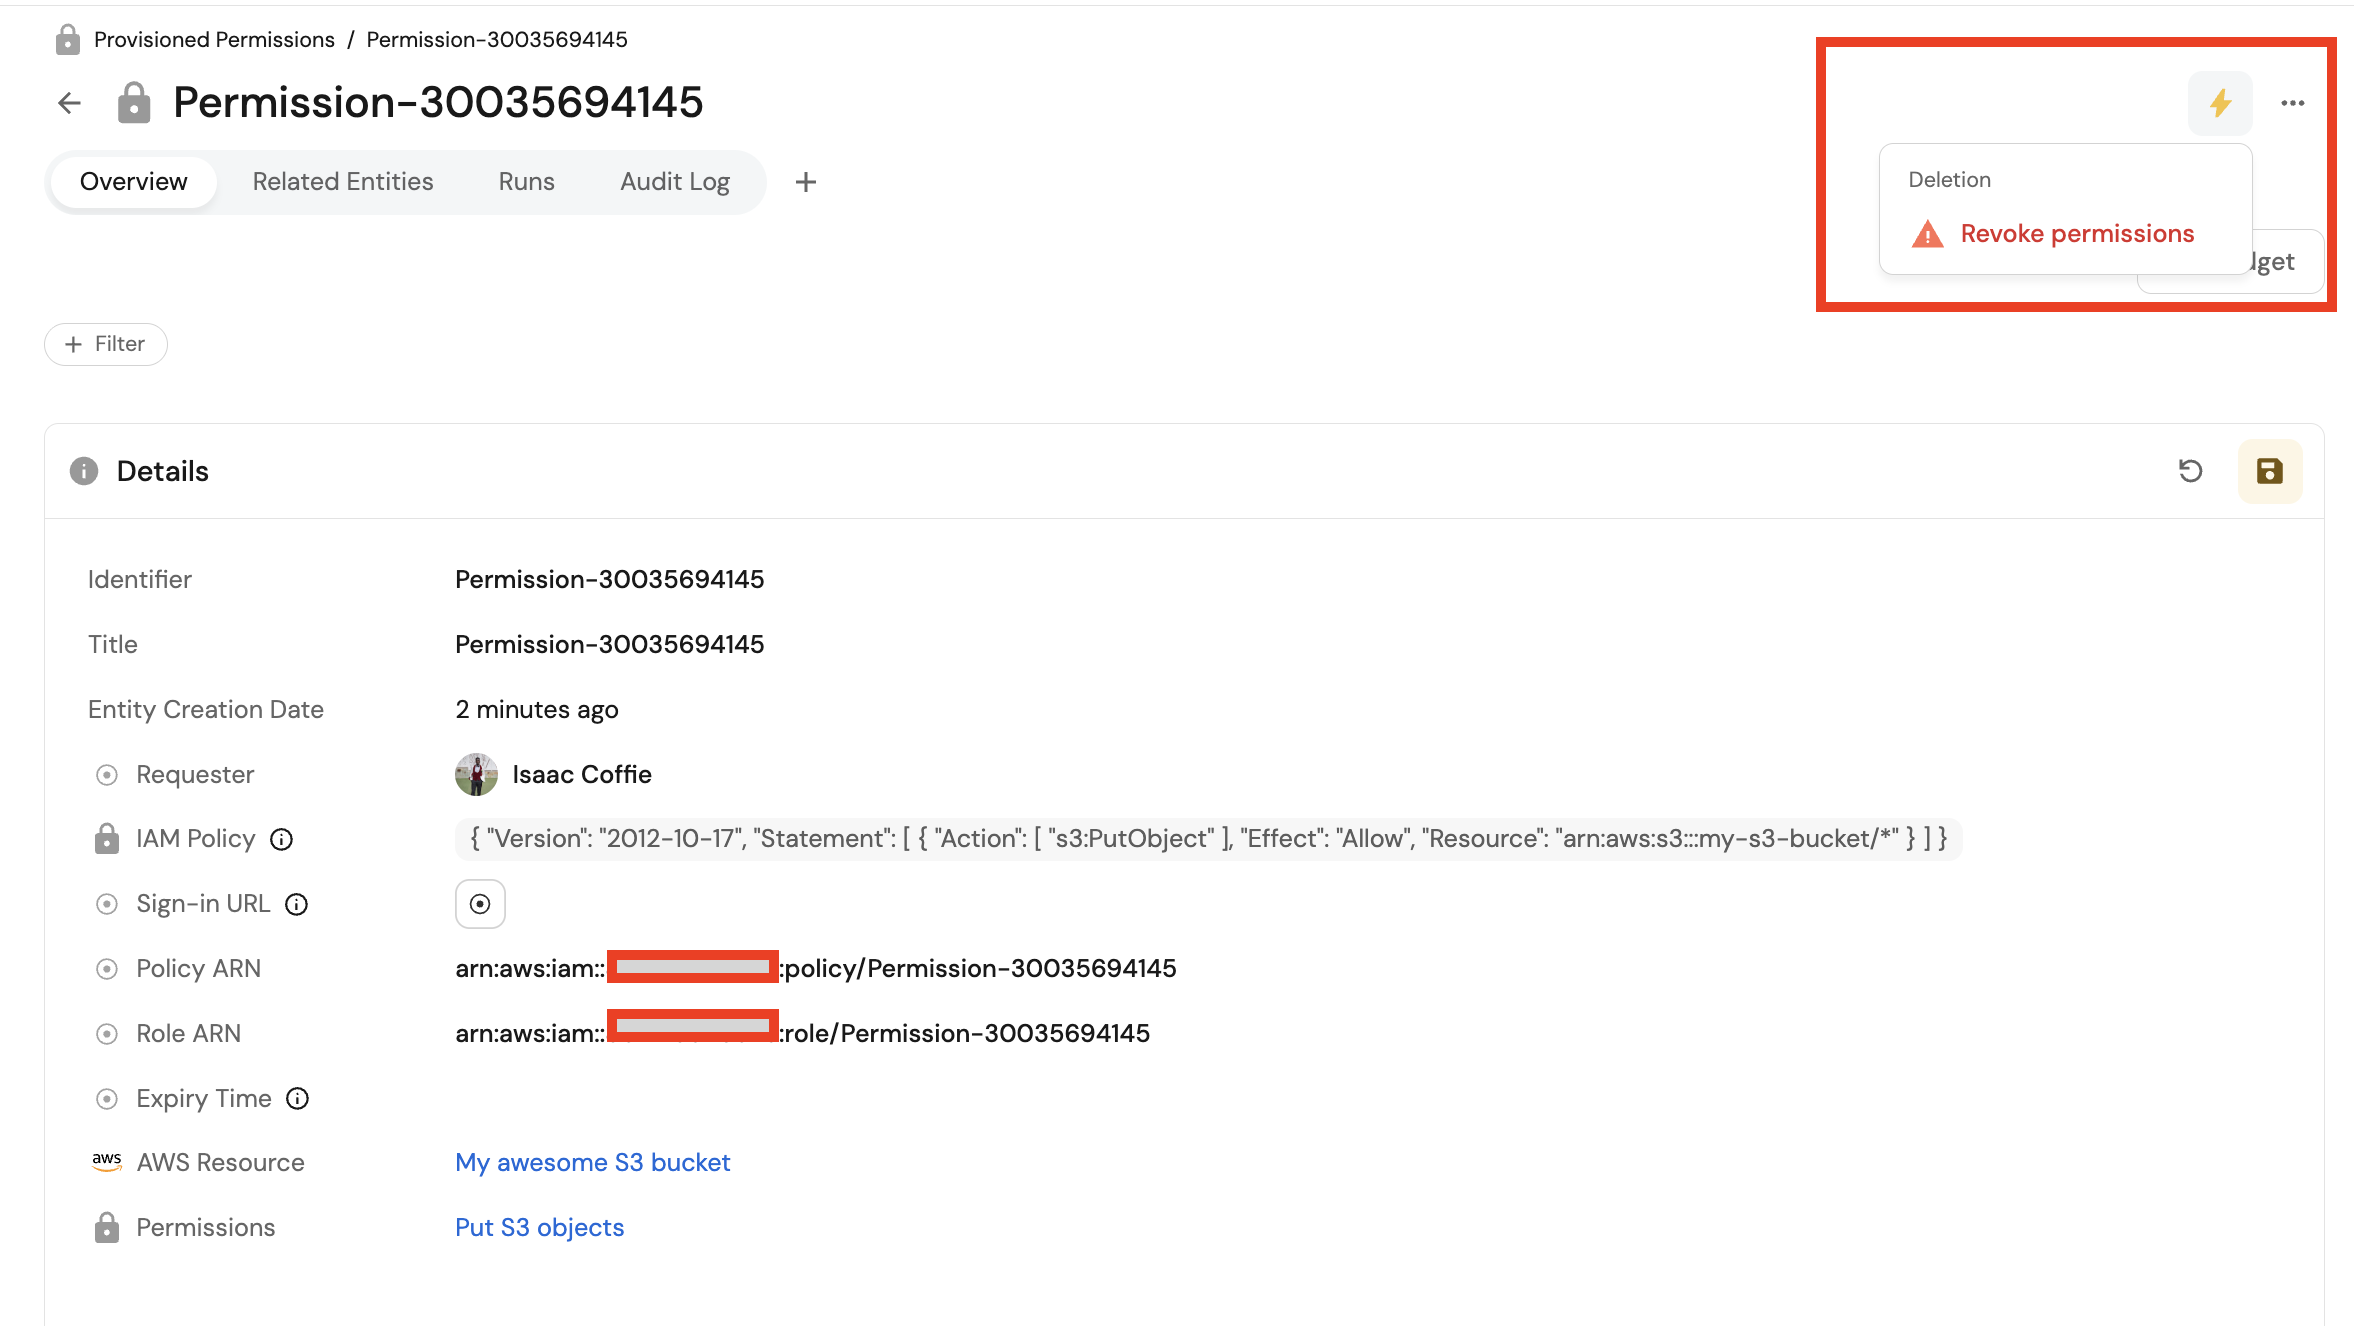
Once you're in the provisioned permission entity you created:
- Click the
...at the top right of the entity screen. - Click
Revoke permissions. - Click
Execute.
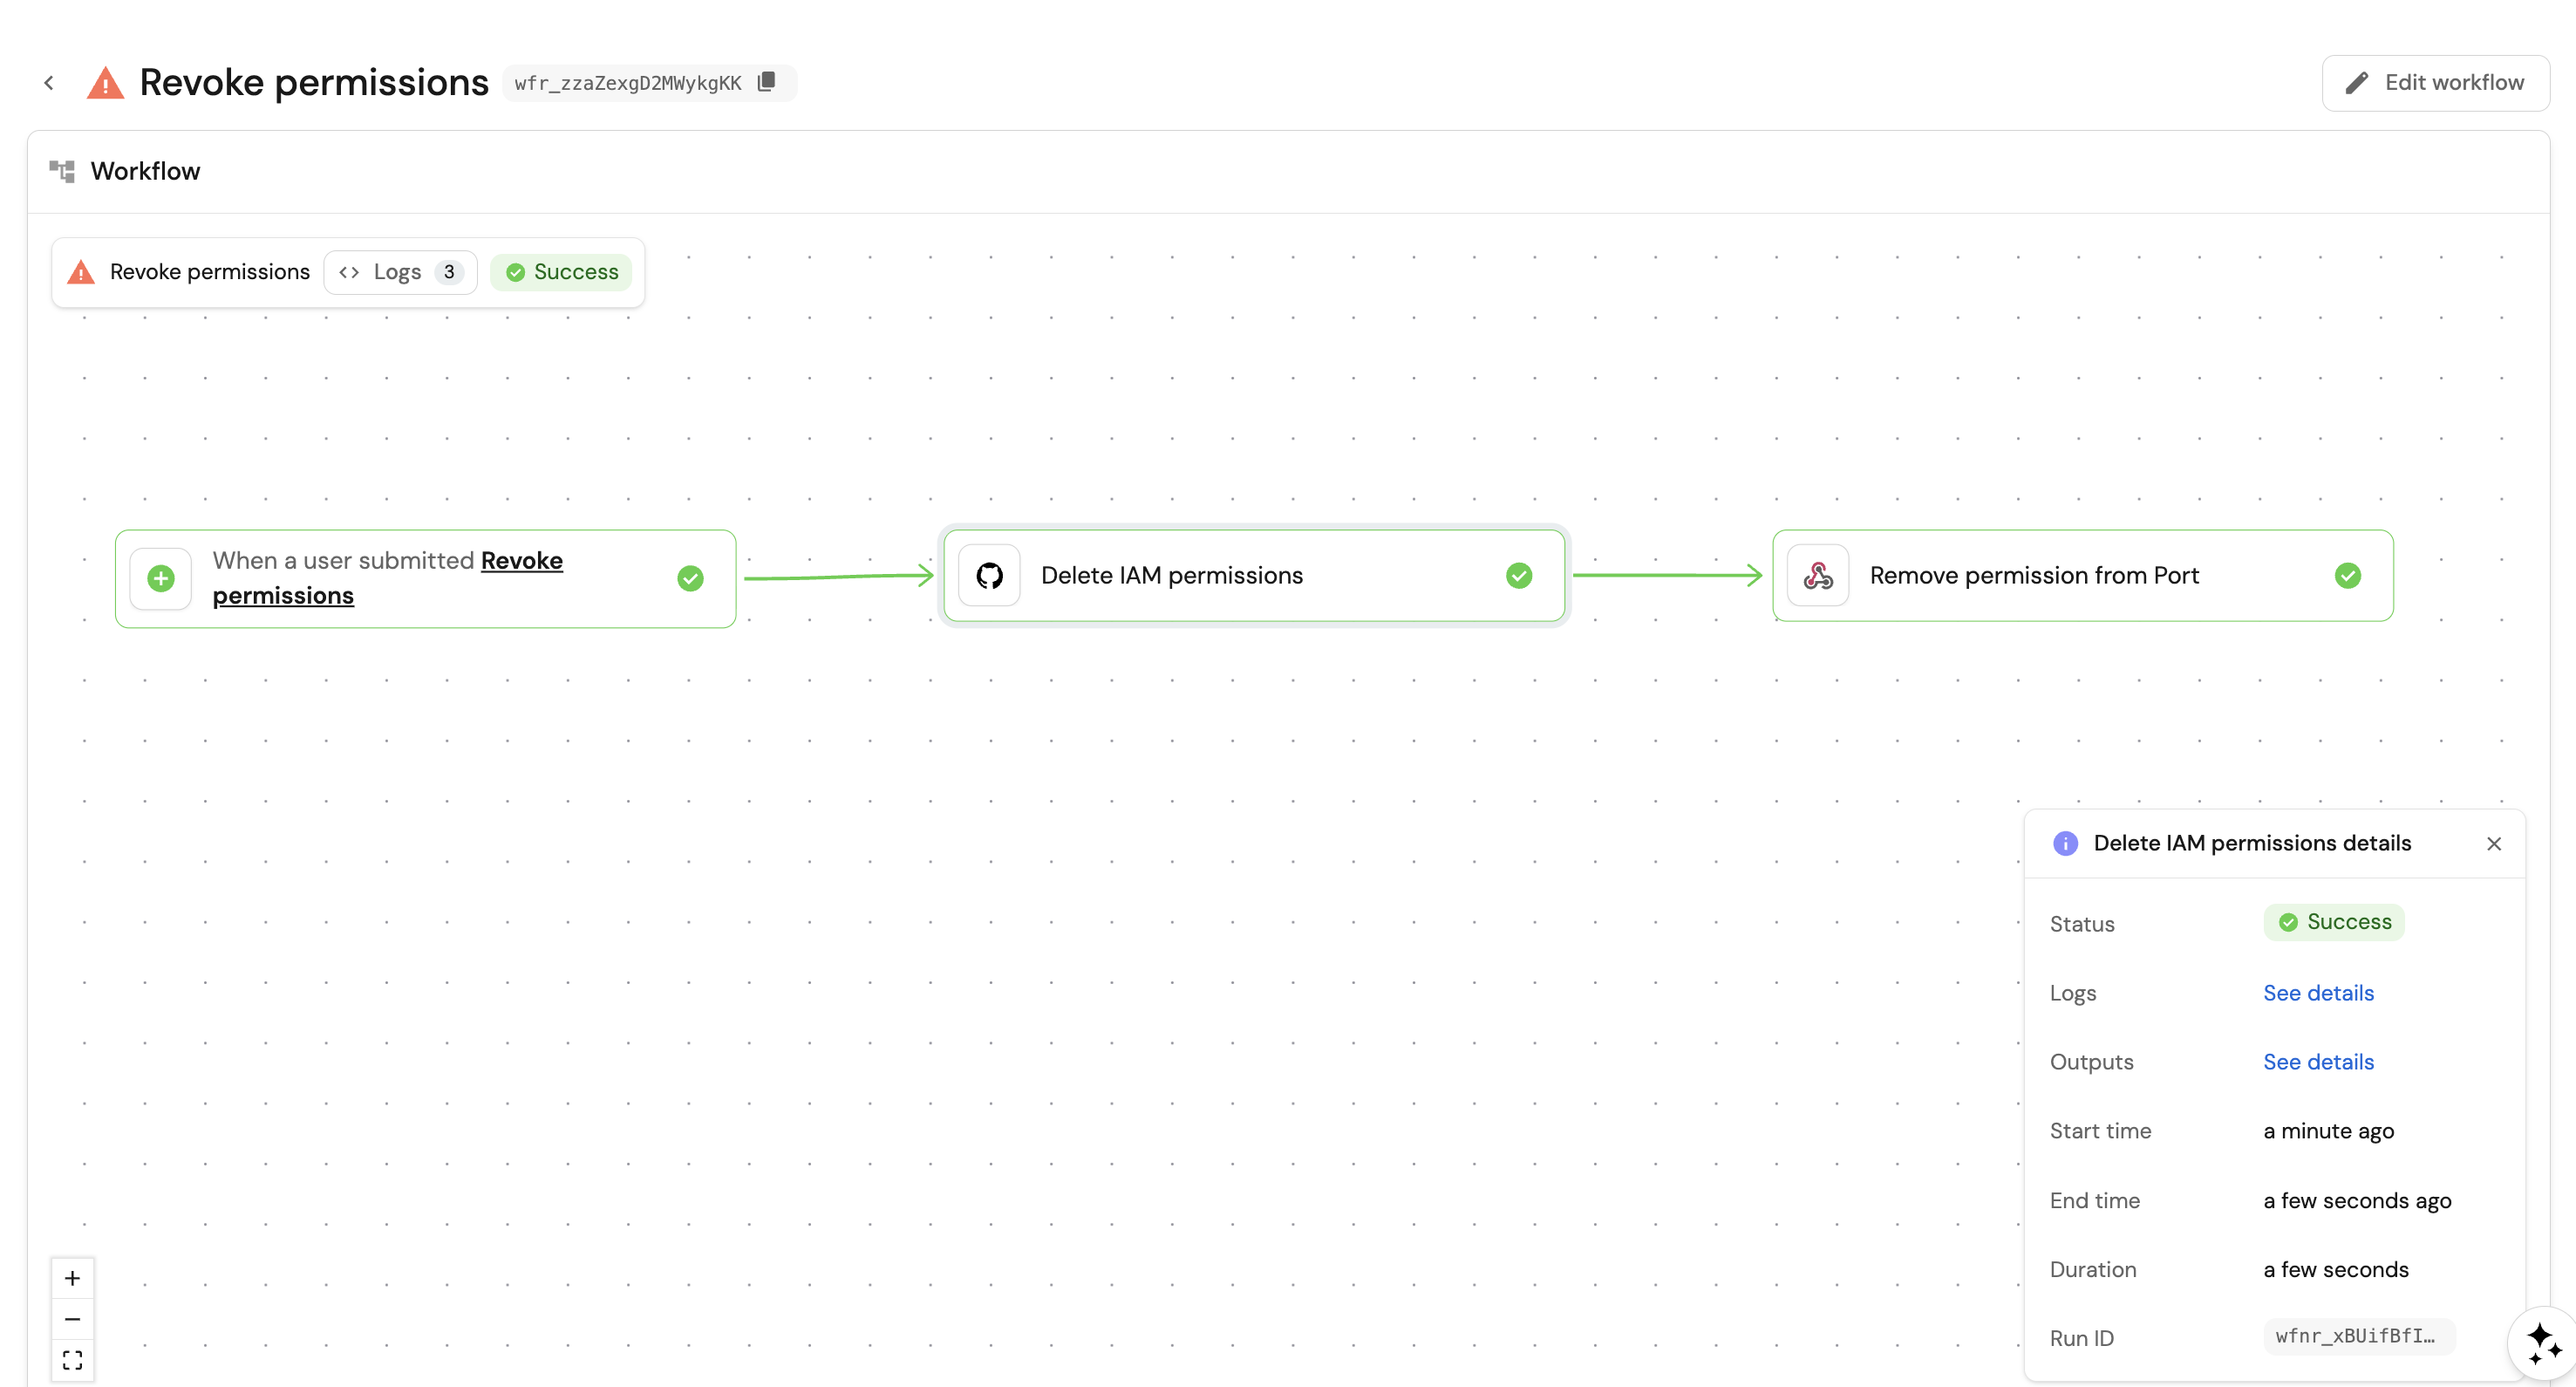
This will trigger a new workflow run which will appear in the workflow runs bar on the right. Click on the workflow run to access its details page.
Upon completion of the workflow run, the workflow removes the IAM role and policy from AWS and then removes the Provisioned Permissions entity generated during the permissions provisioning.
Attempting to use the previous sign-in URL again will demonstrate that the permission is no longer functional ❌.
Remove permissions automatically on expiry
Using an event trigger, you can run a workflow automatically in response to changes in your catalog.
For instance, your HR system can automatically trigger an event to revoke permissions via Port when an employee departs the company. In this guide, we will use the timer expired event to revoke permissions, ensuring temporary permissions expire as required by your security or compliance teams.
Note that the Provisioned Permissions blueprint we deployed earlier has a timer property to specify when a permission will expire.
"expiry_time": {
  "title": "Expiry Time",
  "icon": "DefaultProperty",
  "description": "When the provisioned permission will expire",
  "type": "string",
  "format": "timer"
  }
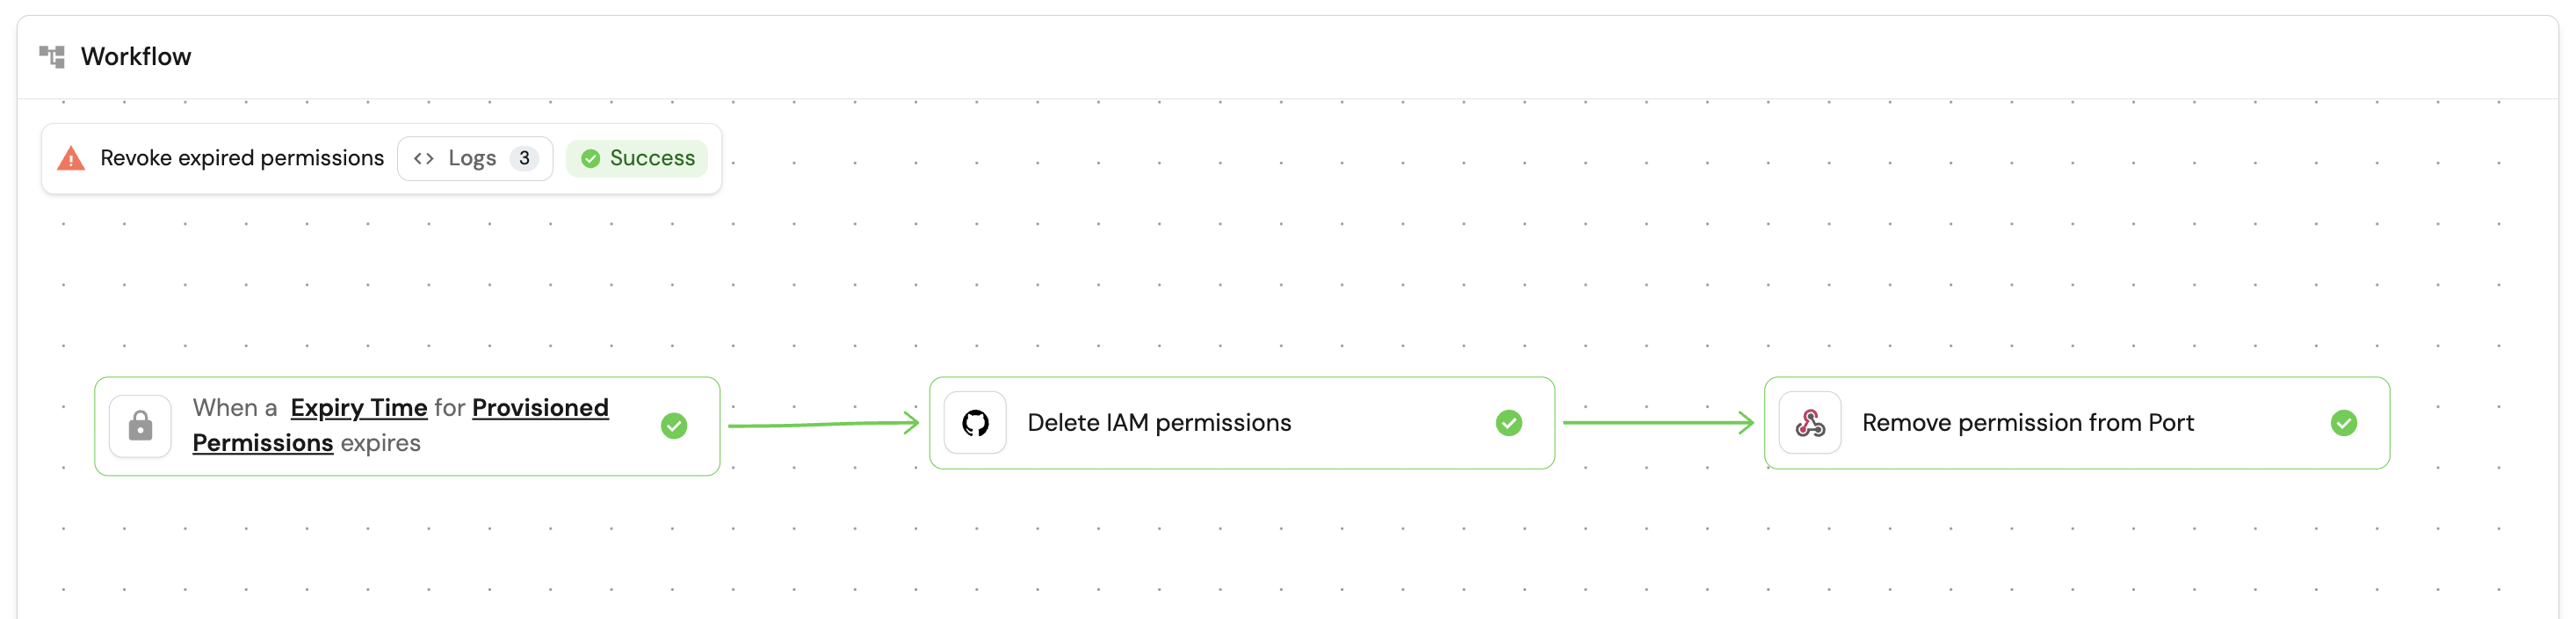
The workflow you will create uses a TIMER_EXPIRED event trigger on the expiry_time property. When the timer expires, it dispatches the Delete IAM permissions GitHub workflow and then removes the entity from Port, mirroring the manual revoke flow.
Create a workflow named Revoke expired permissions using the JSON below. Remember to replace the <YOUR_GITHUB_ORG> and <YOUR_GITHUB_OCEAN_INTEGRATION_ID> placeholders.
Revoke expired permissions workflow (click to expand)
{
  "identifier": "revoke_expired_permissions",
  "title": "Revoke expired permissions",
  "icon": "Alert",
  "description": "Automatically revoke provisioned permissions when their expiry timer expires",
  "nodes": [
    {
      "identifier": "trigger",
      "title": "On expiry timer expired",
      "config": {
        "type": "EVENT_TRIGGER",
        "event": {
          "type": "TIMER_EXPIRED",
          "blueprintIdentifier": "provisioned_permissions",
          "propertyIdentifier": "expiry_time"
        }
      }
    },
    {
      "identifier": "delete_permissions",
      "title": "Delete IAM permissions",
      "config": {
        "type": "INTEGRATION_ACTION",
        "installationId": "<YOUR_GITHUB_OCEAN_INTEGRATION_ID>",
        "integrationProvider": "github-ocean",
        "integrationInvocationType": "dispatch_workflow",
        "integrationActionExecutionProperties": {
          "org": "<YOUR_GITHUB_ORG>",
          "repo": "port-iam-permissions",
          "workflow": "delete-iam-permissions.yaml",
          "workflowInputs": {
            "role_name": "{{ .outputs.trigger.diff.after.identifier }}"
          },
          "reportWorkflowStatus": true
        }
      }
    },
    {
      "identifier": "remove_from_port",
      "title": "Remove permission from Port",
      "config": {
        "type": "WEBHOOK",
        "url": "https://api.port.io/v1/blueprints/provisioned_permissions/entities/{{ .outputs.trigger.diff.after.identifier }}",
        "method": "DELETE",
        "synchronized": true
      }
    }
  ],
  "connections": [
    {
      "sourceIdentifier": "trigger",
      "targetIdentifier": "delete_permissions"
    },
    {
      "sourceIdentifier": "delete_permissions",
      "targetIdentifier": "remove_from_port"
    }
  ]
}
Once the workflow is deployed, we will manually configure the expiry time for a provisioned permission through the Port UI. In a real-world scenario, this would typically be set programmatically based on your organization's permissions time-to-live policy or defined by the developer when requesting the permission.
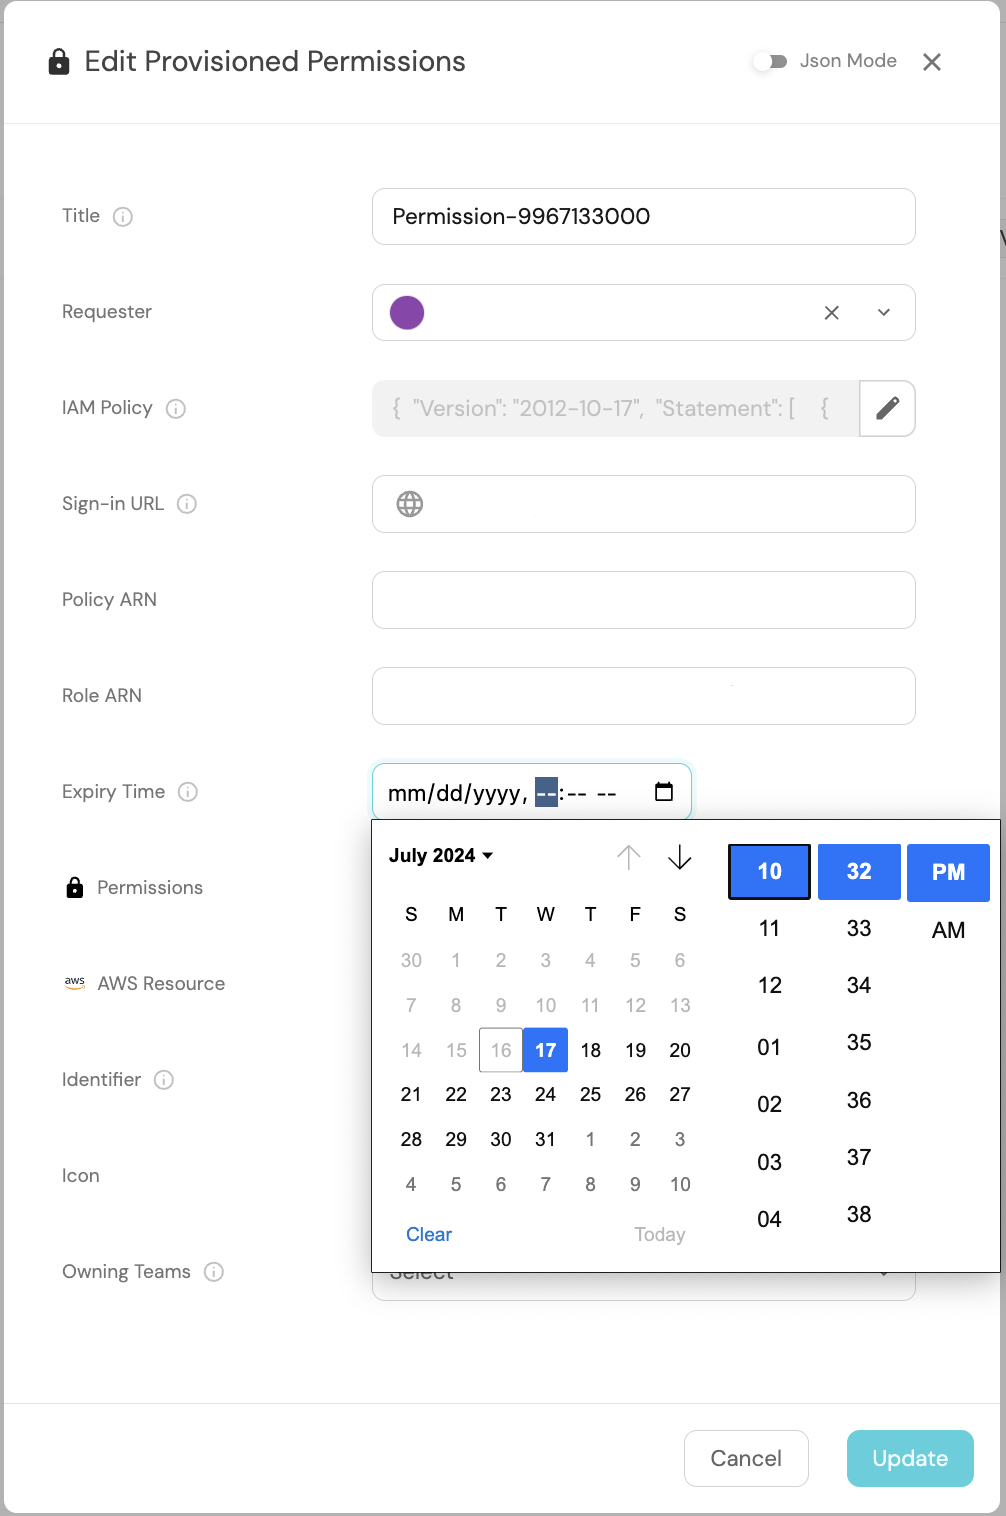
To proceed, run the Request permissions workflow on the S3 bucket entity created earlier, selecting s3:PutObject from the Permissions dropdown. Then, navigate to the Provisioned Permissions catalog page and set an expiry time five minutes into the future for the newly created entity.
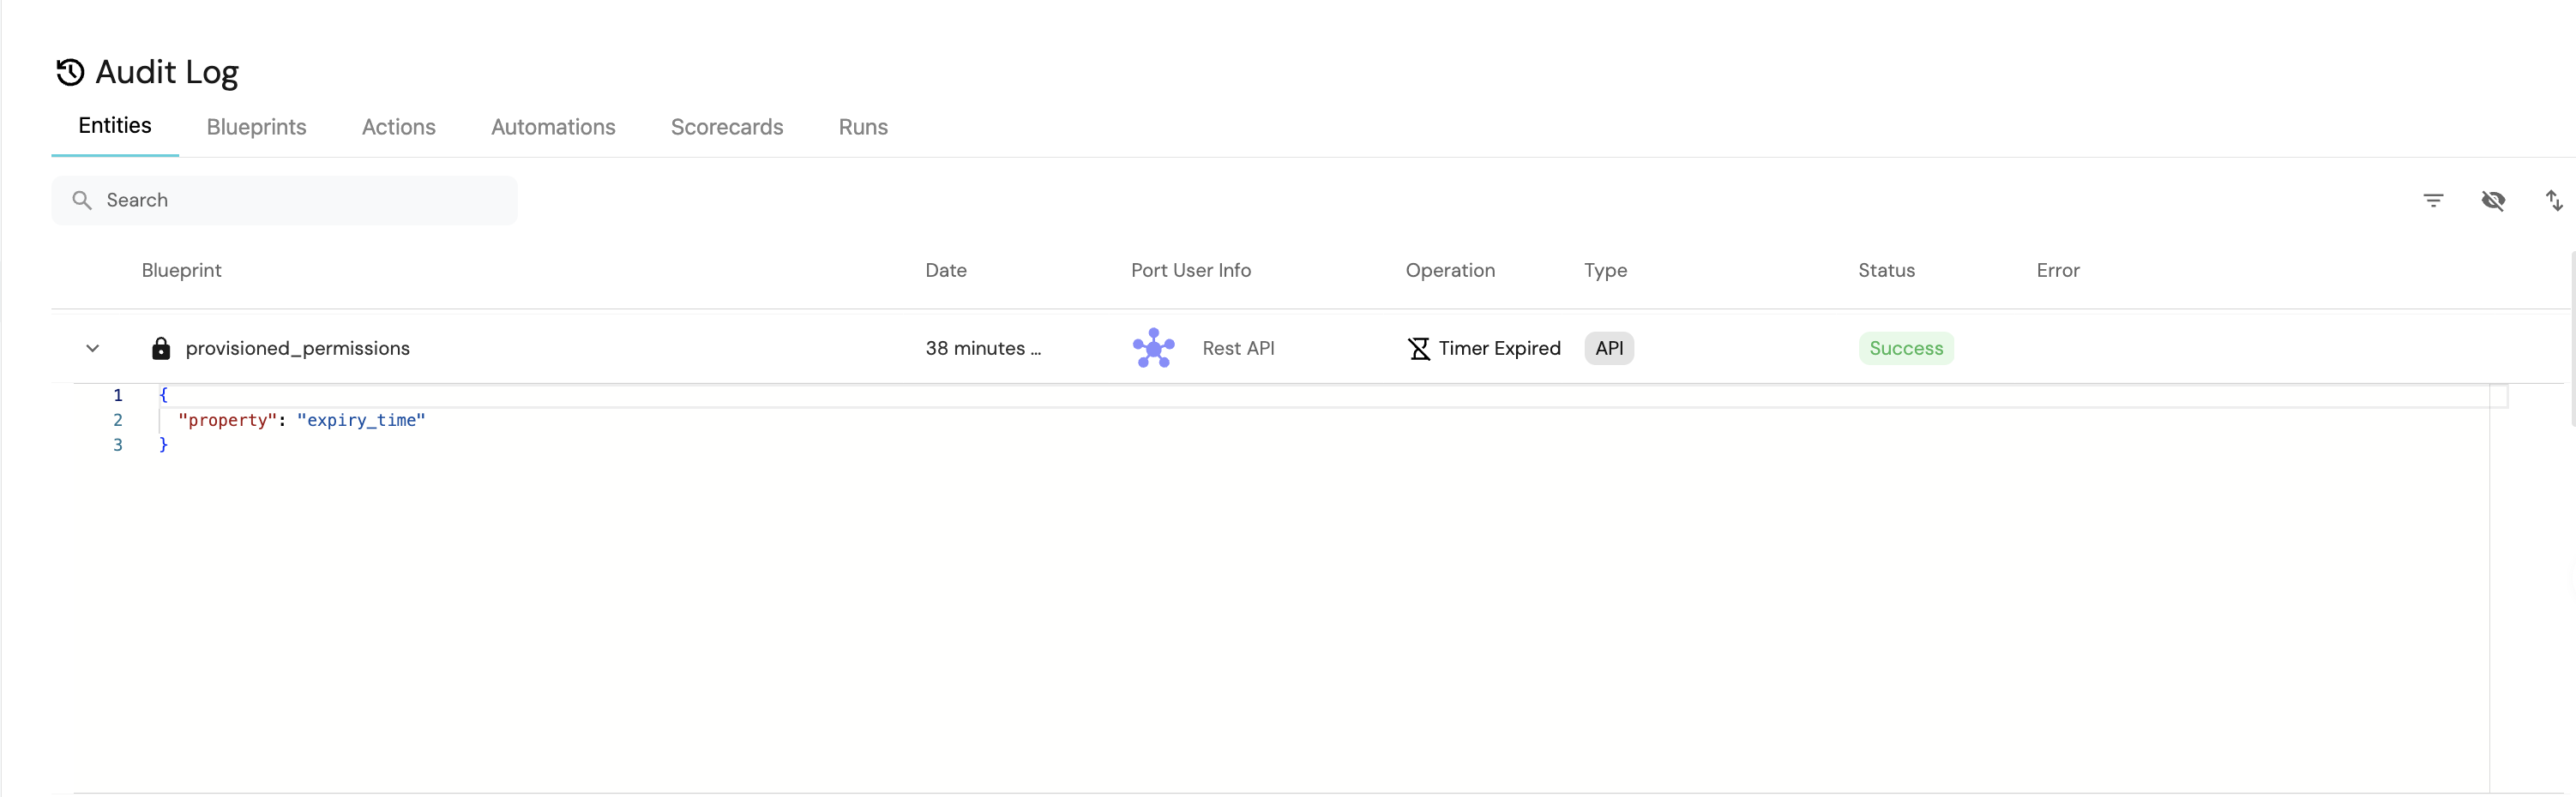
Next, navigate to the Data model page in Port, then go to the Audit Log tab on the left sidebar. After five minutes have elapsed, you should observe a Timer Expired event logged for a provisioned_permissions blueprint. This event is automatically generated by Port when the manually set expiry time for the Provisioned Permissions entity is reached.
Now, navigate to the Workflows page and open the run history for the Revoke expired permissions workflow. You should observe that the latest run completed successfully and the permission was deleted.
Summary
That concludes the setup for managing IAM permissions across your AWS resources using Port! 🚀
Feel free to explore further by adding additional IAM Permissions and AWS Resources entities. You can expand the range of resource types by adjusting the resource_type property within the IAM Permissions and AWS Resources blueprints.
Refer to the Next Steps section to discover how to enhance this guide further within your Port environment.
Next Steps
-
Install Port's AWS exporter: Utilize Port's AWS exporter to automatically populate your context lake with AWS resources from your environment. This tool enables you to populate your
AWS Resourcesblueprints with various AWS resources. -
Add permissions to your workflows: Gain control over provisioning and revoking permissions by restricting who can execute each workflow. This establishes a governed request flow for managing permissions using Port.