Prepare work items with AI
Send this guide to your coding agent.
Prerequisite: Install Port MCP
Open plan mode. Implement this Port guide in my org via MCP:

https://docs.port.io/guides/all/prepare-work-items-with-ai

Goal: get the guide's core flow working end-to-end in my org; adapting it to fit my existing setup takes priority over matching the guide 1:1.

Plan:
1. Confirm MCP is connected, in the right org, with sufficient permissions.
2. Diff the guide's data model (blueprints, properties, relations, actions, agents, automations, integrations, secrets) against mine.
3. Propose adaptations for gaps, reusing existing blueprints/relations over guide-named duplicates.
4. Flag what needs a UI click, credential, or secret from me, testing MCP capability empirically before ruling anything out.
5. Stop on any blocker and give me options. Approving this plan authorizes the writes it lists; pause only for writes beyond what's listed.

Build:
- Extend blueprint schema additively when upserting; don't remove or overwrite existing properties, and treat type conflicts as a blocker, not an auto-fix.
- List any mock data in the plan, minimal and labeled mock; once approved, seed it without re-asking, and tell me what you seeded.
- For anything the guide writes downstream (e.g. a webhook target), use a real entity, not a mock.
- For pages/widgets, use the real page identifier from the app URL, not a guessed slug.
- When you hit a UI step confirmed (not assumed) unsupported via MCP, pause, give exact clicks, then resume via MCP.
- Validate and give links after each meaningful step (only a tool-returned URL, no guessed paths); don't proceed if the last run wasn't a success.

Done:
- Confirm the guide's expected output exists and runs in Port.
- Summarize adaptations, seeded data, what was mocked or skipped, remaining UI steps, and how to verify.
This guide demonstrates how to use Port AI to enrich work items with catalog context, improve incomplete specifications, support human review, and route approved work to coding agents.
You can implement the workflows independently or combine them into an end-to-end preparation process:
| Workflow | Use it to |
|---|---|
| Enrich assigned Jira tasks | Give developers related issues, pull requests, and collaborator suggestions when work starts. |
| Prepare work items for review | Add structured AI recommendations, readiness signals, and an approval step to a reusable work item model. |
| Triage work for coding agents | Evaluate Jira tickets, require human approval, and route only ready work to a coding agent. |
Common use cases
- Reduce planning time by adding catalog and integration context to thin work items.
- Suggest relevant owners, collaborators, related issues, and pull requests.
- Identify missing requirements before developers or coding agents begin implementation.
- Add human approval before AI-generated changes update the source work item.
- Route only prioritized, approved, and assigned tickets to coding agents.
Prerequisites
This guide assumes the following:
- You have a Port account and have completed the onboarding process.
- You have configured the Jira integration for the Jira-specific workflows.
- You have configured Port's GitHub integration if you want the agent to use repository and pull request context.
- You have a blueprint that tracks tickets or work items. You can follow the work item blueprint pattern or extend the blueprint created by your project management integration.
- You have configured a coding agent such as Claude Code or GitHub Copilot if you want to route approved work for implementation.
The structured preparation workflow uses work_item, the contextual Jira enrichment workflow uses the integration-created jiraIssue blueprint, and the coding-agent triage example uses jira_ticket. Replace these identifiers in the examples if your blueprint uses a different identifier.
Enrich assigned Jira tasks with context
Use this workflow to give developers useful context as soon as a Jira task is assigned or moves to In Progress. The Task Assistant agent finds related issues, pull requests, and potential collaborators, then posts the results as a Jira comment.
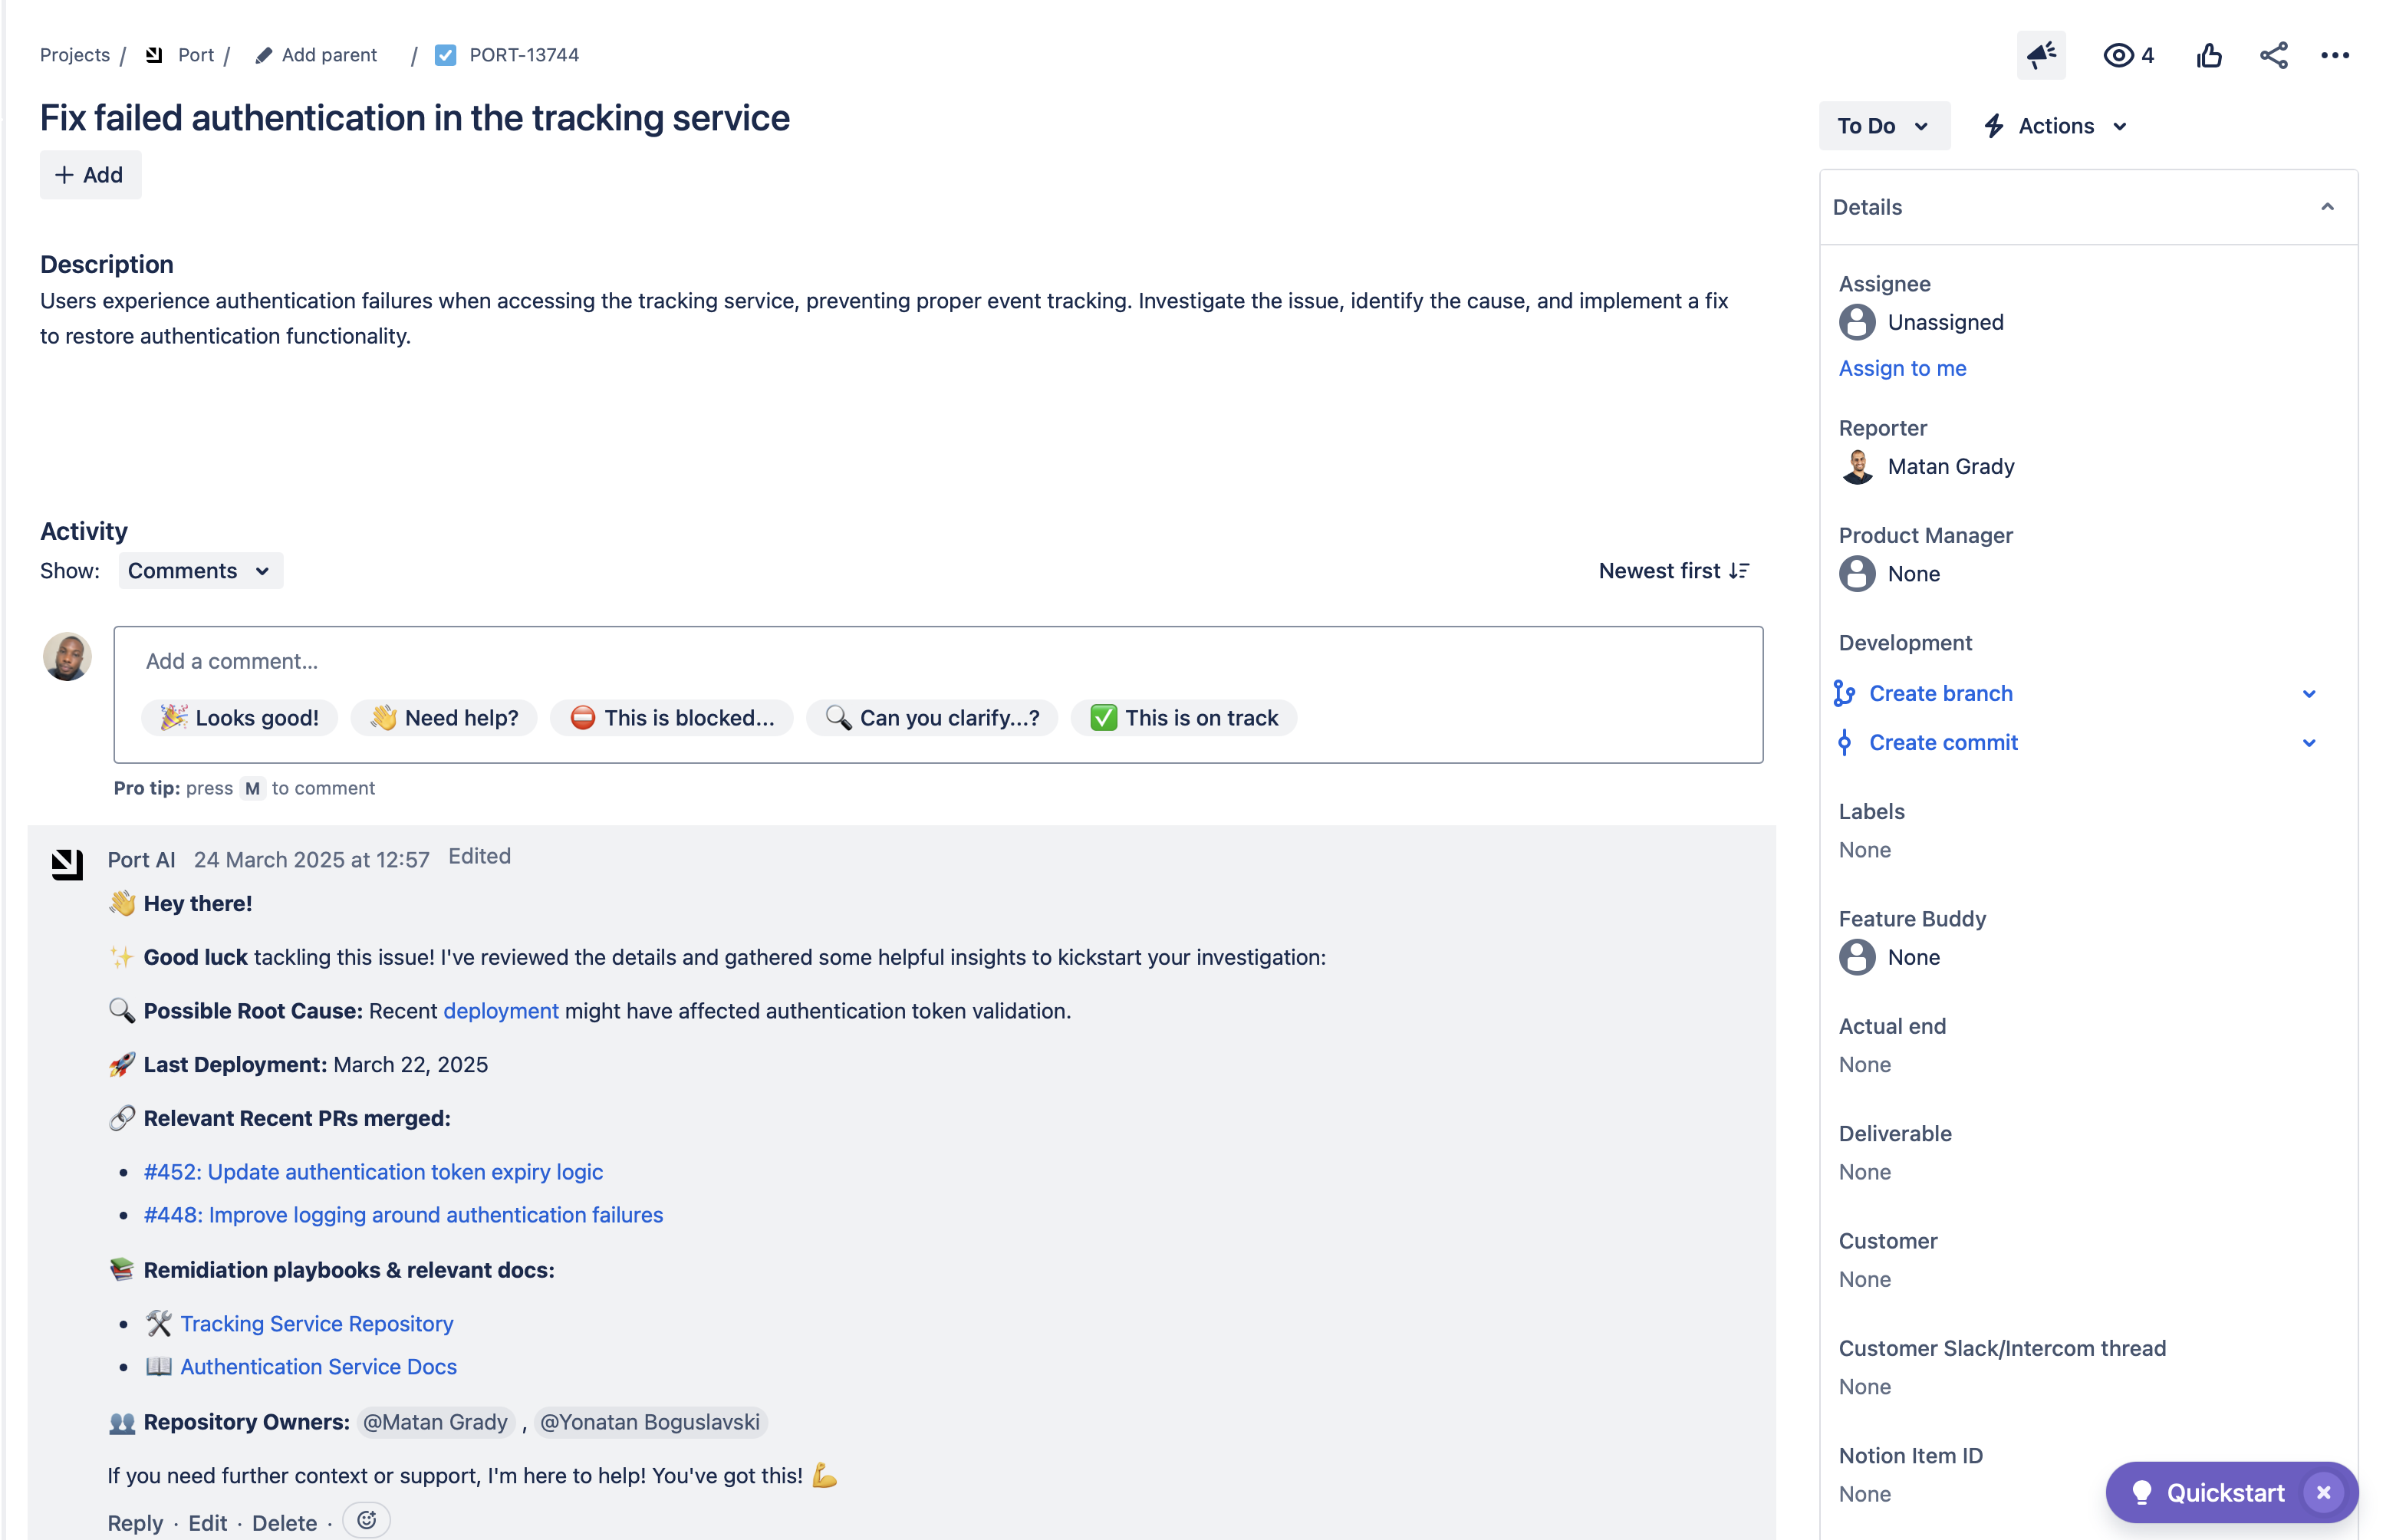
Configure data source access
This workflow uses Jira as its primary data source. The integration provides the task data that the Task Assistant AI agent analyzes.
Install the following integration to have access to these data sources:
- Port's Jira integration for projects, tasks and issues.
While this workflow uses Jira, you can adapt it to tools such as GitHub or ServiceNow.
Create the task assistant AI agent
-
Go to the AI agents page.
-
Click on
+ AI Agent. -
Toggle
Json modeon. -
Copy and paste the following JSON schema:
Task Assistant AI agent configuration (Click to expand)
{"identifier": "task_assistant_ai_agent","title": "Clarity AI","icon": "Details","team": [],"properties": {"description": "Automatically enriches Jira tasks with relevant context when developers start working on them","status": "active","prompt": "# Task\nUse the \"comment_on_jira_issue\" action, automatically send a greeting using their first name and explain this is an automatic message. Then share three sections with emojis for helpful context.\n\n## Message Format\nHey there [First Name], it's Clarity :crystal_ball: - the Port AI agent!\nI noticed you just started working on a new task: [link to assigned issue].\nHere's some context to help you get started :blobdance:\n\n:male-technologist: Devs who might have input:\nList up to 3 developers (excluding the user), explain briefly why each is relevant. If none, write a meaningful explanation.\n\n:jira: Similar Tasks:\nList up to 3 Jira issues (not assigned to the user), mention the assigned person and why it's relevant. If none, explain why.\n\n:github_on_fire: Similar Pull Requests:\nList up to 3 pull requests in statuses \"open\" or \"merged\", mention the creator and why it's relevant. If none, explain why.\n\n## Guidelines\n- Each section can have fewer than 3 items. Always explain\n","execution_mode": "Automatic","tools": ["^(list|search|track|describe)_.*","^run_comment_on_jira_issue$"]},"relations": {}}MCP enhanced capabilitiesThe AI agent uses MCP (Model Context Protocol) enhanced capabilities to automatically discover important and relevant blueprint entities via its tools. The
^(list|search|track|describe)_.*pattern allows the agent to access and analyze related entities in your software catalog, providing richer context for task enrichment. Additionally, we allow the corresponding self-service action in the agent's Allowed Actions input (or include^run_comment_on_jira_issue$in thetoolslist in Advanced mode (regex)), which instructs the AI agent to call this specific action to comment on Jira issues with contextual information. -
Click Create to save the agent.
Create the task enrichment automation
Now that we have created the Task Assistant AI agent, we need to set up an automation that will be triggered automatically whenever a task is assigned or the status is changed to "In Progress".
Follow the steps below to set up the automation:
-
Go to the Automations page of your portal.
-
Click on the
+ Automationbutton. -
Copy and paste the following JSON schema:
Send context to task assignee automation (Click to expand)
{"identifier": "send_context_to_task_assignee","title": "Send context to task assignee","description": "Triggers on Jira task status change to In Progress or assignee","trigger": {"type": "automation","event": {"type": "ENTITY_UPDATED","blueprintIdentifier": "jiraIssue"},"condition": {"type": "JQ","expressions": [".diff.after.relations.assignee != null",".diff.after.properties.status == \"In Progress\"",".diff.before.properties.status == \"To Do\" or .diff.before.relations.assignee != .diff.after.relations.assignee"],"combinator": "and"}},"invocationMethod": {"type": "WEBHOOK","url": "https://api.port.io/v1/agent/task_assistant_ai_agent/invoke","synchronized": true,"body": {"prompt": "User's email: \"{{.event.diff.after.relations.assignee}}\" . Task title: \"{{.event.diff.after.title}}\". Task identifier: \"{{.event.diff.after.identifier}}\".","labels": {"source": "Automation"}}},"publish": true} -
Click Save to create the automation.
Set up self-service action
The value {{cloudId}} in the URL is your Jira cloud ID. If you have a Create a Jira issue action, you can copy the ID from its URL. Otherwise, follow Atlassian's instructions to retrieve your Jira cloud ID.
Create a self-service action that lets the agent or a user comment on Jira issues from Port.
-
Go to the Self-service page of your portal.
-
Click on the
+ New Actionbutton. -
Click on the
{...} Edit JSONbutton. -
Copy and paste the following JSON configuration into the editor:
Comment on Jira issue action (Click to expand)
{"identifier": "comment_on_jira_issue","title": "Comment on a Jira issue","icon": "Jira","description": "Comments on an existing Jira issue","trigger": {"type": "self-service","operation": "DAY-2","userInputs": {"properties": {"assignee": {"title": "Assignee","icon": "DefaultProperty","type": "string","blueprint": "_user","format": "entity","dataset": {"combinator": "and","rules": [{"property": "jira_user_id","operator": "isNotEmpty"}]}},"comment": {"title": "Comment","icon": "DefaultProperty","type": "string","format": "markdown"}},"required": [],"order": ["comment","assignee"]},"blueprintIdentifier": "jiraIssue"},"invocationMethod": {"type": "WEBHOOK","url": "https://api.atlassian.com/ex/jira/{{cloudId}}/rest/api/3/issue/{{ .entity.identifier }}/comment","agent": false,"synchronized": true,"method": "POST","headers": {"Authorization": "Bearer {{ .secrets.__JIRA_JIRA_ATLASSIAN_USER_TOKEN }}","Content-Type": "application/json"},"body": {"body": {"content": [{"content": [{"text": "{{ .inputs.comment }}","type": "text"}],"type": "paragraph"}],"type": "doc","version": 1},"visibility": {"identifier": "Administrators","type": "role","value": "Administrators"}}},"requiredApproval": false} -
Click Save to create the action.
Test task enrichment
-
Assign a Jira issue to a user who is mapped to a Port user.
-
Move the issue from To Do to In Progress.
-
Confirm that the automation invokes the Task Assistant agent.
-
Verify that the agent adds a Jira comment with relevant collaborators, similar issues, and related pull requests.
Prepare structured work items for human review
Use this workflow when you maintain a reusable work_item blueprint and want AI to enrich descriptions, recommend ownership and priority, evaluate readiness, and wait for human approval before applying suggestions.
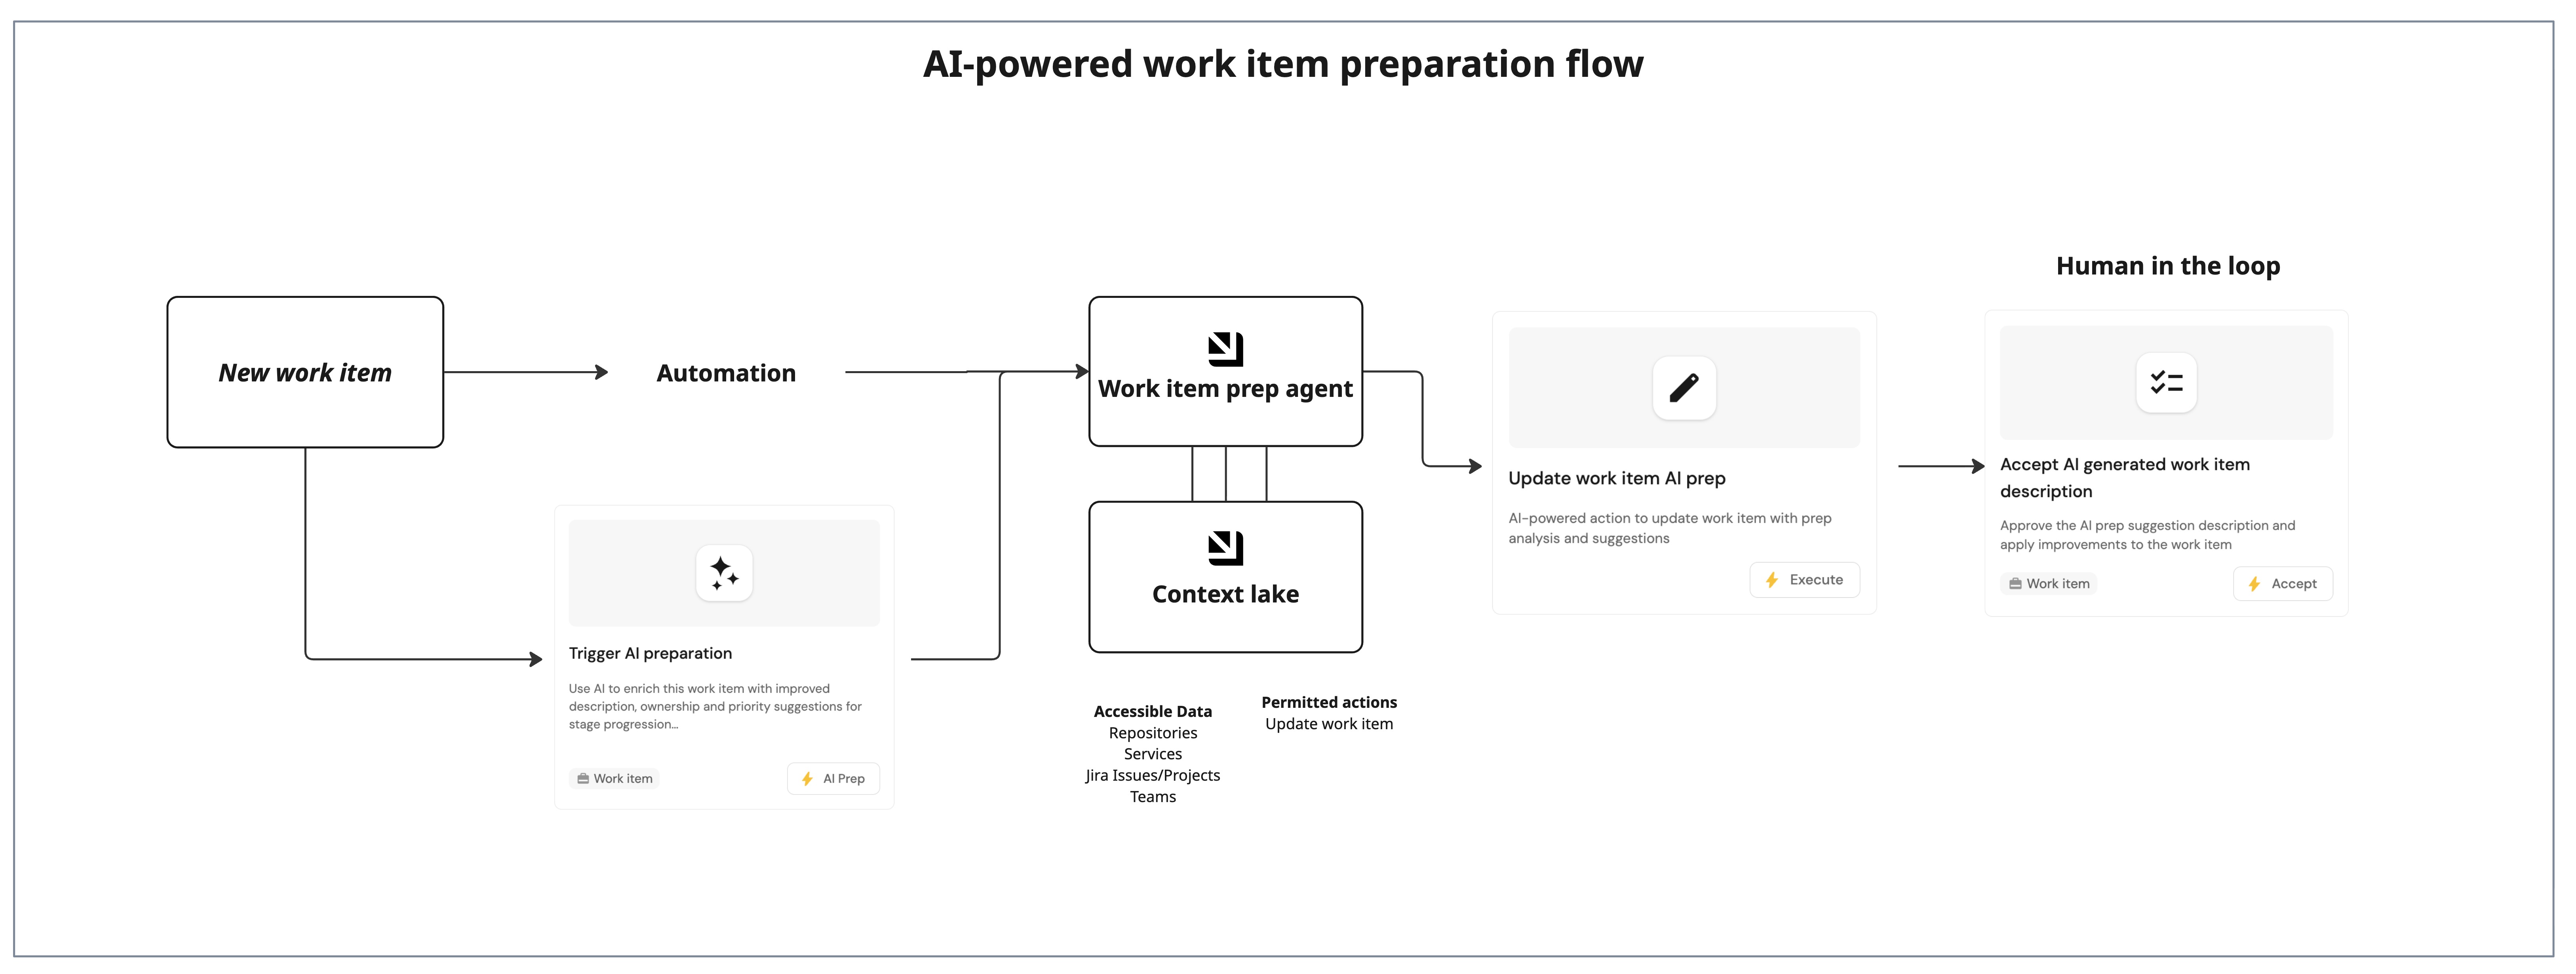
Update the work item data model
You will update the Work Item blueprint to store AI prep output and status.
Add AI preparation properties
-
Go to the builder page of your portal.
-
Find the
Work Itemblueprint. -
Click on
{...} Edit JSON. -
Add the following properties to the
propertiessection:AI prep properties (Click to expand)
{"ai_prep_confidence_score": {"title": "AI Prep Confidence Score","description": "AI assessment confidence level (0-100) for readiness to proceed to next stage","type": "number"},"ai_suggested_description": {"title": "AI Suggested Description","description": "AI-generated suggestions for improving the work item description and context","type": "string","format": "markdown"},"ai_prep_status": {"icon": "DefaultProperty","title": "AI Prep Status","description": "Current stage of AI prep assessment","type": "string","default": "Not started","enum": ["Not started","In review","Awaiting approval","Approved"],"enumColors": {"Not started": "lightGray","In review": "yellow","Awaiting approval": "orange","Approved": "green"}},"ai_prep_notes": {"title": "AI Prep Notes","description": "Additional notes and recommendations from the AI prep agent","type": "string","format": "markdown"}} -
Click Save to update the blueprint.
Create the work item preparation AI agent
You will create an agent that evaluates work items, enriches descriptions, and writes back recommendations for stage progression.
-
Go to the AI agents page of your portal.
-
Click on
+ AI Agent. -
Click on the
{...} Edit JSONbutton. -
Copy and paste the following JSON configuration into the editor:
Work item prep agent (Click to expand)
Note that the following agent prompt is a recommended starting point and can be fully customized to fit your organization's requirements. Feel free to adjust the scope, language, formatting, or additional instructions as needed.
{"identifier": "work_item_prep_agent","title": "Work Item Prep Agent","icon": "AI","team": [],"properties": {"description": "An agent that evaluates work items and suggests improvements to help them meet scorecard requirements for stage progression (Draft → Triaged → Ready for dev)","status": "active","prompt": "Your task is to evaluate and improve work items to help them progress through stages (Draft → Prepped → Ready for dev). **Always enhance the work item description** with context from related entities.\n\n## Steps\n1. **Gather work item context:** Get the `work_item` entity by ID. Analyze properties, relations, and scorecard level.\n2. **Gather related entity context:** Retrieve linked entities and extract details:\n - Jira Ticket: description, status, assignee, labels\n - Service: README, tier, domain, lifecycle, dependencies\n - Repository: README, code structure\n - Team: members, responsibilities\n - Owner: user details\n - Pull Request: status, description, reviewers\n3. **Enhance description (ALWAYS):** Enrich description using:\n - Jira ticket description and details\n - Service README and architecture\n - Repository structure and codebase context\n - Related PR descriptions\n - Team knowledge and domain context\n Add technical context, requirements, implementation considerations, and relevant links. Make it comprehensive and actionable.\n4. **Evaluate scorecard requirements:**\n Draft → Prepped: Owner relation, priority, AI augmentation level, prepped at timestamp set.\n Prepped → Ready for dev: Plan approved (plan_approved = true), pull request relation set.\n5. **Identify gaps and suggest a solution:** \n - Missing owner: based on team or service owners\n - Missing priority: based on work_type, service tier, Jira priority\n - Missing AI level: based on work complexity\n - Missing plan approval: check if description is complete enough for approval\n6. **Score (0–100):** 0-40: Missing critical requirements; 41-70: Needs enrichment; 71-89: Minor improvements; 90-100: Ready\n7. **Assign status:** \"Awaiting approval\" - significant changes; \"Approved\" - ready; \"In review\" - analyzing\n\n### Response Rules\n1. ALWAYS call `update_work_item_ai_prep` action with properties: `work_item_id`, `ai_prep_confidence_score`, and `ai_prep_status`.\n2. **ALWAYS provide enriched `ai_suggested_description`** - enhance description even if original seems complete. This is a core function of the agent.\n3. In `ai_prep_notes`, provide specific recommendations: what relations need to be set (owner, team, service), what properties need values (priority, ai_augmentation_level), what context was added to the description and why, references to related entities, scorecard evaluations\n4. Be concise, data-grounded, specific about found vs. missing info\n","execution_mode": "Automatic","tools": ["^(list|get|search|track|describe|update)_.*","^run_update_work_item_ai_prep$"]},"relations": {}}How the agent uses toolsThe AI agent uses MCP (Model Context Protocol) enhanced capabilities to discover relevant blueprint entities through its tools. The
^(list|get|search|track|describe|update)_.*pattern lets the agent access and analyze related entities in your software catalog, which gives it richer context. You can allow the corresponding self-service action in the agent's Allowed Actions input (or include^run_update_work_item_ai_prep$in thetoolslist in Advanced mode (regex)) to instruct the agent to call this specific action and update the work item with the AI analysis. Therun_prefix marks which self-service actions the agent is allowed to execute. -
Click Create to save the agent.
Set up self-service action
You will create three self-service actions that work together: one triggers AI prep (user-facing), one saves results (AI-facing tool), and one applies the approved suggestions.
Trigger AI preparation
-
Go to the Self-service page of your portal.
-
Click on the
+ New Actionbutton. -
Click on the
{...} Edit JSONbutton. -
Copy and paste the following JSON configuration into the editor:
Trigger AI prep action (Click to expand)
{"identifier": "trigger_ai_prep_work_item","title": "Trigger AI preparation","icon": "AI","description": "Use AI to enrich this work item with improved description, ownership and priority suggestions for stage progression","trigger": {"type": "self-service","operation": "DAY-2","userInputs": {"properties": {"instructions": {"type": "string","title": "Additional Instructions","description": "Additional instructions or focus areas for the AI agent","icon": "DefaultProperty","format": "multi-line"}},"required": [],"order": ["instructions"]},"actionCardButtonText": "AI Prep","executeActionButtonText": "Analyze with AI","condition": {"type": "SEARCH","rules": [{"property": "prepped_at","operator": "isEmpty"}],"combinator": "and"},"blueprintIdentifier": "work_item"},"invocationMethod": {"type": "WEBHOOK","url": "https://api.port.io/v1/agent/work_item_prep_agent/invoke","agent": false,"synchronized": true,"method": "POST","headers": {"RUN_ID": "{{ .run.id }}","Content-Type": "application/json"},"body": {"prompt": "Work Item Information:\n\nWork Item ID: {{.entity.identifier}}\nWork Item Title: {{.entity.title}}\nWork Item Description: {{.entity.properties.description}}\n\nCurrent Properties:\n- Priority: {{.entity.properties.priority}}\n- Work Type: {{.entity.properties.work_type}}\n- AI Augmentation Level: {{.entity.properties.ai_augmentation_level}}\n- Plan Approved: {{.entity.properties.plan_approved}}\n- Prep Status: {{.entity.properties.ai_prep_status}}\n\nRelated Entities (for context):\n- Jira Ticket: {{.entity.relations.jira_ticket}}\n- Service: {{.entity.relations.service}}\n- Team: {{.entity.relations.team}}\n- Owner: {{.entity.relations.owner}}\n- Repository: {{.entity.relations.repository}}\n- Pull Request: {{.entity.relations.pull_request}}\n\nAdditional instructions: {{.inputs.instructions}}","labels": {"source": "ai_prep_work_item_ssa","work_item_id": "{{.entity.identifier}}"}}},"allowAnyoneToViewRuns": true} -
Click Save to create the action.
Save AI preparation results
-
Go to the Self-service page of your portal.
-
Click on the
+ New Actionbutton. -
Click on the
{...} Edit JSONbutton. -
Copy and paste the following JSON configuration into the editor:
Update work item AI prep action (Click to expand)
{"identifier": "update_work_item_ai_prep","title": "Update work item AI prep","icon": "Edit","description": "AI-powered action to update work item with prep analysis and suggestions","trigger": {"type": "self-service","operation": "DAY-2","userInputs": {"properties": {"work_item_id": {"icon": "DefaultProperty","title": "Work Item Identifier","type": "string","description": "The identifier of the work item to update"},"ai_suggested_description": {"type": "string","title": "AI Suggested Description","format": "markdown"},"ai_prep_confidence_score": {"type": "number","title": "AI Prep Confidence Score","description": "The estimated confidence score for work item readiness (0-100)","minimum": 0,"maximum": 100},"ai_prep_status": {"type": "string","title": "AI Prep Status","enum": ["Not started","In review","Awaiting approval","Approved"],"enumColors": {"Not started": "lightGray","In review": "yellow","Awaiting approval": "orange","Approved": "green"}},"ai_prep_notes": {"type": "string","title": "AI Prep Notes","description": "Additional notes and recommendations from the prep agent","format": "markdown"}},"required": ["ai_suggested_description","ai_prep_status","ai_prep_confidence_score","ai_prep_notes","work_item_id"],"order": ["work_item_id","ai_suggested_description","ai_prep_confidence_score","ai_prep_status","ai_prep_notes"],"titles": {}}},"invocationMethod": {"type": "UPSERT_ENTITY","blueprintIdentifier": "work_item","mapping": {"identifier": "{{ .inputs.work_item_id }}","properties": {"ai_suggested_description": "{{ .inputs.ai_suggested_description }}","ai_prep_confidence_score": "{{ .inputs.ai_prep_confidence_score }}","ai_prep_status": "{{ .inputs.ai_prep_status }}","ai_prep_notes": "{{ .inputs.ai_prep_notes }}"}}},"requiredApproval": false} -
Click Save to create the action.
Approve AI preparation suggestions
-
Go to the Self-service page of your portal.
-
Click on the
+ New Actionbutton. -
Click on the
{...} Edit JSONbutton. -
Copy and paste the following JSON configuration into the editor:
Approve AI prep suggestions action (Click to expand)
{"identifier": "approve_ai_prep_suggestions","title": "Approve AI prep suggestions","icon": "Checklist","description": "Approve the AI prep suggestion description and apply improvements to the work item","trigger": {"type": "self-service","operation": "DAY-2","userInputs": {"properties": {"apply_description": {"type": "boolean","title": "Apply Suggested Description","description": "Replace work item description with AI-suggested description","default": true}},"required": [],"order": ["apply_description"]},"actionCardButtonText": "Accept","executeActionButtonText": "Accept","condition": {"type": "SEARCH","combinator": "and","rules": [{"property": "ai_prep_status","operator": "=","value": "Awaiting approval"}]},"blueprintIdentifier": "work_item"},"invocationMethod": {"type": "UPSERT_ENTITY","blueprintIdentifier": "work_item","mapping": {"identifier": "{{ .entity.identifier }}","properties": {"description": "{{ if .inputs.apply_description }}{{ .entity.properties.ai_suggested_description }}{{ else }}{{ .entity.properties.description }}{{ end }}","ai_prep_status": "Approved","prepped_at": "{{ now | todateiso8601 }}"}}},"requiredApproval": false} -
Click Save to create the action.
The condition ensures this action only appears when ai_prep_status is Awaiting approval.
Add the preparation entity page widgets
You will add a dedicated Prep & Plan tab to the work item entity page and display AI prep output there.
-
Go to the software catalog page in your portal.
-
Select the
Work Itementity page. -
Add a new tab named Prep & Plan.
-
Add an Action card for Trigger AI preparation and Approve AI prep suggestions.
-
Add two Markdown widgets. Configure the first widget with the title AI suggested description, the description AI-generated description and context for this work item. Run Trigger AI preparation to generate, and the AI Suggested Description property as its data source.
Configure the second widget with the title AI prep notes, the description AI recommendations, missing context, and scorecard readiness signals, and the AI Prep Notes property as its data source.
Test work item preparation
-
Open a
Work Itemin Draft stage with a Jira ticket relation. -
Run Trigger AI preparation.
-
Confirm the agent updates AI prep properties and writes an enriched description.
-
Debug the run from the AI invocations page to review execution logs, tool calls, and failures.
-
Review the suggested description and run Approve AI prep suggestions.
-
Check the Prep & Plan tab for the latest AI prep output.
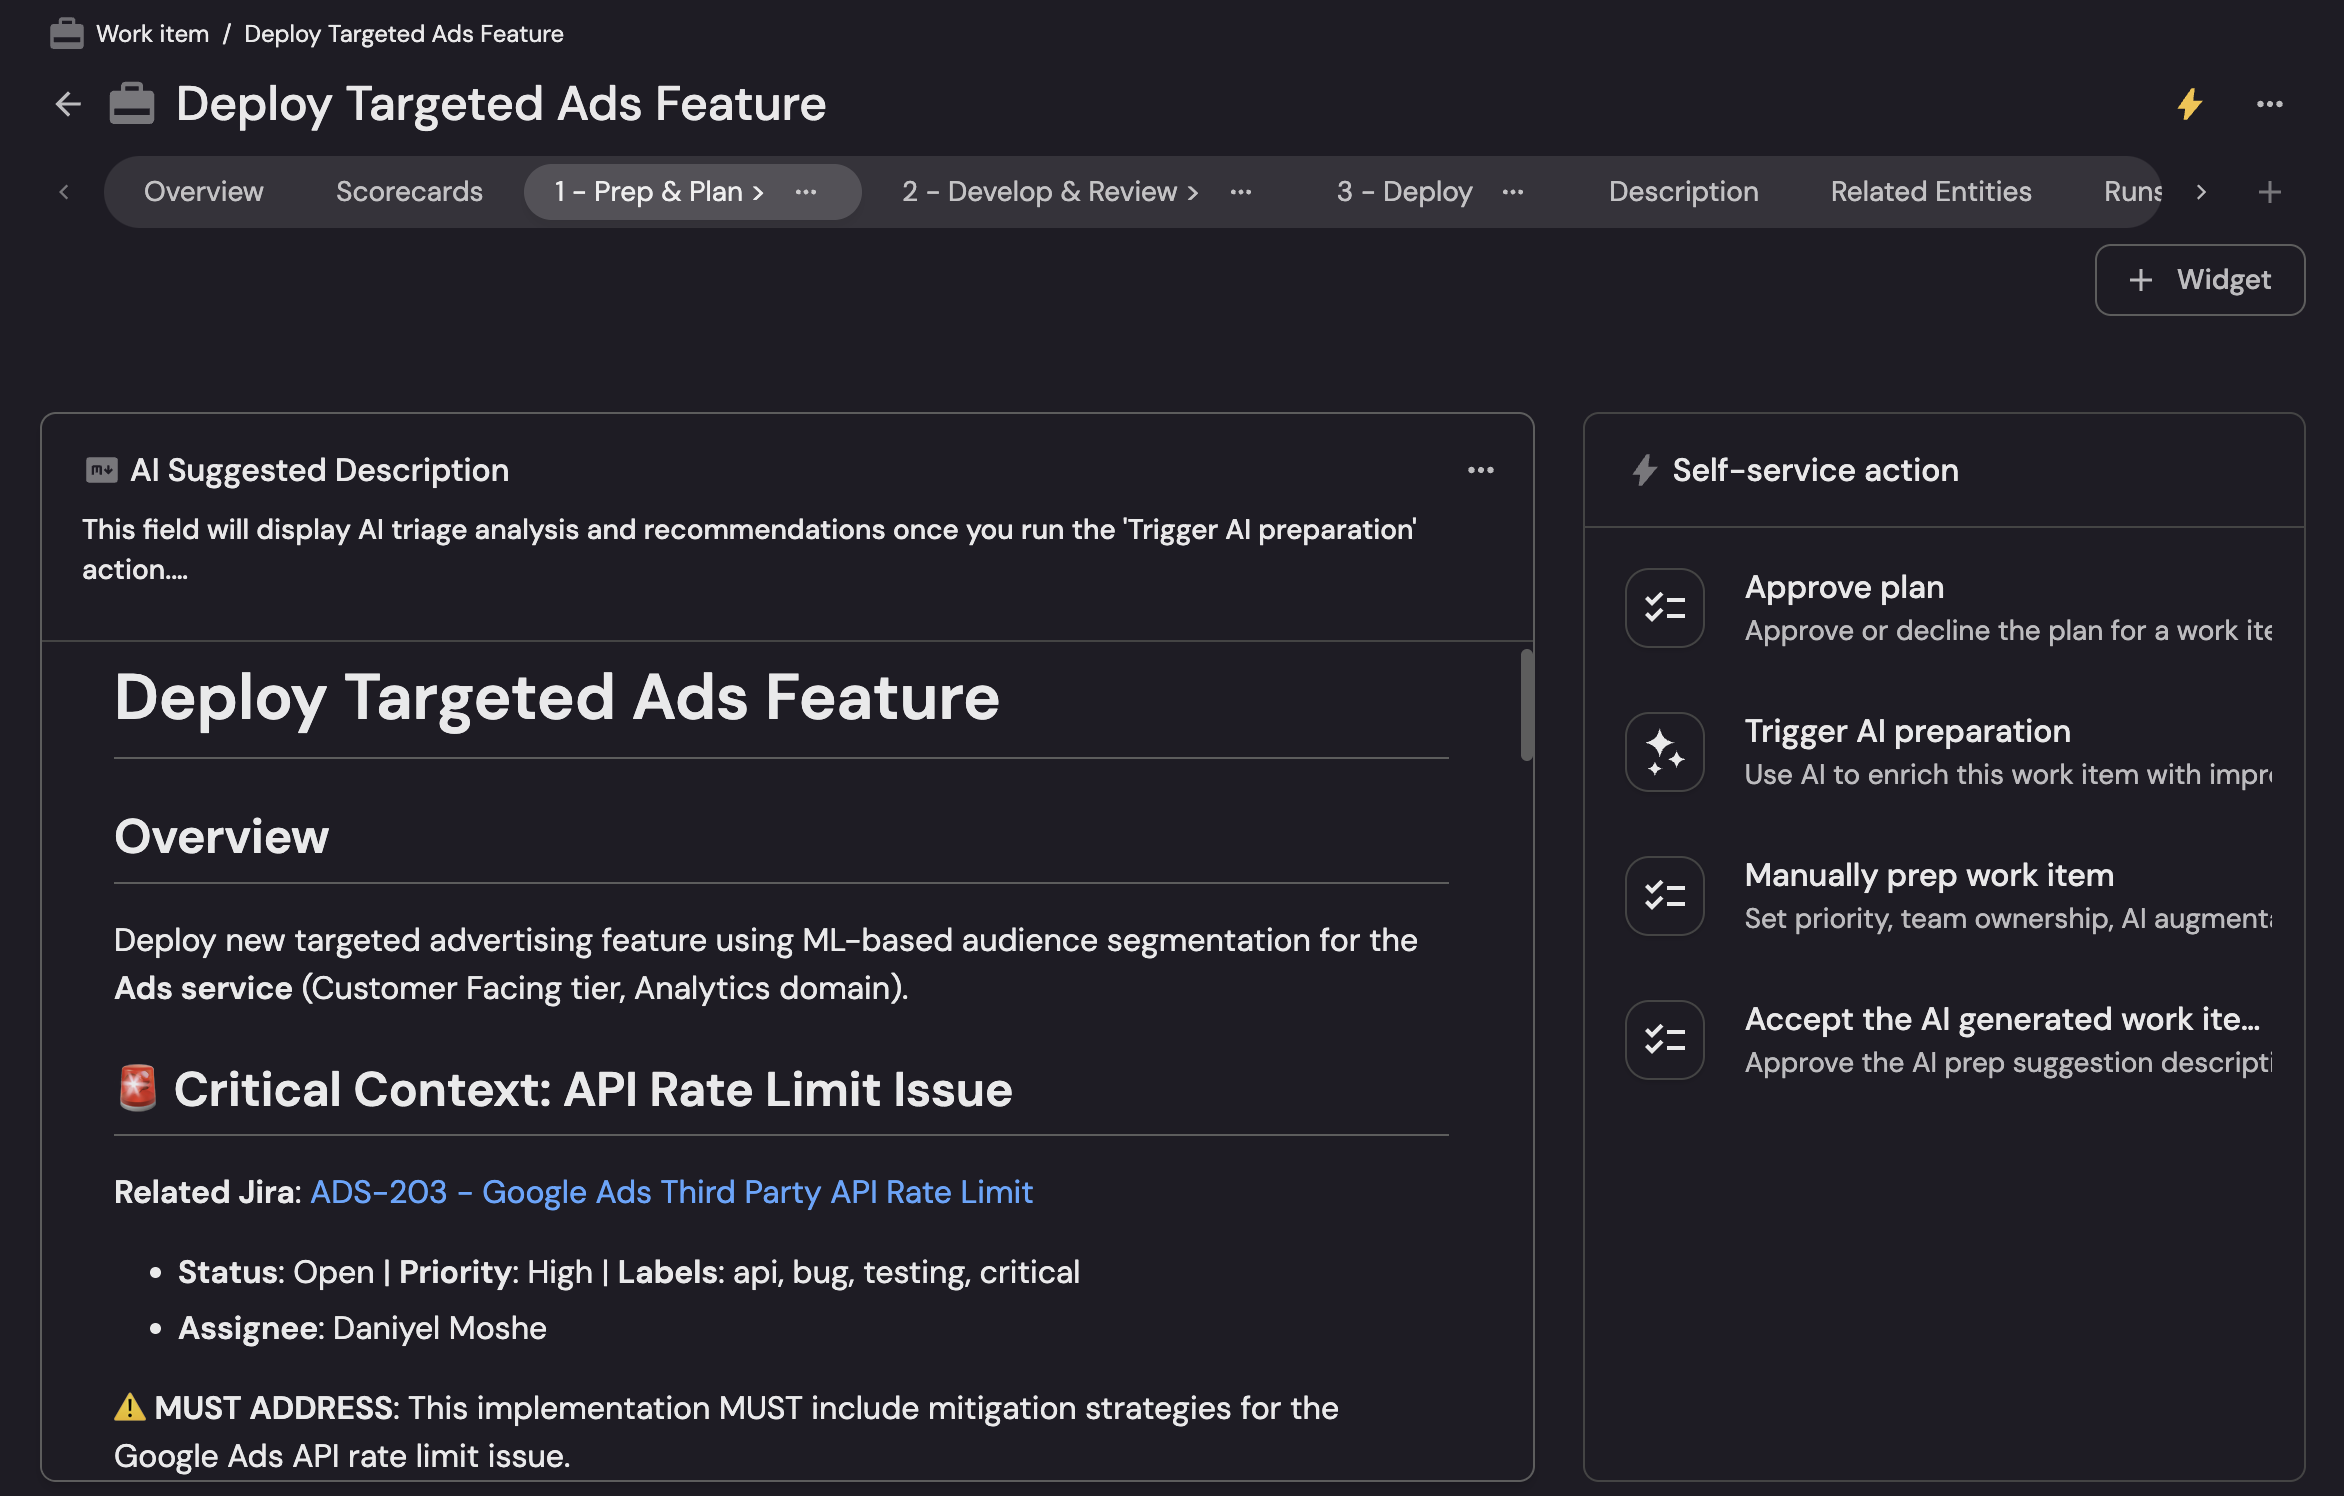 Try it out
You can try this AI-powered work item preparation workflow in Port's demo portal.
Triage work items for coding agents
Use this workflow to prevent incomplete Jira tickets from reaching coding agents. Port AI evaluates each ticket against readiness criteria, suggests a stronger specification, supports approval or retry, and triggers a coding agent only after the ticket becomes ready.
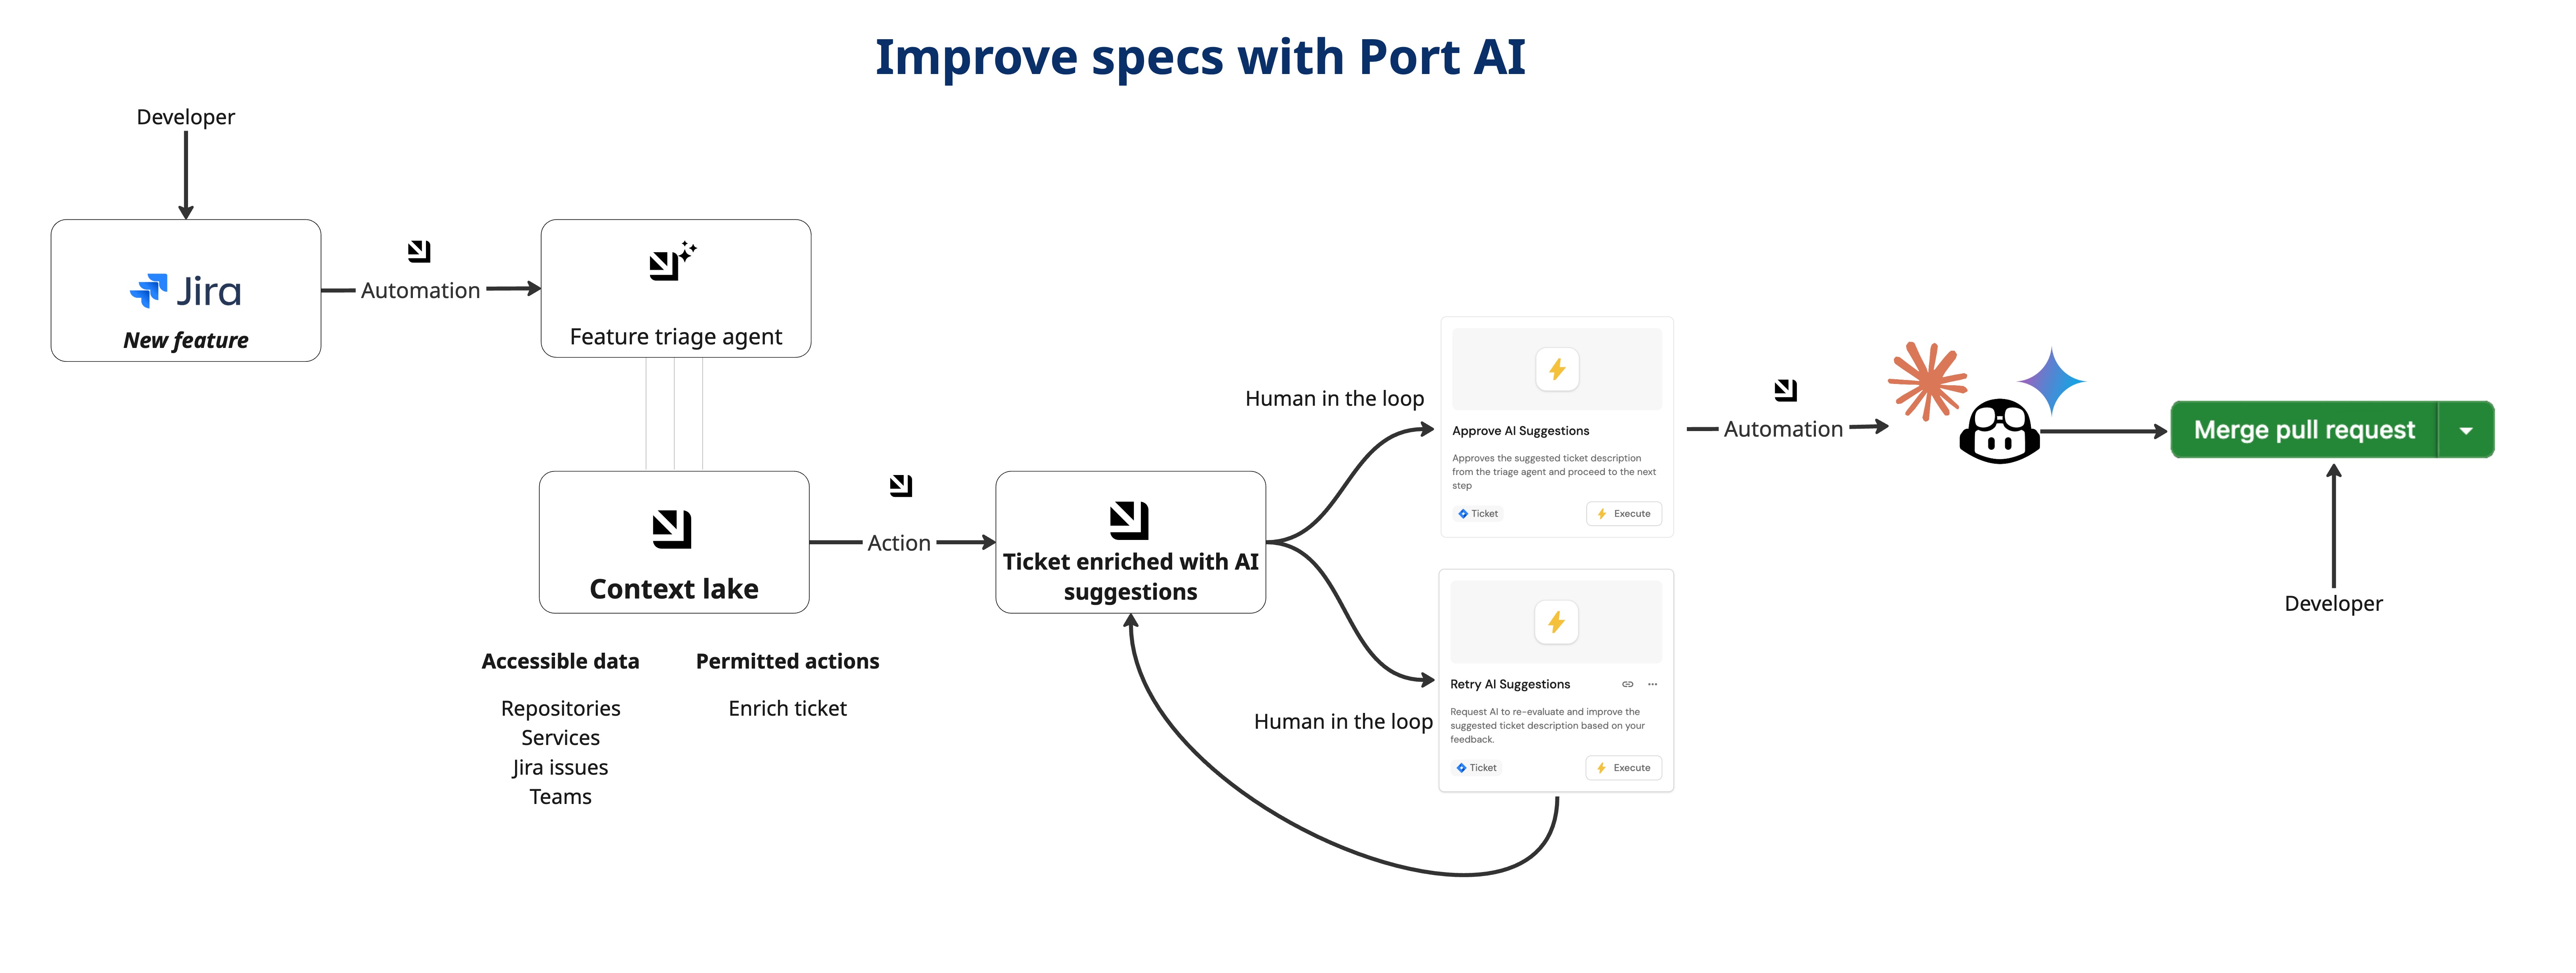
Set up the Jira ticket data model
We will configure the necessary blueprints and scorecards to support our AI triage workflow.
Create or extend the ticket blueprint
To implement the AI triage system, we need a blueprint to store different features (tickets) from your project management tool. This blueprint will track the AI readiness status, triage stages, and enrichment suggestions for each feature.
Port's Jira integration creates a jiraIssue blueprint by default. You can extend this existing blueprint by adding the following properties to enable AI triage functionality:
-
Go to the builder page of your portal.
-
Select the
Jira Issueblueprint. -
Click on the
{...} Edit JSONbutton. -
Copy and paste the following JSON configuration under the
propertiesschema:Extended Jira ticket blueprint (Click to expand)
{"description": {"type": "string","title": "Description","description": "Detailed description of the issue","format": "markdown"},"current_stage": {"icon": "DefaultProperty","title": "Triage Stage","description": "Current triage stage of the issue","type": "string","default": "Not started","enum": ["Awaiting approval","Not started","Draft","Approved"],"enumColors": {"Awaiting approval": "yellow","Not started": "lightGray","Draft": "orange","Approved": "green"}},"confidence_score": {"type": "number","title": "Confidence Score","description": "AI's assessment of readiness for coding agent (0-100)","minimum": 0,"maximum": 100},"ai_suggested_description": {"type": "string","title": "AI Suggested Description","description": "AI-generated suggestions for improving the ticket","format": "markdown"},"prioritized": {"type": "boolean","title": "Prioritized"}}
The examples in this workflow use jira_ticket as the blueprint identifier. If you extend the integration-created blueprint, replace every jira_ticket reference in this workflow with jiraIssue, including references in actions, automations, the AI agent, and the scorecard.
If you don't have Jira integration or want to create a custom blueprint, follow these steps:
-
Go to the builder page of your portal.
-
Click on
+ Blueprint. -
Click on the
{...} Edit JSONbutton. -
Copy and paste the following JSON configuration:
Jira ticket blueprint (Click to expand)
{"identifier": "jira_ticket","title": "Feature","icon": "Jira","schema": {"properties": {"status": {"type": "string","title": "Status","description": "Current status of the Jira issue"},"issue_type": {"type": "string","title": "Issue Type","description": "Type of the Jira issue (Bug, Story, Task, etc.)"},"priority": {"type": "string","title": "Priority","description": "Priority level of the issue"},"creator": {"type": "string","title": "Creator","description": "User who created the issue"},"assignee": {"type": "string","title": "Assignee","description": "User assigned to the issue"},"manager": {"type": "string","title": "Manager","description": "Manager responsible for the issue"},"description": {"type": "string","title": "Description","description": "Detailed description of the issue","format": "markdown"},"date_created": {"type": "string","title": "Date Created","description": "Date when the issue was created","format": "date-time"},"current_stage": {"icon": "DefaultProperty","title": "Triage Stage","description": "Current triage stage of the issue","type": "string","default": "Not started","enum": ["Awaiting approval","Not started","Draft","Approved"],"enumColors": {"Awaiting approval": "yellow","Not started": "lightGray","Draft": "orange","Approved": "green"}},"confidence_score": {"type": "number","title": "Confidence Score","description": "AI's assessment of readiness for coding agent (0-100)","minimum": 0,"maximum": 100},"ai_suggested_description": {"type": "string","title": "AI Suggested Description","description": "AI-generated suggestions for improving the ticket","format": "markdown"},"prioritized": {"type": "boolean","title": "Prioritized"}},"required": ["status","issue_type","priority","creator","description","date_created","current_stage"]},"mirrorProperties": {},"calculationProperties": {},"aggregationProperties": {},"relations": {"jiraProject": {"title": "Jira Project","target": "jiraProject","required": true,"many": false},"service": {"title": "Service","target": "service","required": false,"many": false}}} -
Click Save to create the blueprint.
Create the AI readiness scorecard
Next, we will create a scorecard that evaluates whether tickets are ready for coding agents based on completeness criteria. This ensures that only well-defined and complete tasks reach your AI coding assistants, preventing wasted compute resources and failed runs.
The scorecard evaluates tickets based on three readiness criteria:
- Whether the ticket has been prioritized for development.
- Current stage status (must be approved).
- Assignment status (requires an assignee).
-
Go to the Builder page of your portal.
-
Search for the Feature blueprint and select it.
-
Click on the Scorecards tab.
-
Click on
+ New Scorecard. -
Click on the
{...}button in the top-right corner, and choose Edit JSON. -
Paste the following JSON configuration:
AI readiness scorecard (Click to expand)
{"identifier": "ai_readiness_stage","title": "AI Readiness Stage","rules": [{"identifier": "readiness_status","level": "Ready for coding agent","query": {"combinator": "and","conditions": [{"operator": "=","property": "prioritized","value": true},{"operator": "=","property": "current_stage","value": "Approved"},{"operator": "isNotEmpty","property": "assignee"}]},"description": "Ticket has been prioritized, approved, and assigned","title": "Readiness Status"}],"levels": [{"color": "red","title": "Not ready for coding agent"},{"color": "green","title": "Ready for coding agent"}]} -
Click Save to create the scorecard.
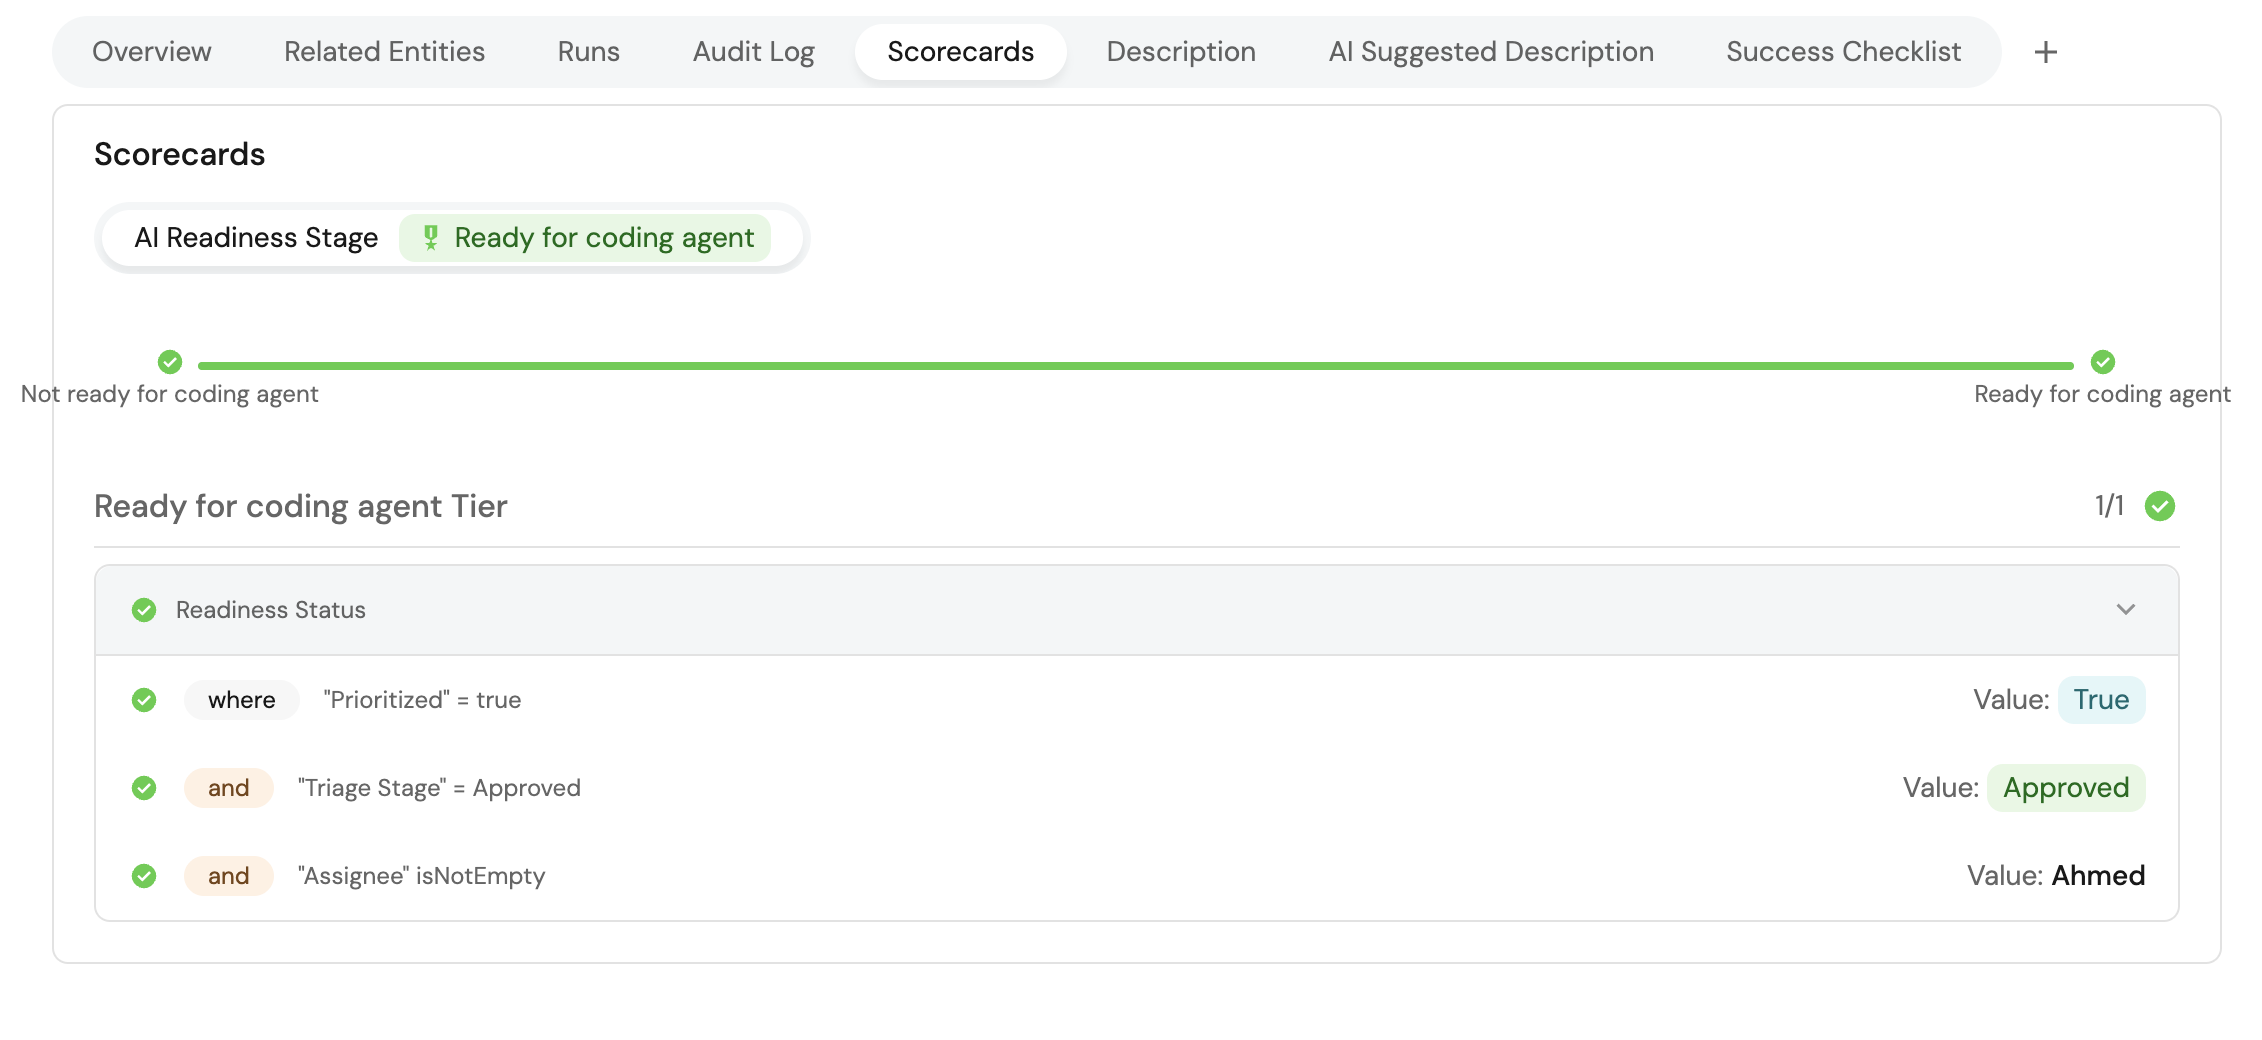
Set up self-service action
We will create three self-service actions to handle the triage workflow: improving tickets with AI suggestions, approving suggestions, and requesting refinements.
Save AI ticket improvements
This action allows the AI agent to suggest improvements to ticket descriptions.
-
Go to the Self-service page of your portal.
-
Click on the
+ New Actionbutton. -
Click on the
{...} Edit JSONbutton. -
Copy and paste the following JSON configuration:
Ask AI to improve ticket action (Click to expand)
{"identifier": "ask_ai_to_improve_on_ticket","title": "Ask AI to Improve Ticket","description": "Self-service action that enriches tickets with additional context based on AI suggestions","trigger": {"type": "self-service","operation": "CREATE","userInputs": {"properties": {"ai_suggested_description": {"title": "AI Suggested Description","icon": "DefaultProperty","type": "string","format": "markdown"},"confidence_score": {"icon": "DefaultProperty","type": "number","title": "Confidence Score","maximum": 100,"minimum": 0,"description": "The estimated confidence score for the current ticket description"},"current_stage": {"type": "string","title": "Current Stage","enum": ["Awaiting approval","Not started","Draft","Approved"],"enumColors": {"Awaiting approval": "yellow","Not started": "lightGray","Draft": "orange","Approved": "green"}},"ticket": {"type": "string","blueprint": "jira_ticket","title": "Ticket","format": "entity"}},"required": ["confidence_score","current_stage","ticket"],"order": ["ticket","ai_suggested_description","confidence_score","current_stage"]}},"invocationMethod": {"type": "UPSERT_ENTITY","blueprintIdentifier": "jira_ticket","mapping": {"identifier": "{{ .inputs.ticket.identifier }}","properties": {"ai_suggested_description": "{{ .inputs.ai_suggested_description }}","confidence_score": "{{ .inputs.confidence_score }}","current_stage": "{{ .inputs.current_stage }}"}}},"requiredApproval": false} -
Click Save to create the action.
Approve AI ticket improvements
This action allows human reviewers to approve or reject AI suggestions.
-
Go to the Self-service page of your portal.
-
Click on the
+ New Actionbutton. -
Click on the
{...} Edit JSONbutton. -
Copy and paste the following JSON configuration:
Approve AI suggestions action (Click to expand)
{"identifier": "approve_ai_suggested_ticket_descripted","title": "Approve AI Suggestions","description": "Approves the suggested ticket description from the triage agent and proceeds to the next step","trigger": {"type": "self-service","operation": "DAY-2","userInputs": {"properties": {"decision": {"type": "string","title": "Decision","enum": ["Approve & Proceed","Reject"],"icon": "DefaultProperty","enumColors": {"Approve & Proceed": "green","Reject": "red"}}},"required": ["decision"],"order": ["title_section","decision"],"titles": {"title_section": {"title": "Approve to apply the AI's suggested description and mark as ready, or reject to keep current state."}}},"blueprintIdentifier": "jira_ticket"},"invocationMethod": {"type": "UPSERT_ENTITY","blueprintIdentifier": "jira_ticket","mapping": {"identifier": "{{ .entity.identifier }}","properties": {"description": "{{if (.inputs.decision == (\"Approve & Proceed\")) then .entity.properties.ai_suggested_description else .entity.properties.description end}}","current_stage": "{{if (.inputs.decision == (\"Approve & Proceed\")) then \"Approved\" else .entity.properties.current_stage end}}","confidence_score": 95}}},"requiredApproval": false} -
Click Save to create the action.
Request refined AI suggestions
This action allows users to provide feedback and request AI to refine its suggestions.
-
Go to the Self-service page of your portal.
-
Click on the
+ New Actionbutton. -
Click on the
{...} Edit JSONbutton. -
Copy and paste the following JSON configuration:
Retry AI suggestions action (Click to expand)
{"identifier": "retry_ai_suggested_ticket_description","title": "Retry AI Suggestions","description": "Request AI to re-evaluate and improve the suggested ticket description based on your feedback.","trigger": {"type": "self-service","operation": "DAY-2","userInputs": {"properties": {"notes": {"type": "string","title": "Feedback Notes","description": "Provide guidance or missing details to help the AI improve its next suggestion."}},"required": [],"order": ["notes"]},"condition": {"type": "SEARCH","rules": [{"operator": "isNotEmpty","property": "ai_suggested_description"}],"combinator": "and"},"blueprintIdentifier": "jira_ticket"},"invocationMethod": {"type": "WEBHOOK","url": "https://api.port.io/v1/agent/ticket_triage_agent/invoke","agent": false,"synchronized": true,"method": "POST","headers": {"RUN_ID": "{{ .run.id }}","Content-Type": "application/json"},"body": {"prompt": "The Project Manager has requested changes to the AI-suggested description.\n\nFeedback:\n{{ .inputs.notes }}\n\nTicket Details:\n- Jira Ticket ID: {{ .entity.identifier }}\n- Current Description: {{ .entity.properties.description }}\n- AI Suggested Description: {{ .entity.properties.ai_suggested_description }}\n- Related Entities in the Catalog (for context): {{ .entity.relations }}","labels": {"source": "request_changes_to_jira_task_action","jira_ticket_id": "{{ .entity.identifier }}"}}},"requiredApproval": false} -
Click Save to create the action.
Create the ticket triage AI agent
Now we will create the AI agent that evaluates tickets and suggests improvements.
-
Go to the AI agents page of your portal.
-
Click on
+ AI Agent. -
Toggle
Json modeon. -
Copy and paste the following JSON schema:
Ticket triage AI agent (Click to expand)
{"identifier": "ticket_triage_agent","title": "Ticket Triage Agent","icon": "Details","team": [],"properties": {"description": "An agent that evaluates whether a ticket has sufficient context and well-defined requirements for successful execution by a coding agent","status": "active","prompt": "Your task is to evaluate and improve Jira tickets before coding agent execution.\n\n### Steps\n1. **Gather Context:**\n If the ticket is linked to other entities (e.g. service, repo, or project), retrieve them using available tools (`list_entities`, `list_blueprints`, etc.) and extract relevant details such as README, owners, dependencies, configurations, or architecture notes. Use these to enrich the ticket context.\n\n2. **Evaluate Description:**\n Compare the ticket’s description with the project’s success criteria or an embedded PRD/template.\n\n * If a template exists, treat it as canonical — fill in each section using verified data from the ticket or related entities.\n * If a section lacks enough data, **do not invent content**. Instead, insert a clear placeholder such as:\n\n > ⚠️ Requires more information — please describe [database configuration / email service / environment setup].\n\n3. **Identify Gaps:**\n When details cannot be found in either the ticket or its linked entities, explicitly state this under the relevant section. Examples:\n\n * “⚠️ Requires more information — database schema details not found in repository or catalog.”\n * “⚠️ Requires more information — email provider (SendGrid/AWS SES) not specified.”\n\n4. **Score (0–100):** Rate the ticket’s completeness and clarity.\n5. **Assign Stage:** Use “Awaiting approval” if AI edits are proposed, “Approved” if the ticket meets success criteria already\n\n## Response Rules\n\n1. ALWAYS respond by calling the `ask_ai_to_improve_on_ticket` self-service action with:\n\n ```json\n {\n \"actionIdentifier\": \"ask_ai_to_improve_on_ticket\",\n \"properties\": {\n \"ticket\": \"<provided entity identifier>\",\n \"current_stage\": \"<determined stage>\",\n \"confidence_score\": <number 0-100>,\n \"ai_suggested_description\": \"<markdown-formatted with filled template or empty if already perfect>\"\n }\n }\n ```\n\n### Rules\n* Always include `confidence_score` and `current_stage`.\n* If score < 90 → rewrite ticket with enriched context and clearly flagged missing data.\n* If score ≥ 90 → leave `ai_suggested_description` with empty string (ticket appears complete).\n* Be concise, data-grounded, and specific about what info was found vs. missing under the respective section in the template.","execution_mode": "Automatic","tools": ["^(list|search|track|describe)_.*","run_ask_ai_to_improve_on_ticket"]},"relations": {}} -
Click Create to save the agent.
The AI agent uses MCP (Model Context Protocol) enhanced capabilities to automatically discover important and relevant blueprint entities via its tools. The ^(list|search|track|describe)_.* pattern is the standard data-access pattern in the tools list (used directly when working in Advanced mode (regex)), and allows the agent to access and analyze related entities in your software catalog for richer contextual understanding.
Create ticket triage automations
We'll create two automations to orchestrate the AI triage workflow:
-
Trigger the AI agent when new tickets are created or synced.
-
Automatically assign coding agents to approved tickets.
Trigger triage when a ticket is created
This automation triggers the AI triage agent whenever a new Jira ticket is created or synced to the Catalog.
-
Go to the Automations page of your portal.
-
Click on the
+ Automationbutton. -
Copy and paste the following JSON schema:
Ticket sync trigger automation (Click to expand)
{"identifier": "trigger_triage_agent_on_sync","title": "Trigger Triage Agent On Ticket Creation","description": "Automation that triggers AI triage analysis when a Jira ticket is created or synced to the catalog","icon": "AI","trigger": {"type": "automation","event": {"type": "ENTITY_CREATED","blueprintIdentifier": "jira_ticket"},"condition": {"type": "JQ","expressions": [],"combinator": "and"}},"invocationMethod": {"type": "WEBHOOK","url": "https://api.port.io/v1/agent/ticket_triage_agent/invoke","agent": false,"synchronized": true,"method": "POST","headers": {"RUN_ID": "{{ .run.id }}","Content-Type": "application/json"},"body": {"prompt": "Here is the Jira ticket information:\n\nJira Ticket ID: {{.event.diff.after.identifier}}\nJira Ticket Title: {{.event.diff.after.title}}\n\nRelated Entities in the Catalog (for context): {{.event.diff.after.relations}}\n\nFull Jira Ticket Properties:\n{{.event.diff.after.properties}}","labels": {"source": "auto_enhance_jira_task_automation","jira_ticket_id": "{{ .event.diff.after.identifier }}"}}},"publish": true} -
Click Save to create the automation.
Route approved tickets to a coding agent
This automation automatically assigns coding agents to tickets once they're approved and ready.
-
Go to the Automations page of your portal.
-
Click on the
+ Automationbutton. -
Copy and paste the following JSON schema:
Auto-assign coding agent automation (Click to expand)
{"identifier": "auto_assign_claude_on_ready_for_ai","title": "Auto-Assign Claude Coding Agent on Ready for AI","description": "Automatically triggers Claude to begin code generation once a Jira ticket is approved and marked as 'Ready for AI'. This ensures a seamless handoff from human triage to AI execution.","trigger": {"type": "automation","event": {"type": "ENTITY_UPDATED","blueprintIdentifier": "jira_ticket"},"condition": {"type": "JQ","expressions": [".diff.before.scorecards.ai_readiness_stage.level != \"Ready for coding agent\"",".diff.after.scorecards.ai_readiness_stage.level == \"Ready for coding agent\""],"combinator": "and"}},"invocationMethod": {"type": "WEBHOOK","url": "https://api.port.io/v1/actions/run_claude_code_demo/runs","agent": false,"synchronized": true,"method": "POST","headers": {"RUN_ID": "{{ .run.id }}","Content-Type": "application/json"},"body": {"properties": {"service": "<GITHUB-ORG>/<REPO>","prompt": "You are a senior software engineer tasked with implementing the following approved ticket: '{{ .event.diff.after.title }}'.\n\nBase your implementation on the approved technical description below:\n\n{{ .event.diff.after.properties.description }}\n\nOnce complete, generate a pull request summarizing what was implemented and why."}}},"publish": true} -
Click Save to create the automation.
Replace service with the name of the GitHub repository. Also replace the webhook URL and payload structure with the values required by your coding agent. You can use Claude Code, GitHub Copilot, Devin, or another coding assistant that accepts webhook triggers.
Test coding-agent handoff
Now let us test the complete AI triage workflow to ensure everything works correctly.
Create a test ticket
-
Go to your Jira instance and create a new ticket with minimal information, for example:
- Title: "Implement Product Search and Filtering on Storefront".
- Description: "Users can't search for products on the website".
- Labels: Add any relevant labels.
Verify the AI triage analysis
-
Go to your Port catalog and find the synced Jira ticket.
-
Check that the AI agent has analyzed the ticket and provided:
- A confidence score.
- A suggested improved description if the original was incomplete.
- An appropriate current stage.
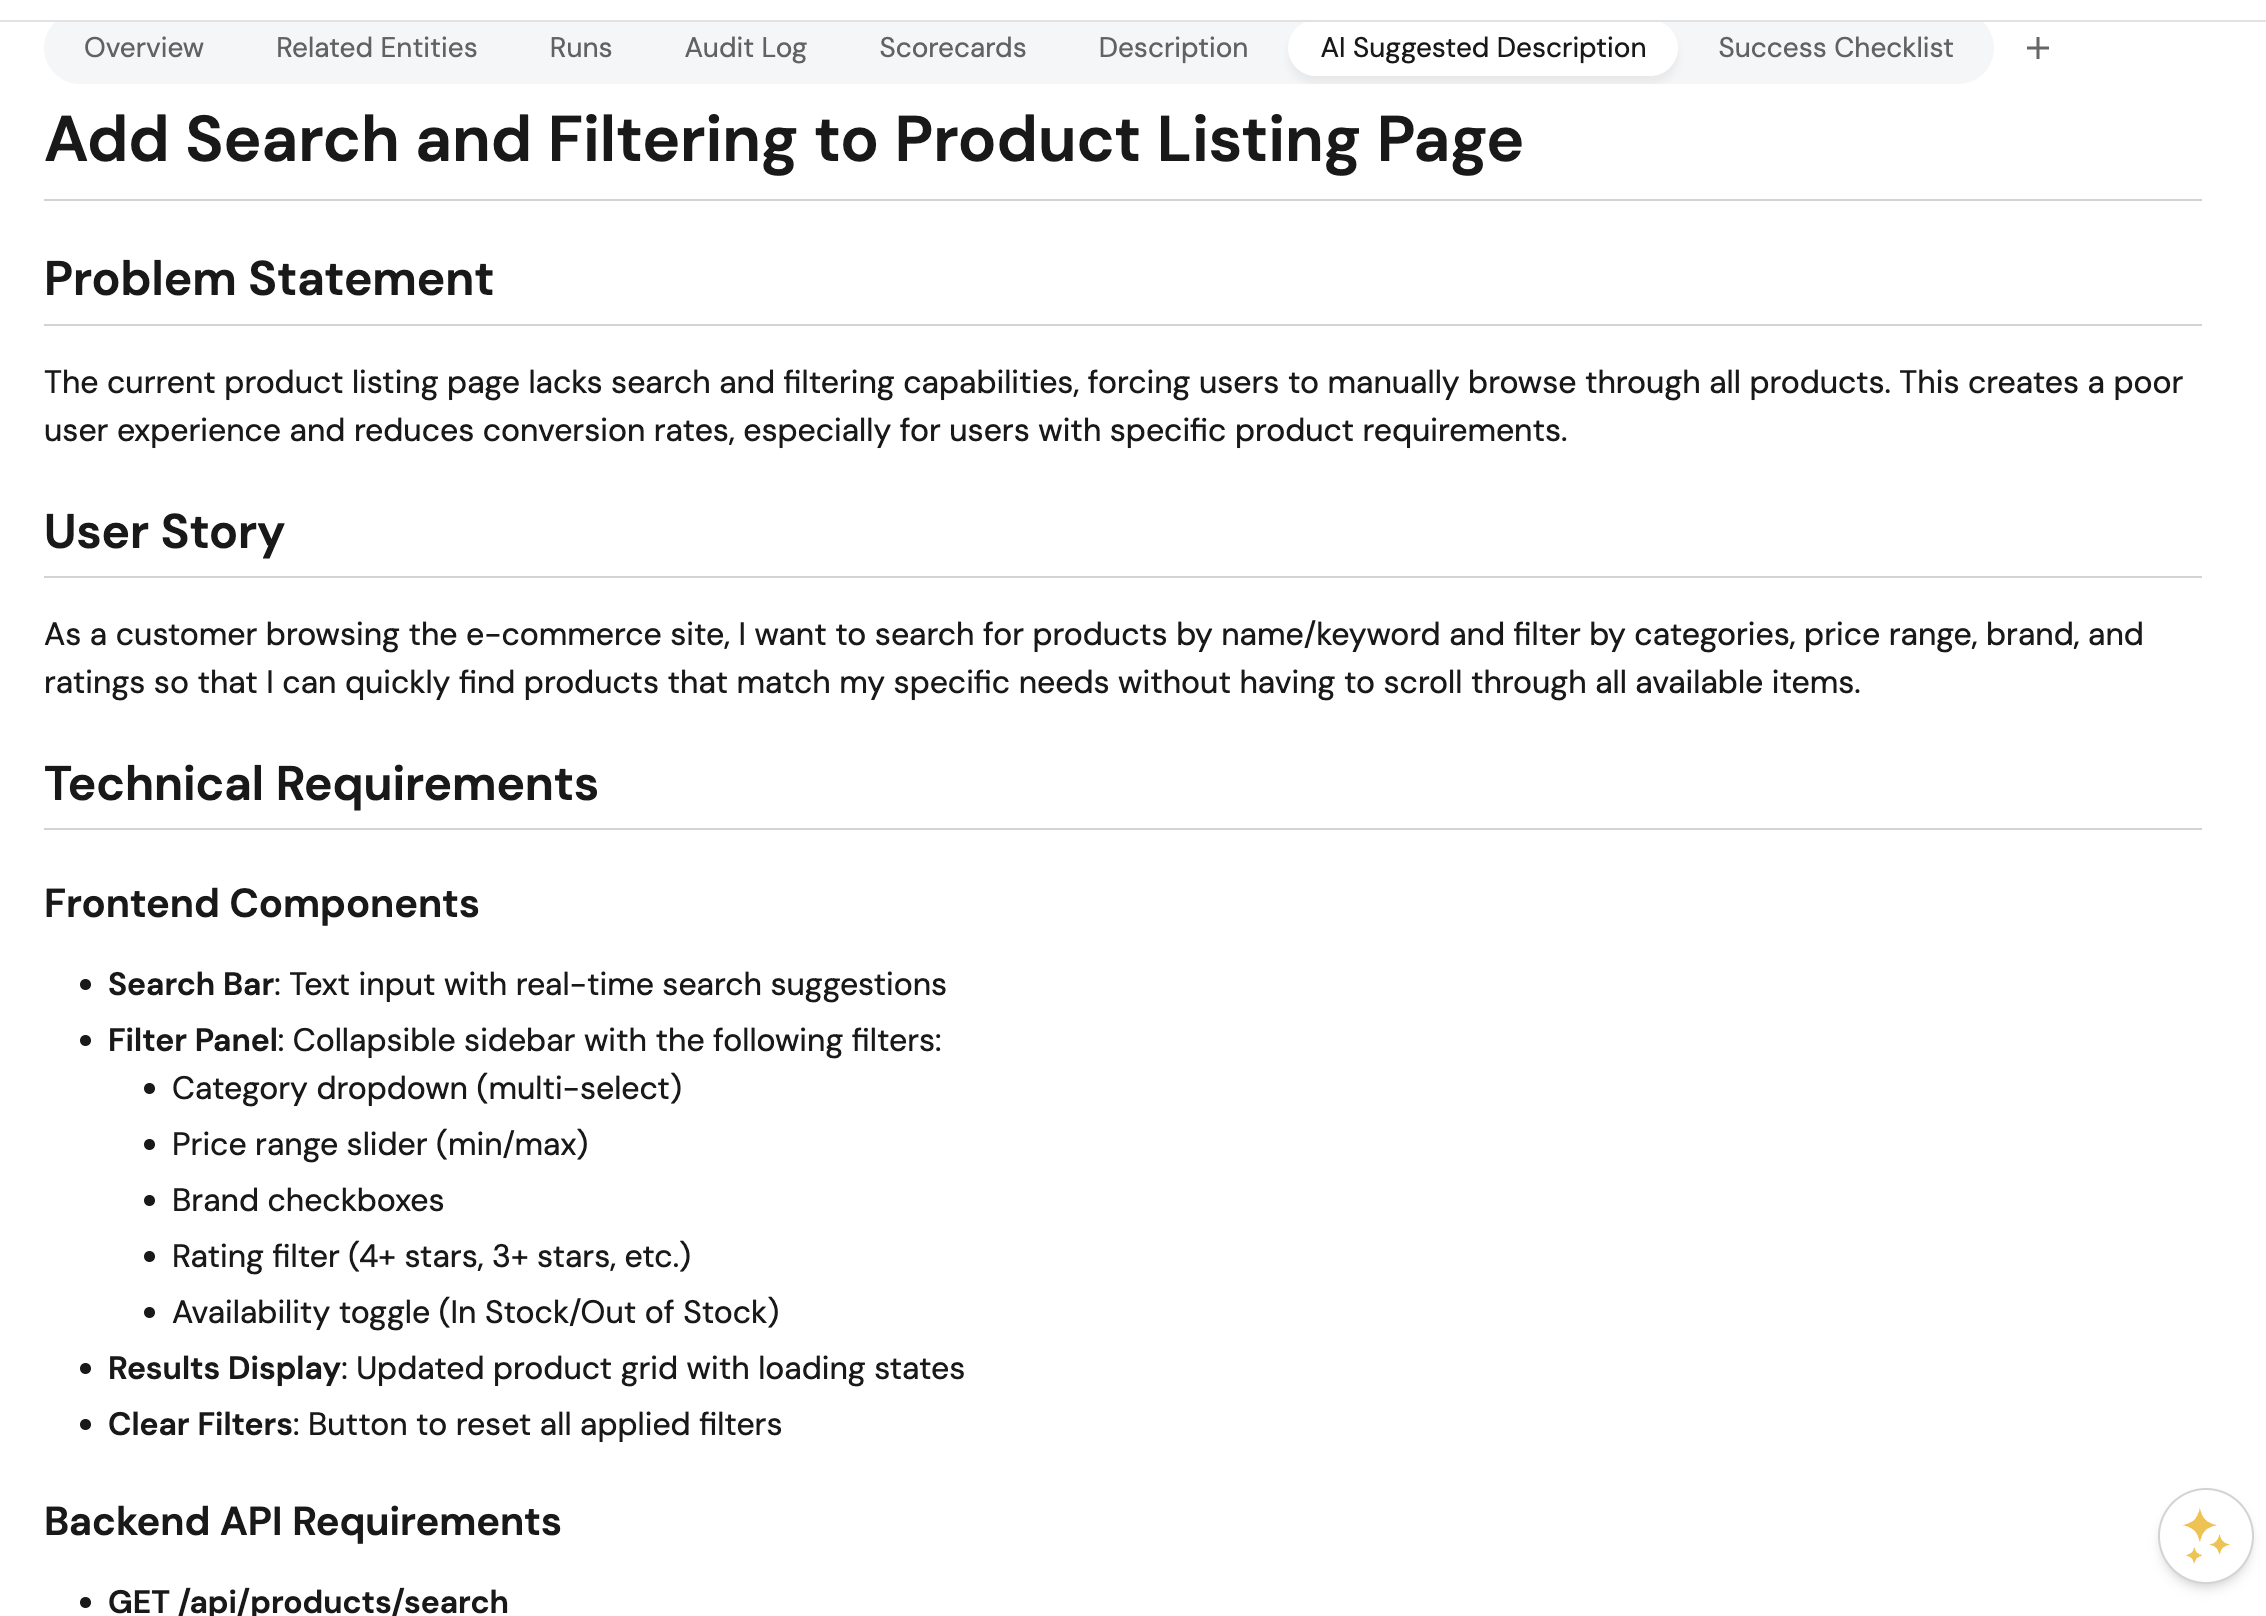
Test the human review process
-
If the AI suggested improvements, use the Approve AI Suggestions action to review and approve the changes.
-
If you want to request refinements, use the Retry AI Suggestions action to provide feedback.
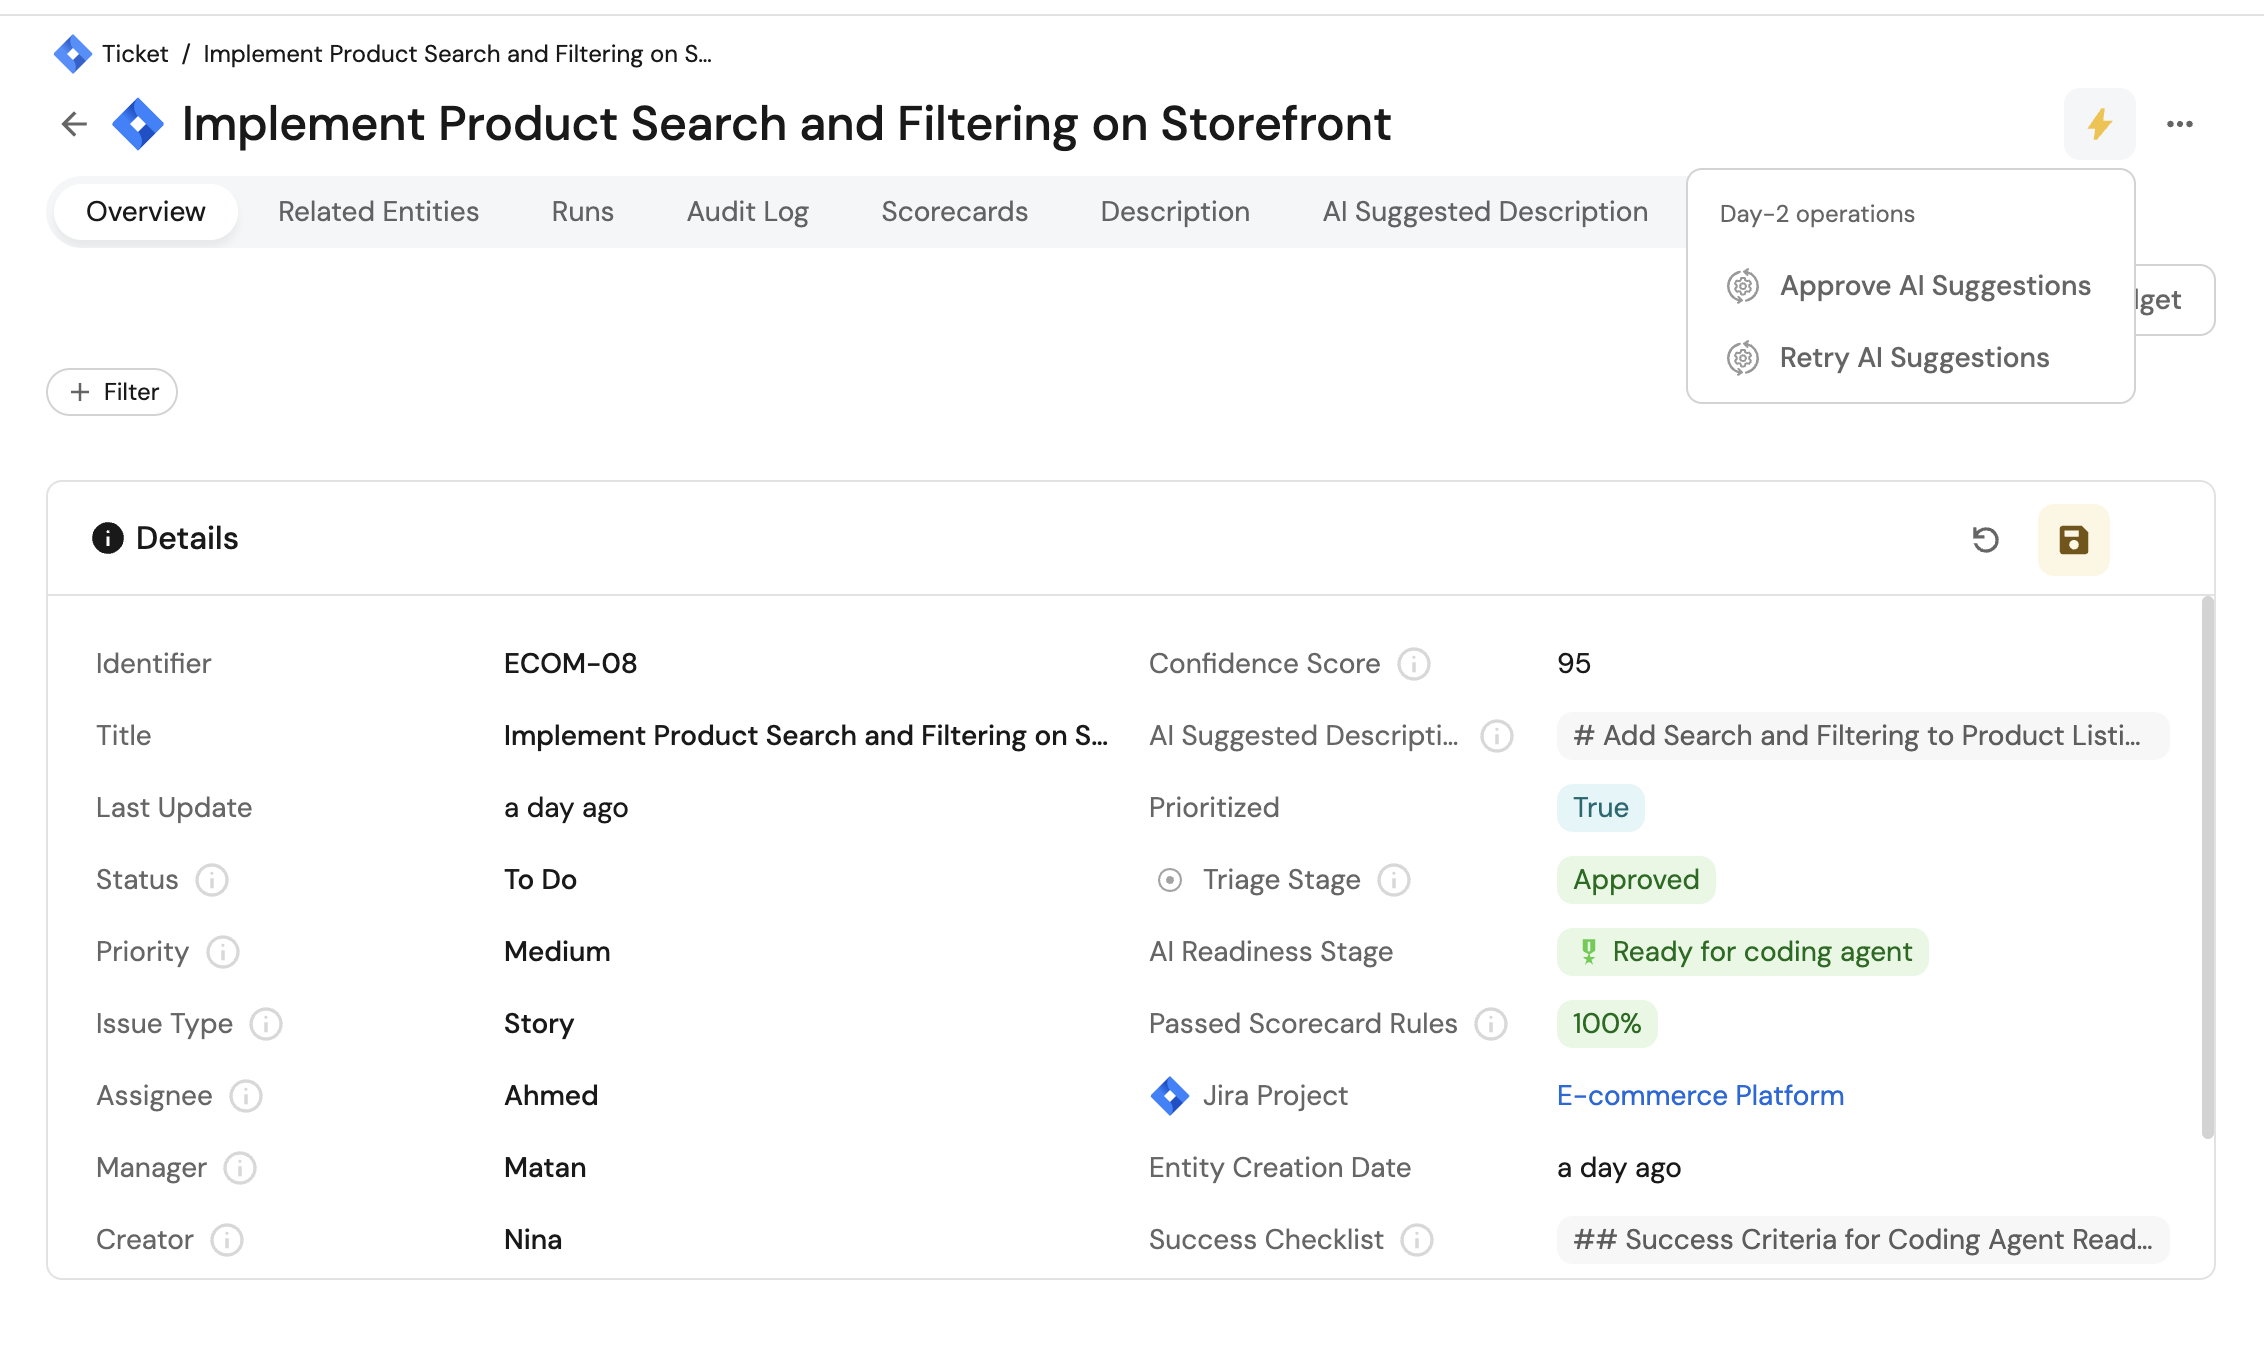
Verify the coding-agent assignment
-
Once a ticket is approved and marked as Ready for coding agent, check that your coding agent is automatically triggered.
-
Verify that the coding agent receives the enriched ticket description with all necessary context.
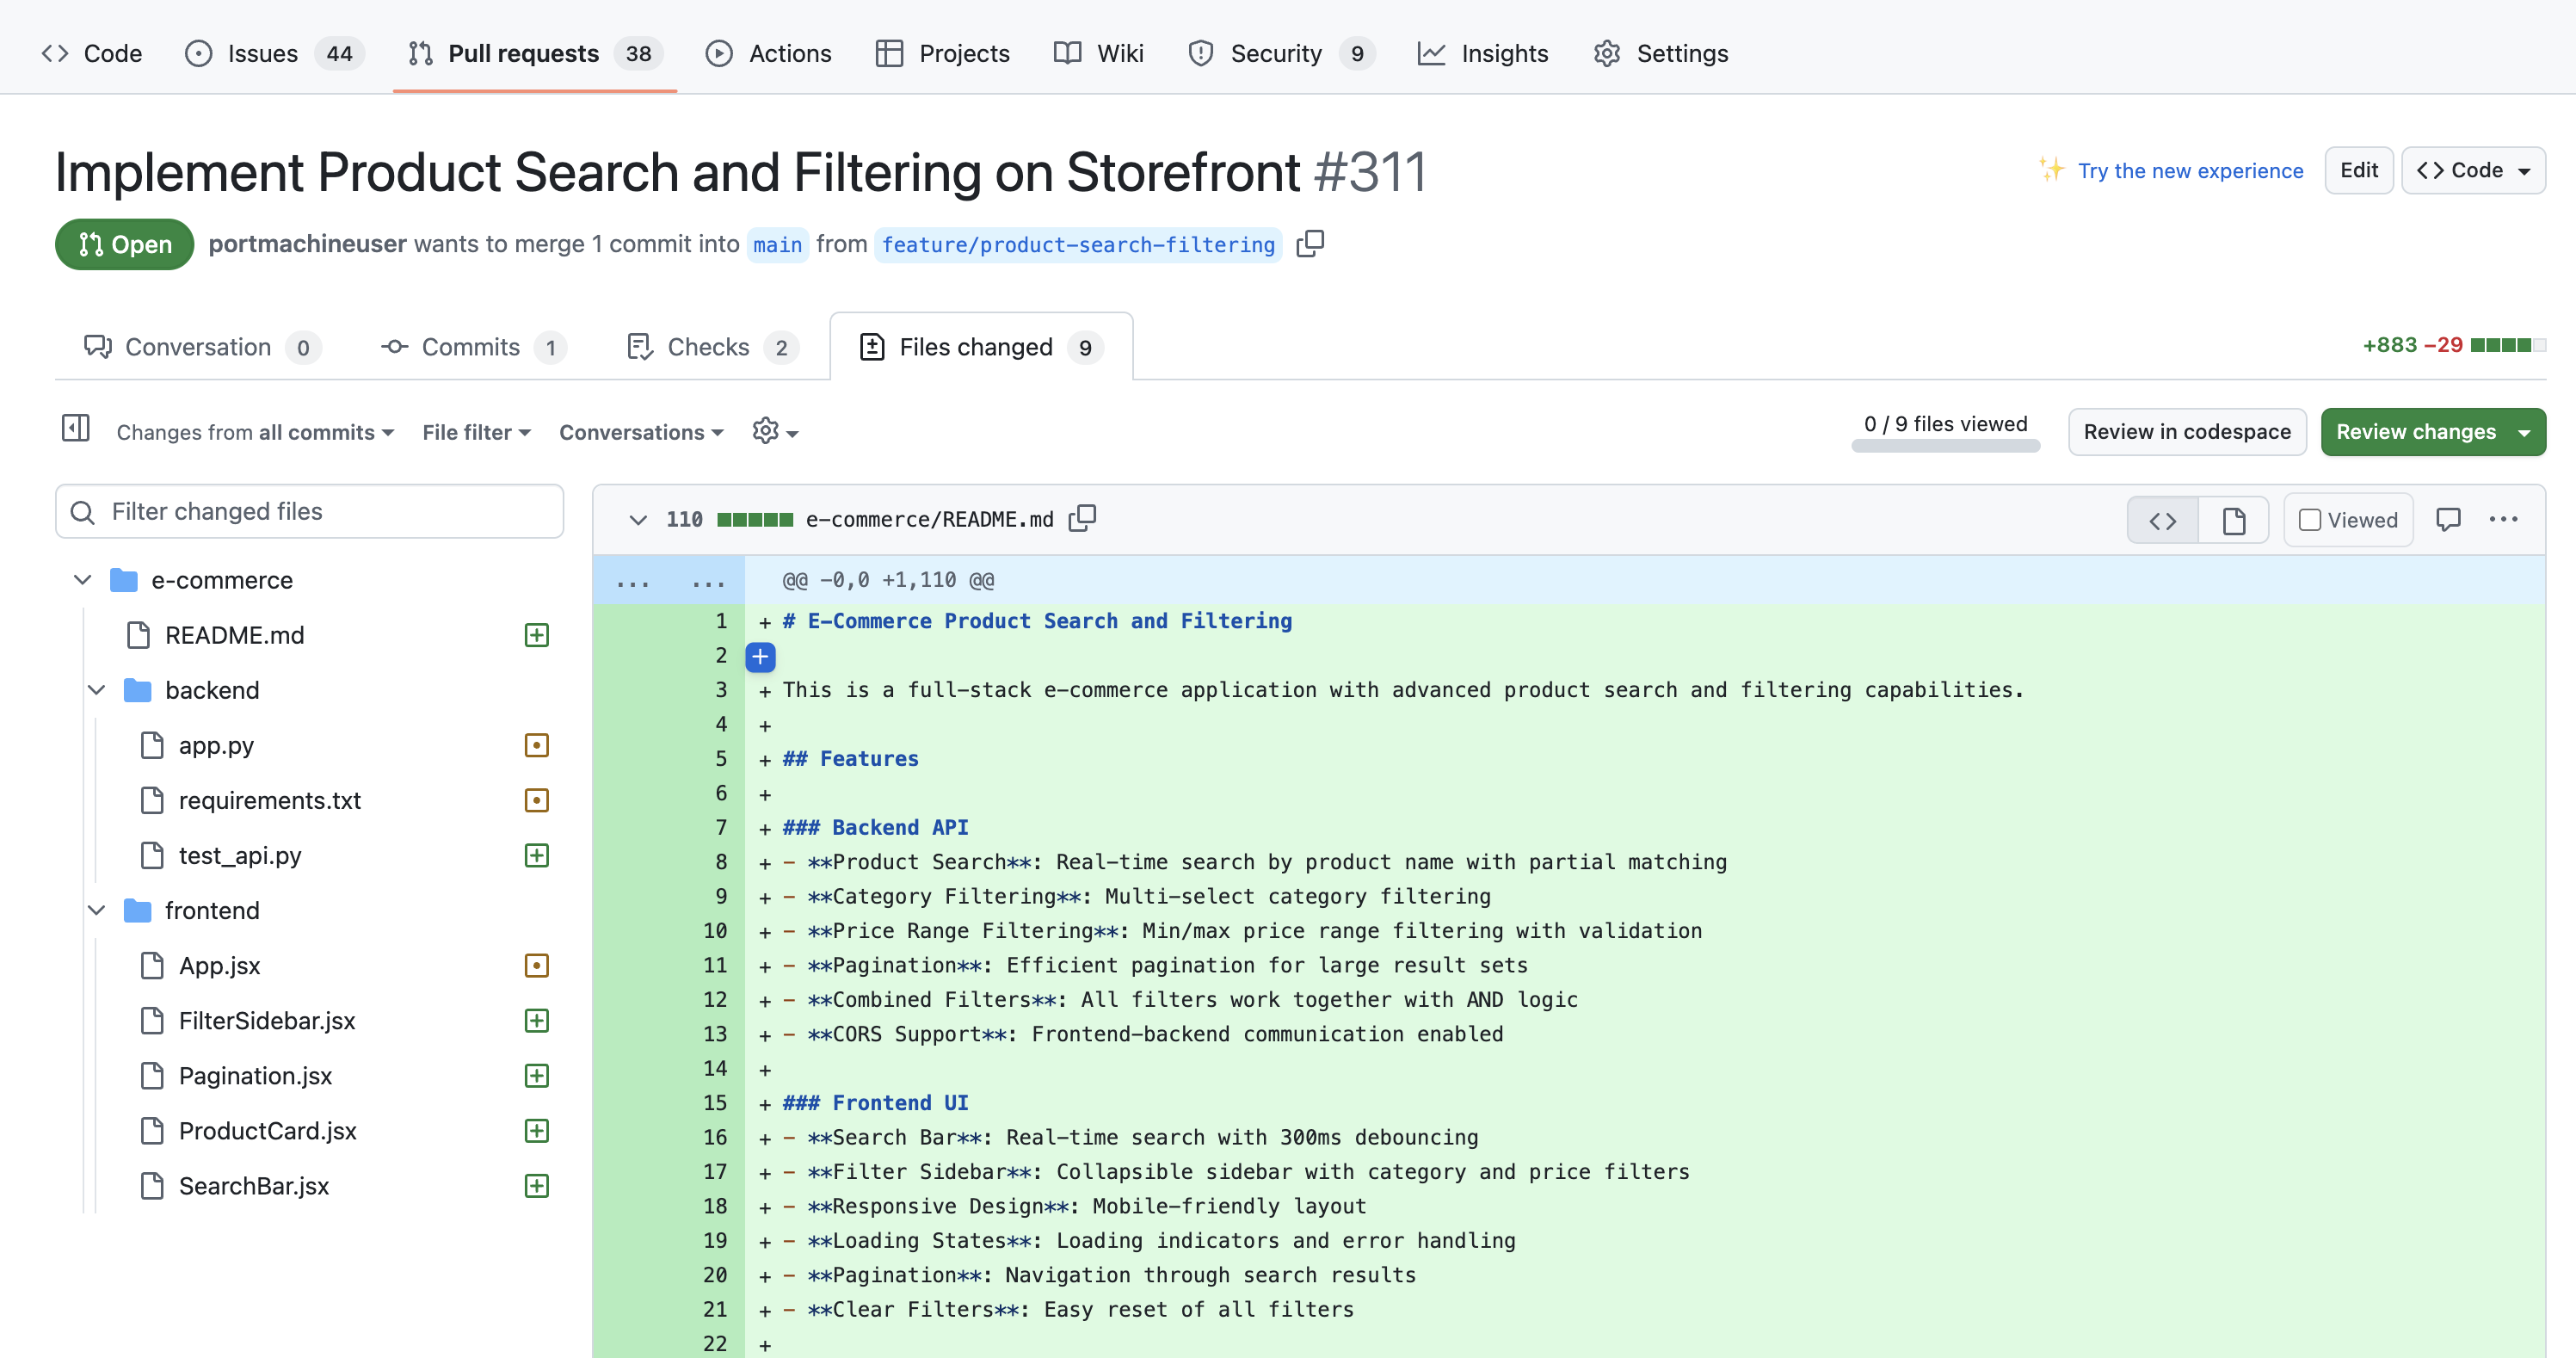
Apply best practices
- Review agent responses regularly to confirm that the added context remains useful.
- Refine agent prompts as your work item templates and team requirements change.
- Test automations and actions with sample issues before enabling them for production projects.
- Restrict each agent to the tools and self-service actions it needs.
Extend work item preparation
- Add sources such as Confluence, ServiceNow, or other catalog entities to broaden the available context.
- Add automation triggers for other assignment, status, or readiness events.
- Adapt the Jira examples to project management tools such as Linear, Asana, or Azure DevOps.
- Replace the coding-agent webhook with the API and payload required by your preferred coding assistant.