Remediate vulnerabilities with AI

A security vulnerability is a work item like any other ticket. It needs context, a routing decision, and often a coding agent to implement the fix. This guide applies Port's autonomous ticket resolution (ATR) pattern to vulnerabilities using a single Port workflow, so teams can move from a raw scanner finding to a merged fix without manual triage.
Security teams often face two critical challenges that slow down vulnerability remediation:
- Understanding vulnerabilities quickly - Raw scanner output is dense, technical, and rarely provides clear remediation steps.
- Acting fast enough - Even after analysis, fixing issues typically requires manual developer effort, leading to delays and higher risk exposure.
This guide demonstrates how to solve both problems with one event-triggered workflow. When a vulnerability is marked as critical, the workflow invokes an AI agent to enrich it with a clear summary and remediation steps, saves the analysis to the catalog, and dispatches your coding agent backend to generate a fix in a pull request.
Common use cases
- Automatically enrich critical vulnerabilities with plain-language impact and remediation guidance.
- Trigger a coding agent to open a pull request with a proposed fix minutes after severity escalation.
- Reduce time-to-remediation without manual handoffs between security and engineering teams.
Prerequisites
Before you begin, ensure you have:
- Completed the onboarding process.
- Security vulnerabilities synced into Port (e.g., via Snyk, Wiz, or SonarQube).
- Completed the GitHub backend setup for your preferred coding agent from the Trigger AI coding assistants from Port guide. You only need the backend workflow and secrets from that guide, not the self-service actions:
- Claude Code - deploy
claude-backend.yamlin your dedicated workflows repository. - GitHub Copilot - store
GITHUB_TOKENas a Port secret. - Google Gemini - deploy
gemini-backend.yamlin your dedicated workflows repository.
- Claude Code - deploy
Set up data model
First, you need to ensure your vulnerability blueprint includes an ai_summary property to store the AI-generated analysis.
-
Go to the Data model page in Port.
-
Search for the blueprint you want to update.
-
Click on the
{...}button in the top right corner, and chooseEdit JSON. -
Add this JSON snippet to the properties of the blueprint:
"ai_summary": {"type": "string","title": "AI Analysis","description": "AI-generated analysis and remediation steps","format": "markdown"} -
Click
Save.
This guide uses securityVulnerability as the blueprint identifier in the workflow JSON. Change it to match your data model (e.g., snykVulnerability, wizIssue, or sonarQubeIssue).
Configure the service relation
The workflow sends coding agent work to the GitHub repository that owns the vulnerable code. Every backend tab reads relations.service from the triggered vulnerability entity. For these steps to succeed, the service relation on your vulnerability blueprint must resolve to a GitHub repository identifier in org/repo format (for example port-labs/port-docs).
If vulnerabilities are not linked to a service yet:
- In the Data model, add a
servicerelation on your vulnerability blueprint pointing to your service blueprint. - Update your security integration mapping to set the relation during sync (often from project name, repository URL, or a project-to-service match).
Create your AI agent
Create an AI agent that analyzes vulnerabilities. The workflow invokes this agent directly, it does not need access to self-service actions.
-
Go to the AI Agents page in Port.
-
Click on
+ AI Agent. -
Toggle
Json modeon. -
Copy and paste the following JSON schema:
Vulnerability enrichment agent (click to expand)
{"identifier": "vulnerability_enrichment_agent","title": "Vulnerability Enrichment Agent","icon": "Vulnerability","properties": {"description": "Provides remediation steps and mitigation strategies for vulnerabilities","status": "active","prompt": "You are an agent responsible for analyzing security vulnerabilities and providing actionable recommendations.\n\n### Guidelines\n- Summarize the vulnerability in simple terms.\n- Explain the potential impact if exploited.\n- Recommend step-by-step remediation strategies.\n- Suggest best practices to prevent similar vulnerabilities.\n- Tailor responses to the severity (Critical, High, Medium, Low).\n\nReturn your analysis as clear Markdown suitable for storage in a catalog property and for use by a coding agent that will implement the fix.","execution_mode": "Automatic","conversation_starters": ["Explain the impact of CVE-2025-1234","Suggest a remediation plan for this SQL injection vulnerability","What steps should I take to patch a high severity XSS issue?"],"tools": ["^(list|search|track|describe)_.*"]},"relations": {}}MCP enhanced capabilitiesThe
^(list|search|track|describe)_.*pattern lets the agent read related entities from your context lake for richer vulnerability context. -
Click
Createto save the agent.
Build the workflow
When a vulnerability becomes critical, this workflow enriches it, saves the AI summary, and dispatches your coding agent to propose a fix.
This workflow triggers when severity changes to critical. You can adapt the event trigger condition to match your policy, for example High or above, specific services, or newly created vulnerabilities.
Choose the workflow JSON that matches your coding agent:
- Claude Code
- GitHub Copilot
- Google Gemini
Build the workflow
-
Go to the workflows page in Port.
-
Click + Workflow.
-
Fill out the Create new workflow form. For Name, enter
Remediate critical vulnerability, then click Confirm. -
Click the
{...}button to open the JSON editor and paste the workflow JSON below:Remediate critical vulnerability workflow JSON for Claude Code (click to expand)
{"identifier": "remediate_critical_vulnerability","title": "Remediate critical vulnerability","icon": "Vulnerability","description": "Enrich critical vulnerabilities with AI analysis and dispatch Claude Code to propose a fix","allowAnyoneToViewRuns": true,"nodes": [{"identifier": "trigger","title": "On severity changed to critical","icon": "Vulnerability","description": "Trigger when a vulnerability severity changes to critical","config": {"type": "EVENT_TRIGGER","event": {"type": "ENTITY_UPDATED","blueprintIdentifier": "securityVulnerability"},"condition": {"type": "JQ","expressions": [".diff.before.properties.severity != \"critical\"",".diff.after.properties.severity == \"critical\""],"combinator": "and"}},"variables": {}},{"identifier": "enrich_vulnerability","title": "Analyze vulnerability with AI","icon": "AI","description": "Invoke the Vulnerability Enrichment Agent","config": {"type": "AI_AGENT","agentIdentifier": "vulnerability_enrichment_agent","userPrompt": "Generate a summary and remediation steps for vulnerability with entity identifier {{ .outputs.trigger.diff.after.identifier }}. The issue has been updated with the following details: {{ .outputs.trigger.diff.after.properties | tojson }}"},"variables": {}},{"identifier": "save_ai_summary","title": "Save AI summary","icon": "Vulnerability","description": "Update the vulnerability entity with the AI-generated analysis","config": {"type": "UPSERT_ENTITY","blueprintIdentifier": "securityVulnerability","mapping": {"identifier": "{{ .outputs.trigger.diff.after.identifier }}","properties": {"ai_summary": "{{ .outputs.enrich_vulnerability.response }}"}}},"variables": {}},{"identifier": "run_claude_code","title": "Generate fix with Claude Code","icon": "Code","description": "Dispatch Claude Code to generate a fix and open a pull request","config": {"type": "INTEGRATION_ACTION","installationId": "<YOUR_GITHUB_OCEAN_INTEGRATION_ID>","integrationProvider": "github-ocean","integrationInvocationType": "dispatch_workflow","integrationActionExecutionProperties": {"org": "<YOUR_GITHUB_ORG>","repo": "<YOUR_WORKFLOW_REPO>","workflow": "claude-backend.yaml","workflowInputs": {"repo_name": "{{ .outputs.trigger.diff.after.relations.service }}","command": "Here is the information about the security vulnerability: {{ .outputs.trigger.diff.after | tojson }}.\n\nGenerate a code fix for the issue based on the AI-provided summary:\n\n{{ .outputs.enrich_vulnerability.response }}\n\nAfter generating the code, open a PR with a description summarizing what was fixed and why."},"reportWorkflowStatus": true}},"variables": {}}],"connections": [{"sourceIdentifier": "trigger","targetIdentifier": "enrich_vulnerability"},{"sourceIdentifier": "enrich_vulnerability","targetIdentifier": "save_ai_summary"},{"sourceIdentifier": "save_ai_summary","targetIdentifier": "run_claude_code"}]} -
Click Apply changes.
Replace YOUR_GITHUB_OCEAN_INTEGRATION_ID, YOUR_GITHUB_ORG, and YOUR_WORKFLOW_REPO with your GitHub Ocean integration ID, organization name, and the repository where claude-backend.yaml lives.
Build the workflow
-
Go to the workflows page in Port.
-
Click + Workflow.
-
Fill out the Create new workflow form. For Name, enter
Remediate critical vulnerability, then click Confirm. -
Click the
{...}button to open the JSON editor and paste the workflow JSON below:Remediate critical vulnerability workflow JSON for GitHub Copilot (click to expand)
{"identifier": "remediate_critical_vulnerability","title": "Remediate critical vulnerability","icon": "Vulnerability","description": "Enrich critical vulnerabilities with AI analysis and create a Copilot issue to propose a fix","allowAnyoneToViewRuns": true,"nodes": [{"identifier": "trigger","title": "On severity changed to critical","icon": "Vulnerability","description": "Trigger when a vulnerability severity changes to critical","config": {"type": "EVENT_TRIGGER","event": {"type": "ENTITY_UPDATED","blueprintIdentifier": "securityVulnerability"},"condition": {"type": "JQ","expressions": [".diff.before.properties.severity != \"critical\"",".diff.after.properties.severity == \"critical\""],"combinator": "and"}},"variables": {}},{"identifier": "enrich_vulnerability","title": "Analyze vulnerability with AI","icon": "AI","description": "Invoke the Vulnerability Enrichment Agent","config": {"type": "AI_AGENT","agentIdentifier": "vulnerability_enrichment_agent","userPrompt": "Generate a summary and remediation steps for vulnerability with entity identifier {{ .outputs.trigger.diff.after.identifier }}. The issue has been updated with the following details: {{ .outputs.trigger.diff.after.properties | tojson }}"},"variables": {}},{"identifier": "save_ai_summary","title": "Save AI summary","icon": "Vulnerability","description": "Update the vulnerability entity with the AI-generated analysis","config": {"type": "UPSERT_ENTITY","blueprintIdentifier": "securityVulnerability","mapping": {"identifier": "{{ .outputs.trigger.diff.after.identifier }}","properties": {"ai_summary": "{{ .outputs.enrich_vulnerability.response }}"}}},"variables": {}},{"identifier": "create_copilot_issue","title": "Create Copilot fix issue","icon": "Github","description": "Create a GitHub issue for Copilot to generate a fix","config": {"type": "WEBHOOK","url": "https://api.github.com/repos/{{ .outputs.trigger.diff.after.relations.service }}/issues","agent": false,"synchronized": true,"method": "POST","headers": {"Accept": "application/vnd.github+json","Authorization": "Bearer {{ .secrets[\"GITHUB_TOKEN\"] }}","X-GitHub-Api-Version": "2022-11-28","Content-Type": "application/json"},"body": {"title": "Fix critical vulnerability: {{ .outputs.trigger.diff.after.title }}","body": "## Task for Copilot\n\nGenerate a code fix for the security vulnerability described below. Commit the change on a new branch and open a pull request summarizing what was fixed and why.\n\n## Vulnerability details\n\n{{ .outputs.trigger.diff.after | tojson }}\n\n## AI-provided summary and remediation steps\n\n{{ .outputs.enrich_vulnerability.response }}","labels": ["security", "auto_assign"]}},"variables": {}}],"connections": [{"sourceIdentifier": "trigger","targetIdentifier": "enrich_vulnerability"},{"sourceIdentifier": "enrich_vulnerability","targetIdentifier": "save_ai_summary"},{"sourceIdentifier": "save_ai_summary","targetIdentifier": "create_copilot_issue"}]} -
Click Apply changes.
Build the workflow
-
Go to the workflows page in Port.
-
Click + Workflow.
-
Fill out the Create new workflow form. For Name, enter
Remediate critical vulnerability, then click Confirm. -
Click the
{...}button to open the JSON editor and paste the workflow JSON below:Remediate critical vulnerability workflow JSON for Google Gemini (click to expand)
{"identifier": "remediate_critical_vulnerability","title": "Remediate critical vulnerability","icon": "Vulnerability","description": "Enrich critical vulnerabilities with AI analysis and dispatch Gemini to propose a fix","allowAnyoneToViewRuns": true,"nodes": [{"identifier": "trigger","title": "On severity changed to critical","icon": "Vulnerability","description": "Trigger when a vulnerability severity changes to critical","config": {"type": "EVENT_TRIGGER","event": {"type": "ENTITY_UPDATED","blueprintIdentifier": "securityVulnerability"},"condition": {"type": "JQ","expressions": [".diff.before.properties.severity != \"critical\"",".diff.after.properties.severity == \"critical\""],"combinator": "and"}},"variables": {}},{"identifier": "enrich_vulnerability","title": "Analyze vulnerability with AI","icon": "AI","description": "Invoke the Vulnerability Enrichment Agent","config": {"type": "AI_AGENT","agentIdentifier": "vulnerability_enrichment_agent","userPrompt": "Generate a summary and remediation steps for vulnerability with entity identifier {{ .outputs.trigger.diff.after.identifier }}. The issue has been updated with the following details: {{ .outputs.trigger.diff.after.properties | tojson }}"},"variables": {}},{"identifier": "save_ai_summary","title": "Save AI summary","icon": "Vulnerability","description": "Update the vulnerability entity with the AI-generated analysis","config": {"type": "UPSERT_ENTITY","blueprintIdentifier": "securityVulnerability","mapping": {"identifier": "{{ .outputs.trigger.diff.after.identifier }}","properties": {"ai_summary": "{{ .outputs.enrich_vulnerability.response }}"}}},"variables": {}},{"identifier": "run_gemini_assistant","title": "Generate fix with Gemini","icon": "Code","description": "Dispatch Gemini Assistant to generate a fix and open a pull request","config": {"type": "INTEGRATION_ACTION","installationId": "<YOUR_GITHUB_OCEAN_INTEGRATION_ID>","integrationProvider": "github-ocean","integrationInvocationType": "dispatch_workflow","integrationActionExecutionProperties": {"org": "<YOUR_GITHUB_ORG>","repo": "<YOUR_WORKFLOW_REPO>","workflow": "gemini-backend.yaml","workflowInputs": {"repo_name": "{{ .outputs.trigger.diff.after.relations.service }}","prompt": "Here is the information about the security vulnerability: {{ .outputs.trigger.diff.after | tojson }}.\n\nGenerate a code fix for the issue based on the AI-provided summary:\n\n{{ .outputs.enrich_vulnerability.response }}\n\nAfter generating the code, open a PR with a description summarizing what was fixed and why."},"reportWorkflowStatus": true}},"variables": {}}],"connections": [{"sourceIdentifier": "trigger","targetIdentifier": "enrich_vulnerability"},{"sourceIdentifier": "enrich_vulnerability","targetIdentifier": "save_ai_summary"},{"sourceIdentifier": "save_ai_summary","targetIdentifier": "run_gemini_assistant"}]} -
Click Apply changes.
Replace YOUR_GITHUB_OCEAN_INTEGRATION_ID, YOUR_GITHUB_ORG, and YOUR_WORKFLOW_REPO with your GitHub Ocean integration ID, organization name, and the repository where gemini-backend.yaml lives.
Test your workflow
Now it's time to test the complete vulnerability enrichment flow:
-
Create or sync a vulnerability with severity set to Critical, or update an existing vulnerability's severity to critical.
-
Port runs the workflow automatically when the severity change is detected.
-
Verify the workflow run on the Workflow page. Confirm the trigger, AI analysis, save summary, and coding agent dispatch nodes completed successfully.
-
Check the vulnerability entity in the catalog and confirm
ai_summarywas populated. -
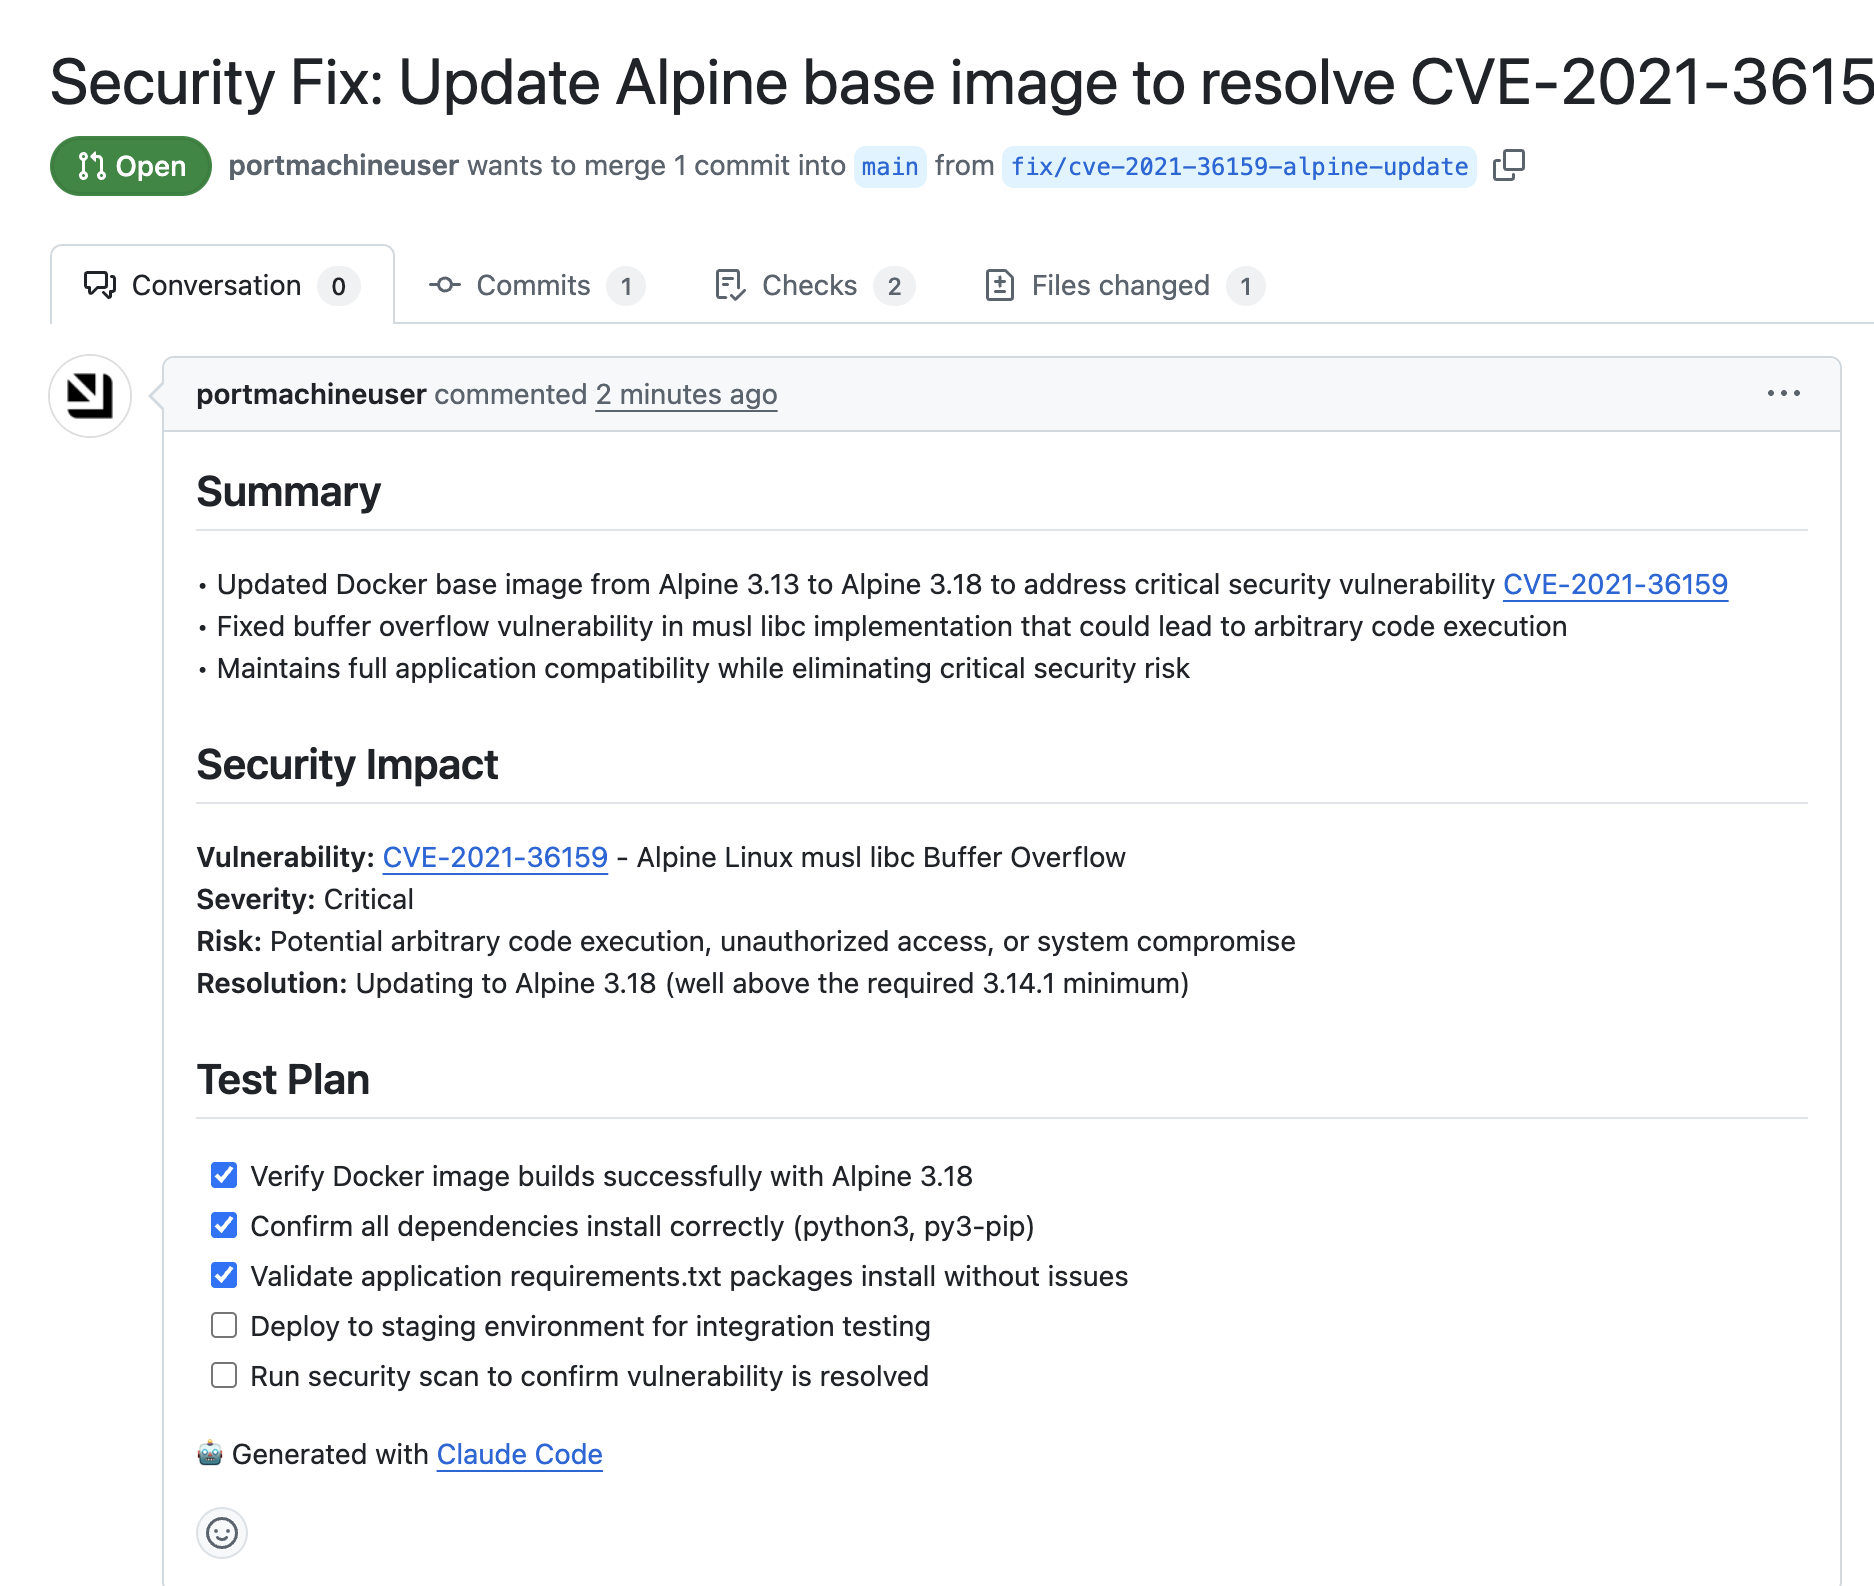
Review the pull request or Copilot issue opened by your coding agent backend.
-
Merge the PR to complete the remediation loop.
What's next?
Your automated security workflow is now complete. Here are some ways you can extend it:
- Customize triggers: Adjust the event trigger condition based on your security policies.
- Add approval steps: Insert a condition or manual gate before dispatching the coding agent.
- Scale to other issue types: Apply the same pattern to bugs, performance issues, or compliance violations.