Enrich pull requests using AI
This guide walks you through setting up a "Pull Request Enricher" using Port workflows and an AI agent.
By the end of this guide, your developers will receive automated, contextual comments on their pull requests to help streamline the review process.
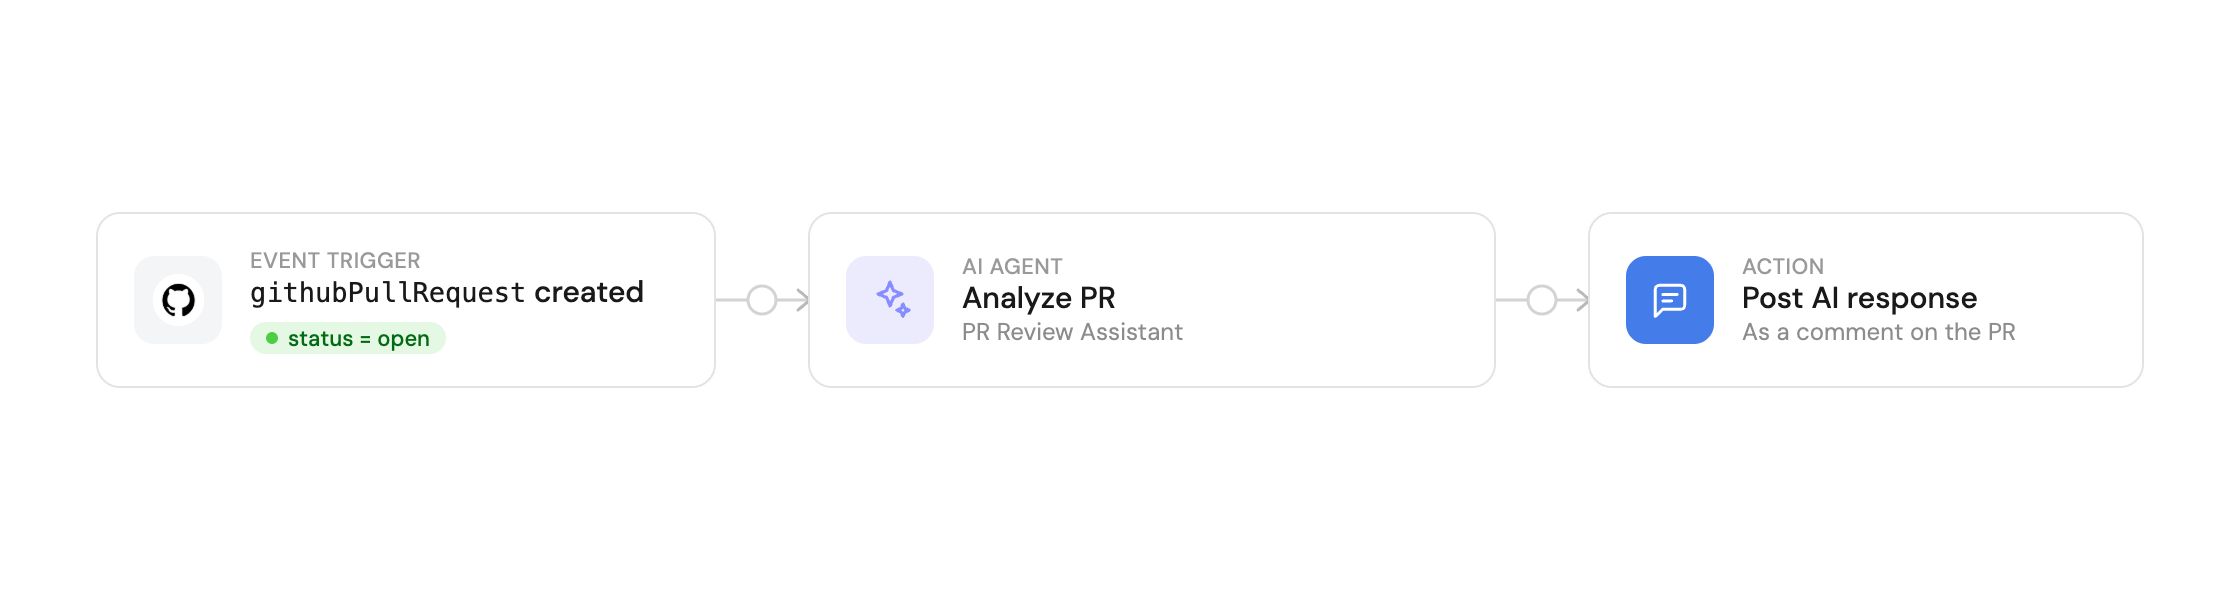
This guide uses a single event-triggered workflow. When a pull request is opened, the workflow invokes an AI agent to analyze it and then dispatches a GitHub Actions workflow to post the agent's response as a comment.
Common use cases
- Automatically comment on new pull requests with assessments based on PR metadata.
- Highlight potential areas of concern.
- Provide context from related Jira tickets directly in the PR comments.
- Suggest relevant reviewers based on code changes.
Prerequisites
This guide assumes you have:
- Jira integration configured in your Port instance.
- Port's GitHub Ocean integration configured in your Port instance.
How it works
The workflow chains three nodes:
- An event trigger that fires when a
githubPullRequestentity is created withstatusset toopen. - An AI node that invokes the PR Review Assistant agent. The workflow pauses until the AI invocation completes, then exposes the agent's response as an output.
- A GitHub dispatch node that triggers a GitHub Actions workflow to post the agent's response as a PR comment.
Set up data model
First, we will create the Pull Request Enricher AI agent in Port.
We will need to configure:
- The data sources it will use to analyze pull requests.
- The agent configuration that defines its capabilities.
Configure data source access
For this guide, we will be using GitHub as our data source to provide comprehensive pull request analysis capabilities. Make sure you have Port's GitHub Ocean integration installed and configured.
While this guide uses GitHub, you can enhance the agent's capabilities by adding other data sources like:
- PagerDuty for checking active incidents.
- Your context lake services for broader context.
Create the agent configuration
-
Go to the AI Agents page in Port.
-
Click on
+ AI Agent. -
Toggle
Json modeon. -
Copy and paste the following JSON schema:
Pull Request Enricher agent configuration (click to expand)
{"identifier": "pr_assistant_ai_agent","title": "PR Review Assistant","description": "AI agent that analyzes pull requests and provides helpful context for reviewers","icon": "Pipeline","properties": {"description": "Comment on open PRs with additional context to assist developers","status": "active","tools": ["^(list|search|describe|track)_.*"],"prompt": "Analyze pull request details and provide a structured review in the following format:\n\nPR Description:\n Summarize the PR description and key properties in one sentence \n\nKey Points:\n{{ List up to 3 key insights about the changes }}\n\nObservations:\nProvide up to 3 observations using 🟢 for low risk, 🟡 for medium risk, and 🔴 for high risk\n\nRecommendations:\nList up to 3 optional recommendations for improvement. Provide this in markdown format","execution_mode": "Automatic"},"relations": {}} -
Click on
Createto save the agent.
Build the workflow
Now let's create the workflow that ties the trigger, the AI agent, and the comment dispatch together.
The workflow uses an INTEGRATION_ACTION node to dispatch the GitHub Actions workflow. With the GitHub Ocean integration, you do not need to add a GitHub token to Port secrets. The integration handles workflow dispatch authentication.
To build the workflow:
-
Go to the workflows page in Port.
-
Click + Workflow.
-
Fill out the Create new workflow form, then click Confirm.
-
Click the
{...}button to open the JSON editor and paste the workflow JSON below:PR Enricher workflow JSON (click to expand)
{"identifier": "pr_enricher","title": "PR Enricher","icon": "Pipeline","description": "Analyze newly opened pull requests with an AI agent and post the result as a PR comment","nodes": [{"identifier": "trigger","title": "On PR opened","icon": "Github","description": "Trigger when a pull request is opened","config": {"type": "EVENT_TRIGGER","event": {"type": "ENTITY_CREATED","blueprintIdentifier": "githubPullRequest"},"condition": {"type": "JQ","expressions": [".diff.after.properties.status == \"open\""],"combinator": "and"}},"variables": {}},{"identifier": "enrich_pr","title": "Analyze PR with AI agent","icon": "AI","description": "Invoke the PR Review Assistant agent","config": {"type": "AI_AGENT","agentIdentifier": "pr_assistant_ai_agent","userPrompt": "Analyze pull request with entity identifier '{{ .outputs.trigger.diff.after.identifier }}'"},"variables": {}},{"identifier": "post_pr_comment","title": "Post PR comment","icon": "Github","description": "Dispatch the GitHub Actions workflow that posts the agent response as a PR comment","config": {"type": "INTEGRATION_ACTION","installationId": "<YOUR_GITHUB_OCEAN_INTEGRATION_ID>","integrationProvider": "github-ocean","integrationInvocationType": "dispatch_workflow","integrationActionExecutionProperties": {"org": "<YOUR_GITHUB_ORG>","repo": "<YOUR_GITHUB_REPO>","workflow": "post-pr-comment.yml","workflowInputs": {"comment": "{{ .outputs.enrich_pr.response }}","pr": "{{ .outputs.trigger.diff.after.properties.prNumber | tostring }}","repo": "{{ (.outputs.trigger.diff.after.properties.link | tostring | split(\"/\"))[3] + \"/\" + ((.outputs.trigger.diff.after.properties.link | tostring | split(\"/\"))[4]) }}"},"reportWorkflowStatus": true}},"variables": {}}],"connections": [{"sourceIdentifier": "trigger","targetIdentifier": "enrich_pr"},{"sourceIdentifier": "enrich_pr","targetIdentifier": "post_pr_comment"}]}Replace placeholdersMake sure to replace
YOUR_GITHUB_OCEAN_INTEGRATION_ID,YOUR_GITHUB_ORG, andYOUR_GITHUB_REPOwith your GitHub Ocean integration ID and the organization and repository where yourpost-pr-comment.ymlworkflow resides. You can find the integration ID on the Data sources page in Port. -
Click Apply changes.
Create the GitHub workflow
Now let's create the workflow file that contains the logic to post the comment.
We recommend creating a dedicated repository for the workflows that are used by Port actions.
Choose the authentication method that best fits your setup:
- Personal access token
- GitHub app
This approach uses your personal GitHub account to comment on pull requests. It's simpler to set up but comments will appear from your personal account.
In your dedicated workflow repository, ensure you have a .github/workflows directory.
-
Create a new file named
post-pr-comment.yml. -
Copy and paste the following snippet:
Post PR comment workflow using PAT (click to expand)
name: Comment on PRon:workflow_dispatch:inputs:comment:description: 'The comment text to post'required: truetype: stringrepo:description: 'Repository in "owner/repo" format (e.g., port-labs/puddle-integrations)'required: truetype: stringpr:description: 'Pull request number'required: truetype: stringjobs:comment:runs-on: ubuntu-lateststeps:- name: Comment on PR using PATenv:GITHUB_TOKEN: ${{ secrets.PORT_GITHUB_TOKEN }}COMMENT: ${{ github.event.inputs.comment }}REPO: ${{ github.event.inputs.repo }}PR_NUMBER: ${{ github.event.inputs.pr }}run: |# Split repo into owner and nameOWNER=$(echo "$REPO" | cut -d'/' -f1)REPO_NAME=$(echo "$REPO" | cut -d'/' -f2)# Post comment to PR using GitHub CLIecho "$COMMENT" | gh pr comment "$PR_NUMBER" --repo "$OWNER/$REPO_NAME" --body-file -Required GitHub SecretsFor this workflow to function properly, you need to add the following secret to your GitHub repository:
PORT_GITHUB_TOKEN: Your Personal Access Token with Read and Write permissions for Pull requests. Follow GitHub's guide to create one.
-
Commit and push the changes to your repository.
This approach uses a GitHub App to comment on pull requests. Comments will appear from the app's account, providing a more professional and centralized approach.
In your dedicated workflow repository, ensure you have a .github/workflows directory.
-
Create a new file named
post-pr-comment.yml. -
Copy and paste the following snippet:
Post PR comment workflow using GitHub App (click to expand)
name: Comment on PRon:workflow_dispatch:inputs:comment:description: 'The comment text to post'required: truetype: stringrepo:description: 'Repository in "owner/repo" format (e.g., port-labs/puddle-integrations)'required: truetype: stringpr:description: 'Pull request number'required: truetype: stringjobs:comment:runs-on: ubuntu-lateststeps:- name: Set up Pythonuses: actions/setup-python@v7with:python-version: '3.x'- name: Install Python dependenciesrun: |pip install PyJWT requests cryptography- name: Comment on PR using GitHub Appenv:PEM: ${{ secrets.PORT_GITHUB_APP_PEM }}APP_ID: ${{ secrets.PORT_GITHUB_APP_ID }}INSTALLATION_ID: ${{ secrets.PORT_GITHUB_APP_INSTALLATION_ID }}COMMENT: ${{ github.event.inputs.comment }}REPO: ${{ github.event.inputs.repo }}PR_NUMBER: ${{ github.event.inputs.pr }}run: |python - <<'EOF'import os, time, jwt, requests# Load environment variablespem = os.environ['PEM']app_id = os.environ['APP_ID']installation_id = os.environ['INSTALLATION_ID']comment = os.environ['COMMENT']repo = os.environ['REPO']pr_number = os.environ['PR_NUMBER']# Generate JWT (valid for 10 minutes)now = int(time.time())payload = {'iat': now - 60,'exp': now + (10 * 60),'iss': app_id}jwt_token = jwt.encode(payload, pem, algorithm='RS256')# Obtain an installation access tokenheaders = {'Authorization': f'Bearer {jwt_token}','Accept': 'application/vnd.github+json'}token_url = f"https://api.github.com/app/installations/{installation_id}/access_tokens"resp = requests.post(token_url, headers=headers)resp.raise_for_status()token = resp.json()['token']# Comment on the pull request (PRs are issues in GitHub API)owner, repo_name = repo.split('/')comment_url = f"https://api.github.com/repos/{owner}/{repo_name}/issues/{pr_number}/comments"comment_payload = {"body": comment}headers = {'Authorization': f'Bearer {token}','Accept': 'application/vnd.github.v3+json','Content-Type': 'application/json'}resp = requests.post(comment_url, headers=headers, json=comment_payload)resp.raise_for_status()print("Comment posted successfully!")EOFRequired GitHub SecretsFor this workflow to function properly, you need to add the following secrets to your GitHub repository:
PORT_GITHUB_APP_PEM: The private key of your GitHub App in PEM format.PORT_GITHUB_APP_ID: The App ID of your GitHub App.PORT_GITHUB_APP_INSTALLATION_ID: The installation ID of your GitHub App in this repository.
-
Commit and push the changes to your repository.
- Personal Access Token: Simpler setup, comments appear from your personal account, suitable for smaller teams or personal projects.
- GitHub App: More professional, comments appear from a dedicated app account, better for larger organizations and provides more granular permissions.
Example response
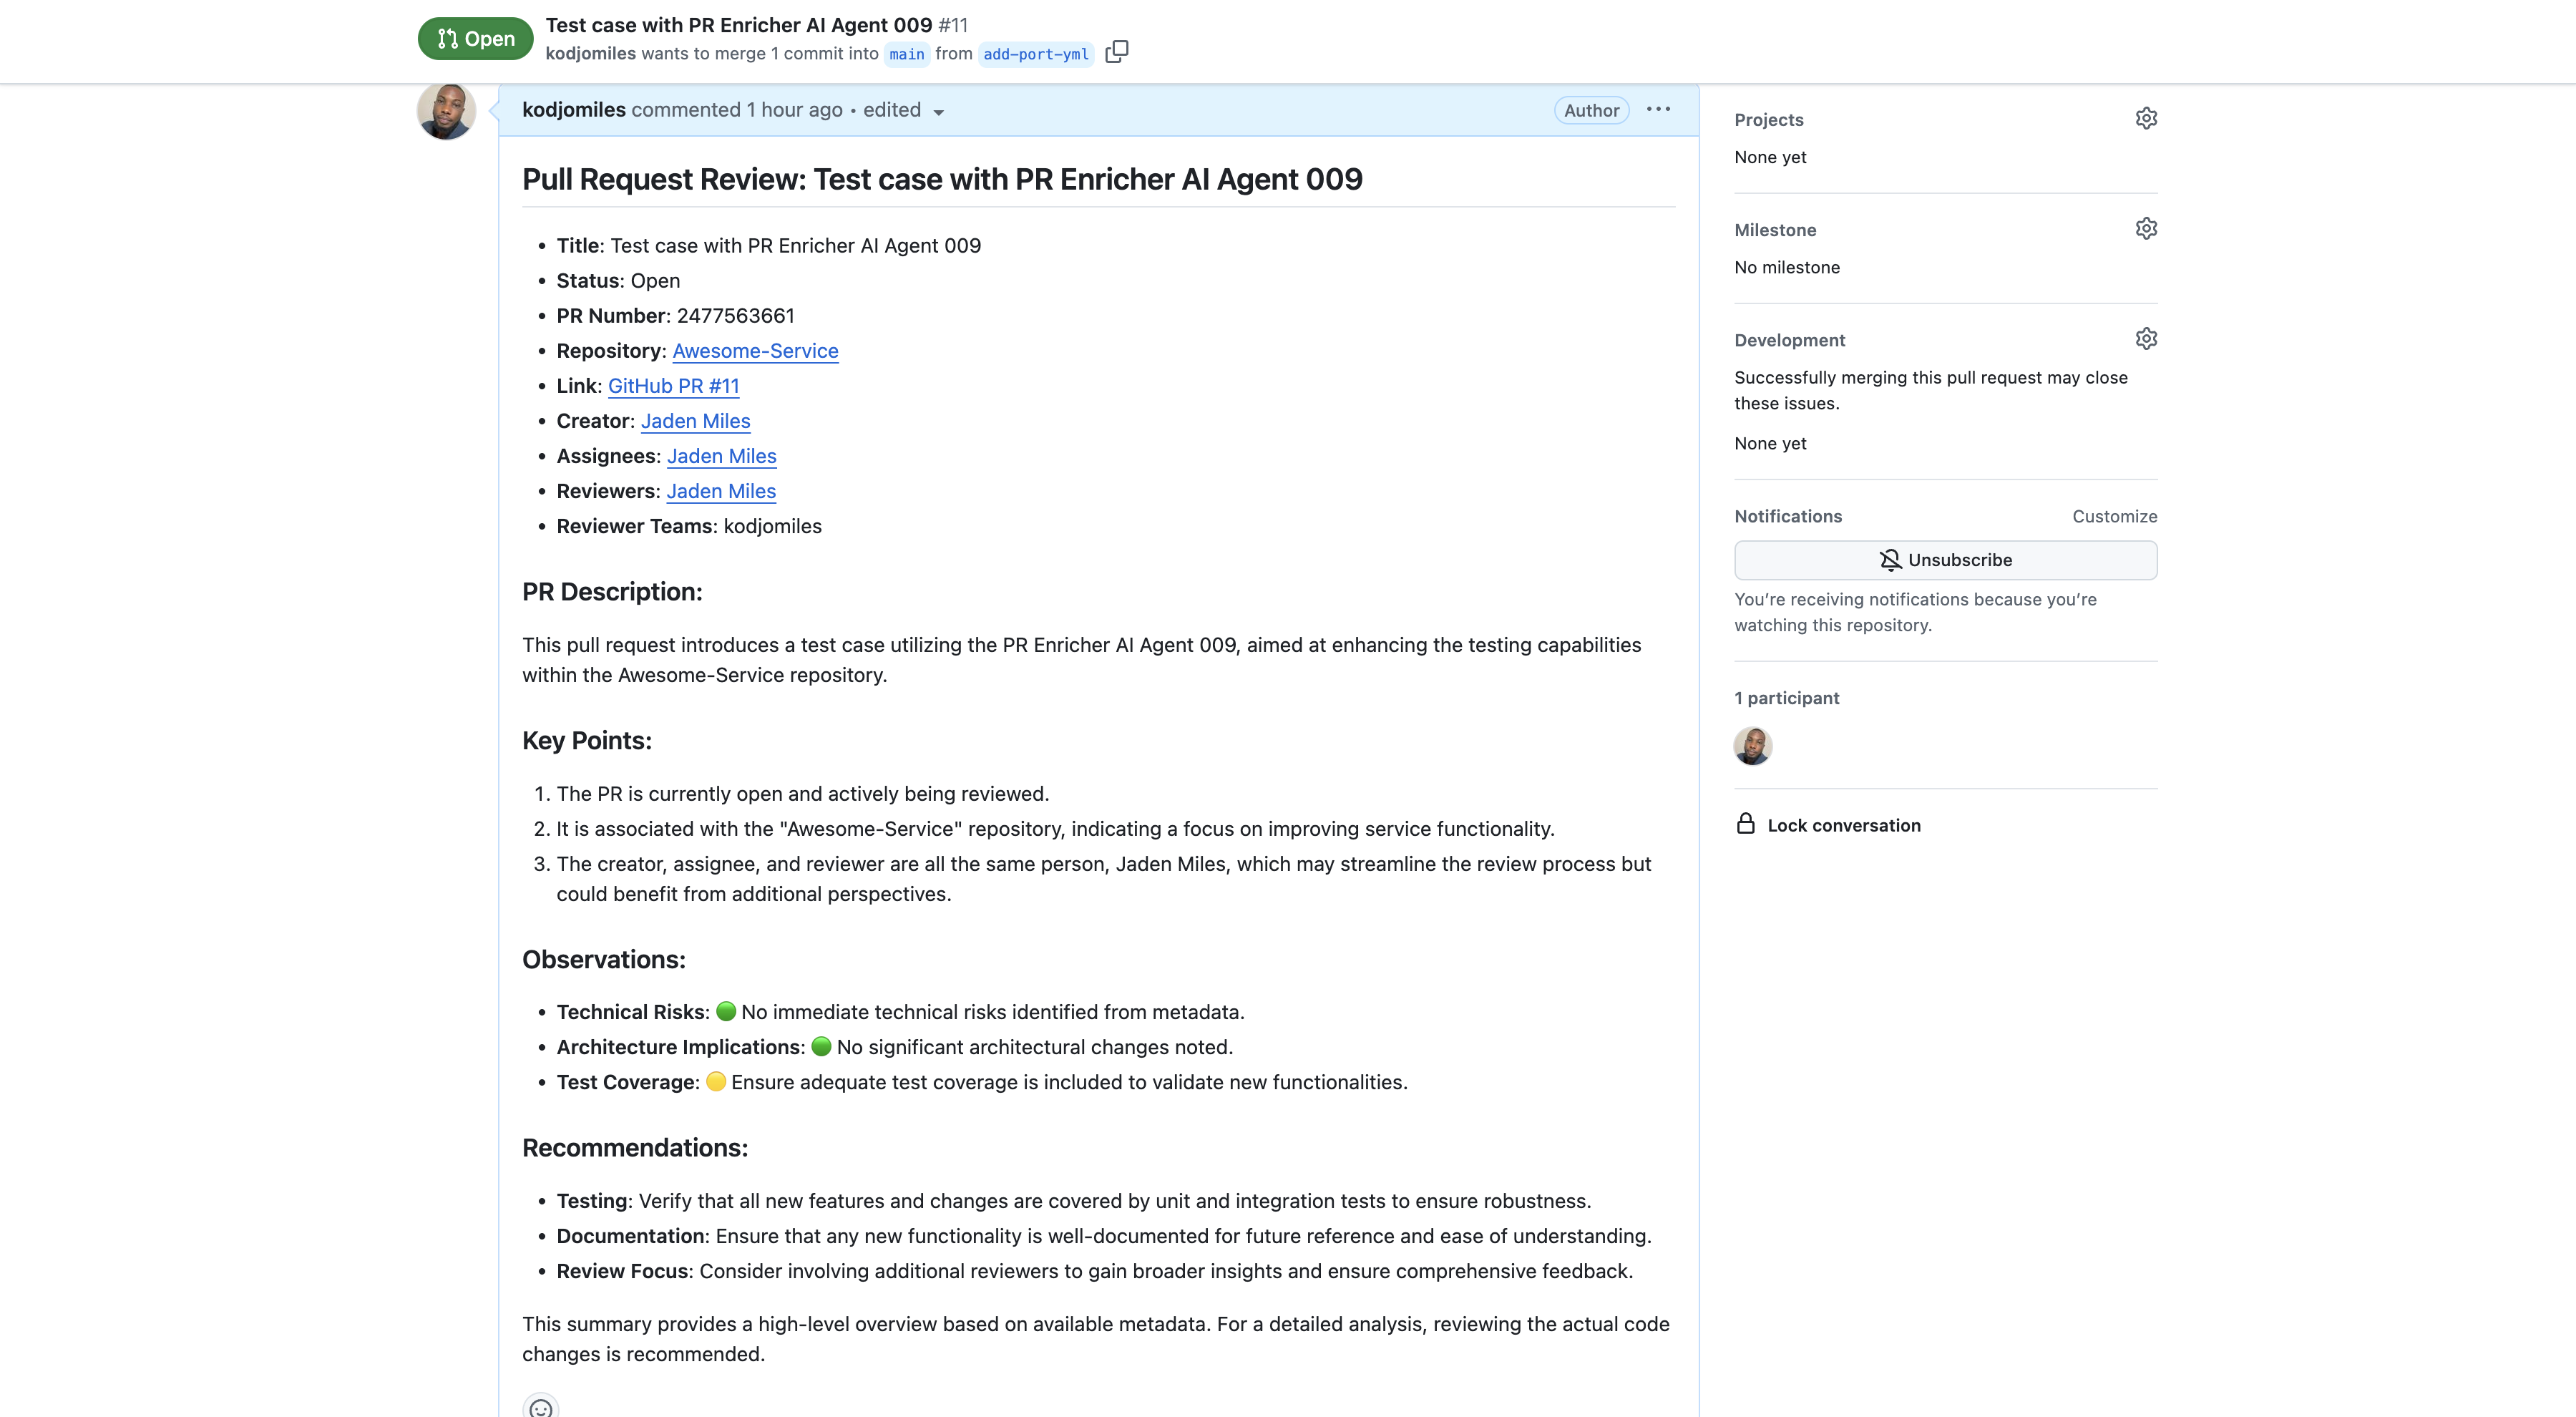
The PR Enricher workflow will automatically comment on new pull requests with information like:
Best practices
To get the most out of your PR Enricher workflow:
-
Ensure PR-Jira Linking: Verify that your Port setup correctly establishes relations between
githubPullRequestentities andjiraIssueentities. -
Start with basic assessment: Begin with simple risk assessment and gradually add more context as you see how the agent performs.
-
Monitor responses: Regularly review the agent's comments to ensure they're helpful and accurate. You may refine the agent's prompt based on the quality of responses and specific needs of your team.
-
Troubleshoot: If you're not getting the expected results, check our troubleshooting guide for common issues and solutions.