SCIM
SCIM (System for Cross-domain Identity Management) enables automated user provisioning and de-provisioning from Identity Providers (IdP) like Okta, Azure AD, and Google Workspace directly into Port.
What is SCIM?
SCIM automates the process of creating, updating, and deleting users in Port based on changes in your identity provider. This eliminates the need for manual user management and ensures your Port user directory stays synchronized with your IdP.
Before SCIM:
- Users had to log in first before being created in Port.
- IT admins had to manually add or remove users.
- User profile updates required manual intervention.
With SCIM:
- Users are automatically created, updated, or deleted in Port when changes happen in the identity provider.
- Changes occur before users log in.
- Reduced manual user management overhead.
- Automatic synchronization of user attributes from your IdP.
Setup
To set up SCIM for your organization:
- Contact Port support to request SCIM enablement.
- Port will provide:
- SCIM endpoint URL.
- SCIM authentication token.
- Configure your identity provider using the endpoint and token provided by Port.
Prerequisites
Before setting up SCIM, ensure you have:
- Migrated to multiple organizations.
- An active SSO connection configured in Port.
- Admin access to your identity provider (Okta, Azure AD, or Google Workspace).
Provider-specific setup
- Okta
- Azure AD
- Google Workspace
- SAML
- OIDC
For Okta SAML applications, SCIM can be configured directly on the same application:
- In your Okta Admin Console, navigate to your Port SAML application.
- Go to the Provisioning tab.
- Click Configure API Integration.
- Enable Enable API integration.
- Enter the SCIM endpoint URL and token provided by Port.
- Set the Unique identifier field to
userName. - For authentication, choose HTTP Header and use the SCIM token provided by Port.
- Save your configuration.
To use SCIM with your Okta OIDC SSO setup, you will need to create an additional Okta application according to the following instructions:
-
Create a new SSO application, of type SWA, and fill the form as below:
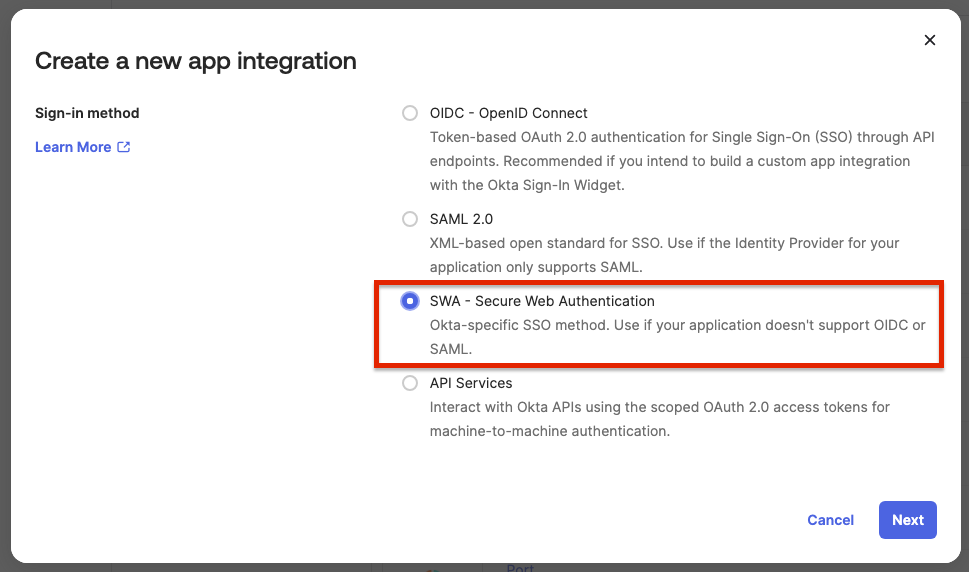
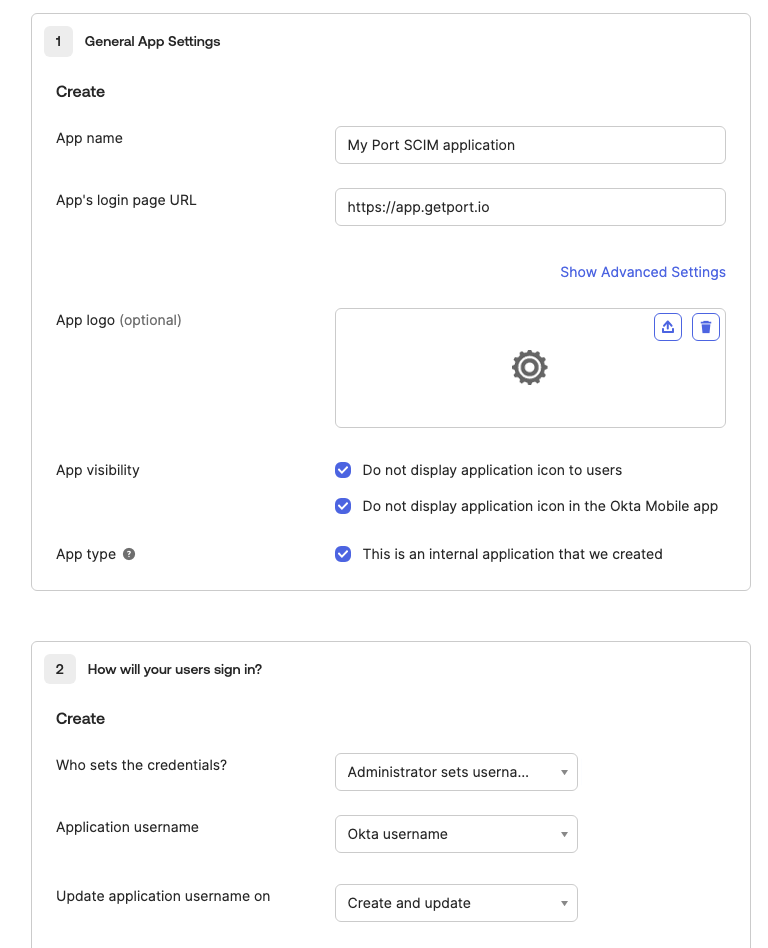
App's login page URL- Organizations hosted in the EU:
https://app.port.io - Organizations hosted in the US:
https://app.us.port.io
- Organizations hosted in the EU:
Who sets the credentials- Administrator sets username, password is the same as user's Okta passwordApplication username- Okta usernameUpdate application username on- Create and update
-
Edit the App Settings, and enable
Enable SCIM provisioning
After completing these steps, reach out to Port's team. You will be provided with:
- A SCIM
endpoint - A SCIM
token
The endpoint and token will be used to complete the setup of the new SWA application.
-
Open the Provisioning tab in your application, and under
Integrationfill the following:-
SCIM connector base URL: The
endpointyou received from Port. -
Unique identifier field for users:
userName. -
Supported provisioning actions:
Push New Users,Push Profile Updates.Note: Only user events (
user.created,user.updated,user.deleted) are supported. Using group events will cause a 403 error as they are not included in the Auth0 token's scope. -
Authentication Mode:
HTTP Header. -
Authorization: The
tokenyou received from Port.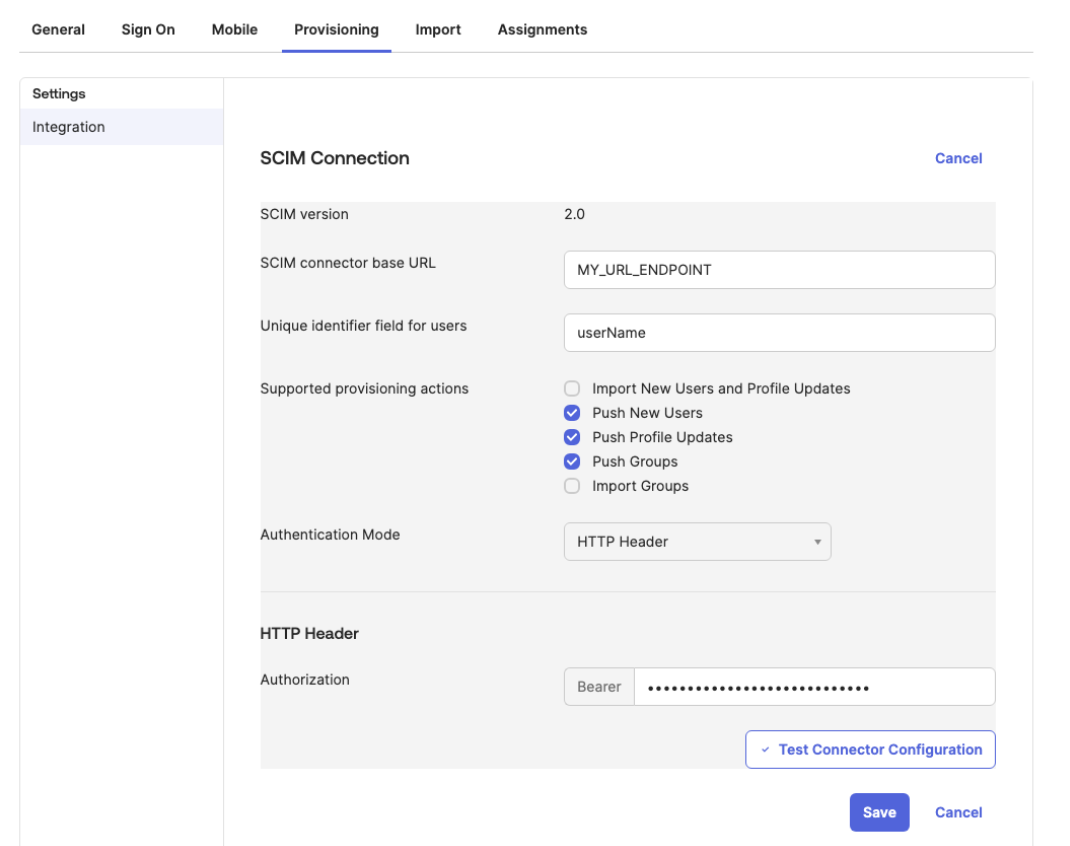
After configuration, press the
Test Connector Configurationand confirm the integration was configured correctly. -
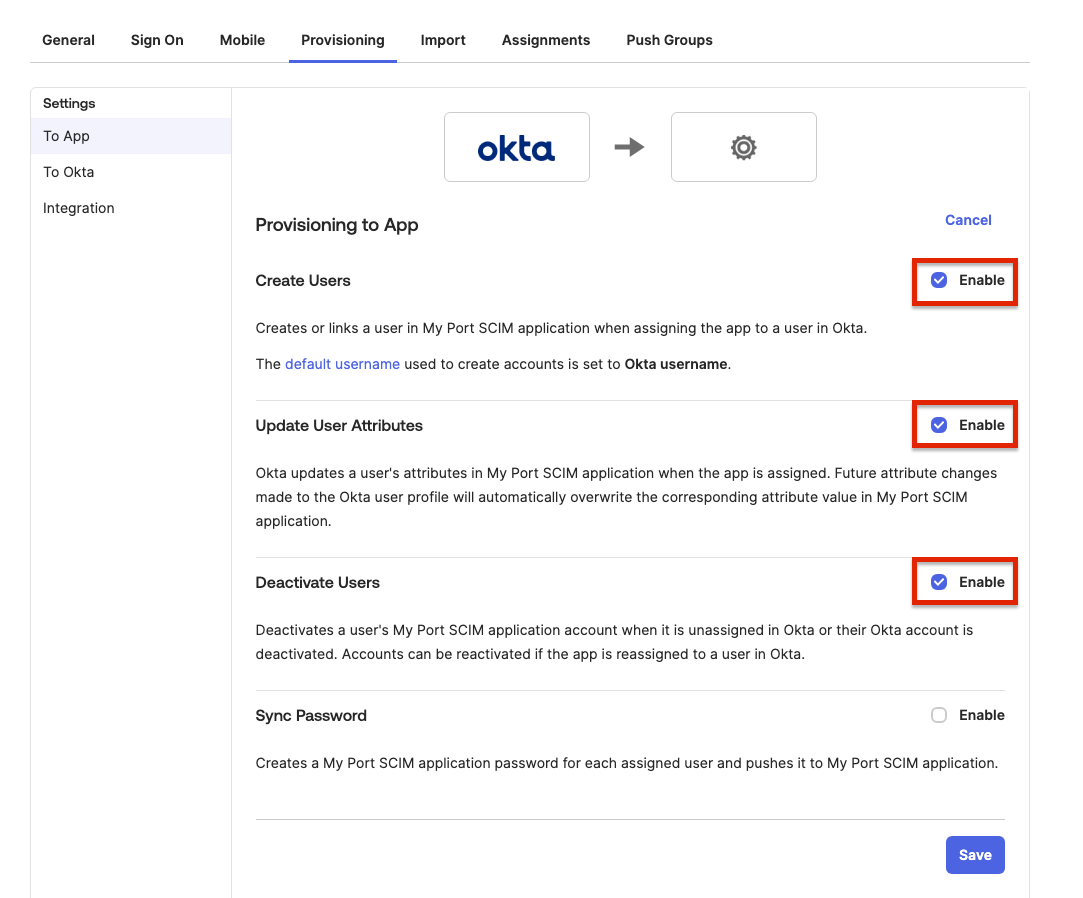
-
Go to the newly created
To Appsettings, and enable the following:- Create Users
- Update User Attributes
- Deactivate Users
- SAML
- OIDC
For Azure AD SAML applications:
- In the Azure portal, navigate to Enterprise applications.
- Select your Port application.
- Go to Provisioning in the left menu.
- Click Get started.
- Set Provisioning Mode to Automatic.
- Enter the SCIM endpoint URL and token provided by Port in the Tenant URL and Secret Token fields.
- Click Test Connection to verify the connection.
- Click Save to enable provisioning.
Entra ID (AzureAD) OIDC applications support SCIM. Since Entra ID does not allow provisioning configuration directly on OIDC app registrations, you must create a separate provisioning application.
Prerequisites
Before setting up SCIM, you must have a working OIDC SSO connection. Follow the Entra ID OIDC setup guide, from Register a new application through Provide application information to Port.
Create a provisioning application
To set up SCIM for Entra ID OIDC based applications, contact Port support.
You will be provided with:
- A SCIM
endpoint. - A SCIM
token.
The endpoint and token will be used to set up the SCIM integration in your identity provider.
After receiving the SCIM endpoint and token, follow this step-by-step guide to enable SCIM.
The OIDC application is used for login, while the provisioning application handles user lifecycle management (creating, updating, and deleting users). Users must be assigned to both applications to ensure full functionality.
Functionality enabled by SCIM
By enabling SCIM the following functionality will be enabled:
- Automatic deprovisioning of users (for example, when a user is unassigned from the SSO application, that user will automatically lose access to Port).
Limitations
- Does not support group provisioning - Group membership changes in your identity provider are not synchronized via SCIM.
For full user and group synchronization, rely on the SSO login process rather than SCIM.
For Google Workspace:
- In the Google Admin Console, go to Apps > Web and mobile apps.
- Select your Port application or create a new one.
- Go to User provisioning.
- Enable SCIM provisioning.
- Enter the SCIM endpoint URL and token provided by Port.
- Save your configuration.
Field management
When SCIM is enabled for a user, certain fields are managed exclusively by your identity provider and cannot be updated via the Port UI or API.
SCIM uses two metadata fields to track management:
managedByScim: Set totrueon first SCIM event, immutable thereafter.scimUpdatedAt: Timestamp of last SCIM update, used for ordering and staleness checks.
Where SCIM attributes appear in Port
SCIM-synced attributes are stored on the user object in Port and are visible in the following places:
- User profile:
firstName,lastName,email, andphoneNumberappear in the user's profile in the Port UI. - Avatar: The
pictureattribute from your IdP is used as the user's avatar throughout Port. - User metadata: All SCIM-managed fields are accessible via the Port API on the user object.
You do not need to create custom properties on the user blueprint or configure additional mapping. SCIM attributes are automatically mapped to built-in user fields.
SCIM-managed vs. non-SCIM fields
The following tabs describe which fields are synced from your identity provider and which remain editable in Port:
- SCIM-managed fields
- Non-SCIM fields
These fields are exclusively managed by SCIM and cannot be updated when managedByScim = true:
email- User's email address.firstName- User's first name.lastName- User's last name.phoneNumber- User's phone number.picture- User's profile picture.companyId- User's company association.
Attempting to update SCIM-managed fields via the API will result in a 409 Conflict error with code SCIM_CONFLICT.
These fields can be updated via the Port UI or API even when SCIM is enabled:
termsAccepted- Terms of service acceptance status.isInvisible- User visibility setting.supportLevel- Support level assignment.type- User type (Standard or Service Account).providers- Authentication providers.companyRole- Role within the company.roles- Port platform roles (Admin, Moderator, Member).teams- Team memberships.
Event processing
SCIM processes three types of events from your identity provider:
- User created
- User updated
- User deleted
When a new user is assigned to the SSO application in your IdP:
- User is automatically created in Port with
managedByScim = true. - User is assigned to the appropriate organizations.
- SSO teams are synchronized.
- User can log in immediately without manual setup.
When user attributes change in your IdP:
- User profile fields are automatically updated in Port.
- Changes are applied before the user's next login.
- Only SCIM-managed fields are updated (email, name, phone, picture, company).
When a user is unassigned from the SSO application in your IdP:
- User is automatically deleted from Port (hard delete with cascade).
- All user data and associations are removed.
- User immediately loses access to Port.
User deletion via SCIM is permanent and cannot be undone. All user data, including entity ownership and team memberships, will be removed.
Post-login behavior
When a SCIM-managed user logs in to Port:
- Profile updates are skipped - SCIM manages
email,firstName,lastName,phoneNumber, andpicture. - Existing user is returned - No upsert occurs. The user record remains as managed by SCIM.
- Teams are still synced - SSO team membership is refreshed on login to ensure current team associations.
API protection
Port's API includes protection logic to prevent conflicts between SCIM and manual updates:
- SCIM-managed users - Attempts to update SCIM-managed fields via API are blocked with a
409 Conflicterror. - Non-SCIM fields - Can be updated normally via API even for SCIM-managed users.
- Mixed updates - If a request includes both SCIM and non-SCIM fields, only non-SCIM fields are updated.
SCIM in multi-organization setups
SCIM provisioning is configured at the account level, not at the individual organization level. This means a single SCIM connection serves all organizations under your account. However, SCIM-provisioned users do not automatically appear in every organization.
How users are added to organizations
When a user is provisioned via SCIM, their access to specific organizations is determined by two mechanisms:
- Explicit invitation: The user has been manually invited to the organization by an admin.
- Automatic user access: The organization has Automatic user access enabled, which grants access to all SSO users upon login.
If neither of these conditions is met for a given organization, the SCIM-provisioned user will not appear in that organization, even though SCIM is active on the account.
Example: controlling access across dev and prod
Consider a company with two organizations: Dev and Prod.
| Organization | Automatic user access | Result |
|---|---|---|
| Dev | Enabled | All SCIM-provisioned users appear here after logging in. |
| Prod | Disabled | Only users who have been explicitly invited appear here. |
This setup lets you provision all users from your IdP via SCIM while restricting who has access to production. Users who need prod access can be individually invited by an organization admin.
SCIM ensures the user exists in Port and their profile stays in sync with your internal development platform.
Which organizations a user can access is controlled separately through explicit invitations or the Automatic user access toggle on each organization.
Inviting users manually in a multi-org setup
If you do not want all IdP users to appear in a specific organization, keep Automatic user access disabled for that organization and instead invite users individually. Manually invited users are still SCIM-managed and their profile attributes will continue to sync from your IdP.
Limitations
- SAML users must use SSO app tile for first login: For SAML connections with SCIM enabled, provisioned users must sign in via the Port app tile in their SSO dashboard for their initial login. If they enter their email directly on the Port sign-in page (app.port.io or app.us.port.io) before completing their first SSO login, they will encounter a 404 error. After one successful login via the app tile, users can sign in using either method.
- Group provisioning is not supported: SCIM in Port manages user lifecycle only. Group provisioning events (creating, updating, or deleting groups) are not supported. If your IdP sends group events to Port's SCIM endpoint, they will be rejected with a
403 insufficient_scopeerror. To avoid this, configure your IdP to only push user events (Push New Users,Push Profile Updates,Deactivate Users) and disable group push operations. - OIDC requires separate application: OIDC integrations require a separate SCIM application. Users must be assigned to both.
- Not real-time: SCIM operations may have delays and are not instantaneous.
- Standard fields only: Only standard user fields are synchronized, custom attributes are not supported.
- Team sync on login: While user data syncs automatically, team membership is refreshed primarily on user login.
Troubleshooting
User not created after assignment
If a user is assigned in your IdP but not appearing in Port:
- Verify SCIM is enabled for your SSO connection.
- Ensure the SCIM endpoint is correctly configured in your IdP.
- Contact Port support if the issue persists.
User updates not syncing
If user profile changes in your IdP are not reflected in Port:
- Verify the user has
managedByScim = truein Port. - Check that the fields being updated are SCIM-managed fields.
- Allow time for the SCIM event to process (may take a few minutes).
- Contact Port support if updates are consistently not syncing.
409 errors when updating pre-existing users
If SCIM was enabled on an account that already had users, the IdP may attempt to create those users instead of updating them. This results in 409 Conflict errors because the users already exist in Port. It can also cause the managedByScim flag to be inconsistent across users.
To resolve this:
- Remove the affected user from Auth0.
- If using Azure AD, also remove the user from the Azure AD SCIM application assignment.
- Re-assign the user in your IdP to trigger a fresh SCIM provisioning event.
This workaround requires removing and re-provisioning each affected user individually, which may not be practical for large numbers of users. If you are experiencing this at scale, contact Port support for assistance.
API update conflicts
If you receive a 409 Conflict error when updating a user:
- The user is SCIM-managed and you're attempting to update a SCIM-managed field.
- Update only non-SCIM fields, or make the change in your identity provider instead.
Users not appearing in all organizations
If SCIM-provisioned users are not visible in some of your organizations, see SCIM in multi-organization setups below.
403 errors on group provisioning
If you see 403 insufficient_scope errors in your IdP's SCIM provisioning logs, your IdP is attempting to push group events. Port's SCIM integration only supports user events. Disable group push operations in your IdP's SCIM configuration. See Limitations for details.
Best practices
- Use SCIM for user lifecycle management: Let SCIM handle user creation, updates, and deletion to maintain consistency.
- Manage roles and teams in Port: Use Port's UI or API to manage user roles and team memberships, as these are not SCIM-managed.
- Monitor SCIM events: Keep an eye on user provisioning to ensure expected behavior.
- Coordinate with IdP changes: Communicate with your IdP administrators about user changes that will affect Port access.